

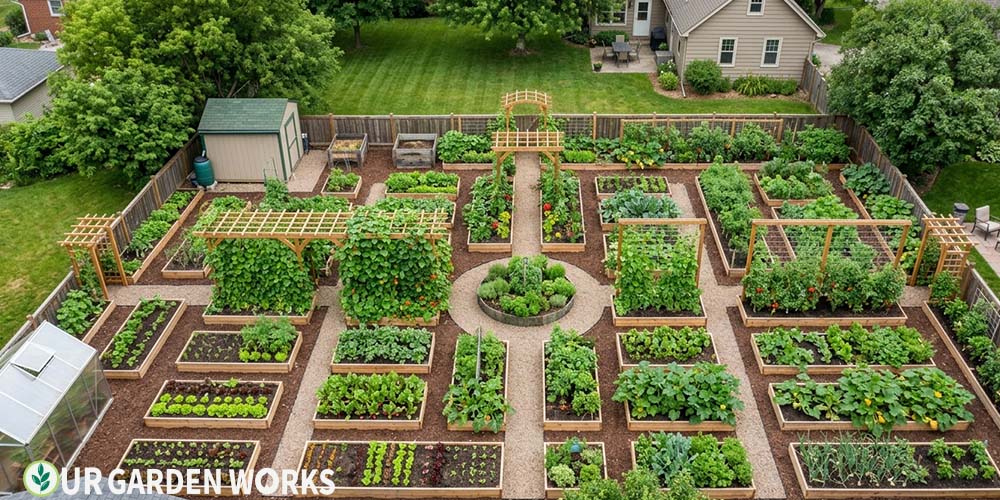
The hardest part of growing a vegetable garden isn’t the growing — it’s starting.
There are a thousand decisions before the first seed goes in the ground, and most first-time gardeners either overthink them (building an elaborate system for year one that overwhelms them) or underthink them (planting wherever seems reasonable and wondering why things don’t work).
This guide gives you the framework that makes year one successful — not perfect, but productive and encouraging enough that you come back for year two.
We’re going to cover site selection, soil preparation, what to grow, how to lay it out, and a realistic first-season plan. By the end, you’ll have a specific action plan rather than a list of general advice.
Editor’s Note: Start small — a 4×8 raised bed or two 4×4 beds is the right scale for a first garden. Choose the sunniest spot available (8+ hours of direct sun). Fill with quality raised bed mix. Plant 3–5 types of vegetables you actually eat. Accept that year one is a learning year — the goal is building confidence, not perfection.
Step 1 — Choose Your Site: Sun Is Non-Negotiable
Everything else in vegetable gardening is secondary to this one decision. Vegetables need 8+ hours of direct sun for productive growth. Six hours gives you survival. Four hours gives you disappointment. Map the sun in your yard before choosing a location — note which areas get direct sun from morning through afternoon.
The site that seems obvious (near the house for convenience) often loses sun to the house’s shadow. Walk your yard at noon and again at 4pm. The spot that’s in direct sun at both times is your garden site.
You can still garden — but limit yourself to shade-tolerant crops: lettuce, spinach, kale, herbs (except basil), and root vegetables tolerate 4–6 hours.
Accept that tomatoes, peppers, cucumbers, and squash won’t produce well with less than 8 hours and choose accordingly. See our 25 easy plants to grow list for low-light options.
Why Sun Matters More Than Almost Every Other Factor Combined
It’s worth understanding exactly why sun gets top billing over soil, water, and fertilizer, since this priority order surprises a lot of first-time gardeners who assume soil quality is the bigger lever.
Photosynthesis is the process by which a plant converts sunlight into the sugars it uses for every other function — growth, flowering, fruiting, and even disease resistance.
No amount of perfect soil or careful watering can substitute for the raw energy input that sunlight provides; a plant in rich, well-watered soil but deep shade simply doesn’t have the fuel to grow vigorously, no matter how well everything else is dialed in.
This is also why a marginal site (6 hours instead of 8) often disappoints gardeners who did everything else right. The plant isn’t failing because of a mistake — it’s running on a genuinely smaller energy budget than a full-sun plant, and adjusting expectations (or crop choice) accordingly saves a lot of frustration during the first season.
Step 2 — Choose Your Garden Style: In-Ground, Raised Beds, or Containers
| Style | Setup Cost | Best For | First-Year Results |
|---|---|---|---|
| In-ground beds | Low ($) | Large spaces; good existing soil | Variable — depends heavily on soil quality |
| Raised beds | Medium ($$) | Most home gardeners; poor or clay soil; any space | Excellent — you control the soil completely |
| Containers | Low–medium ($–$$) | Patios, balconies, renters; small spaces | Good for right variety choices; high maintenance |
We recommend raised beds for most first-time gardeners for one compelling reason: you control the soil.
A 4×8 raised bed filled with quality raised bed mix starts your first season with the best possible growing conditions, regardless of your existing soil. A 4×8 bed (12 inches deep) requires approximately 32 cubic feet (1.2 cubic yards) of growing medium.
For the complete raised bed setup guide, see our how to grow vegetables in raised beds guide. For choosing the right beds, see our best raised garden beds guide.
Step 3 — Fill With the Right Soil
The “Mel’s Mix” formula (⅓ blended compost + ⅓ peat moss or coco coir + ⅓ coarse vermiculite) remains the gold standard for raised bed growing — it’s lightweight, drains well, retains moisture, and provides a good nutrient base. For a more affordable alternative: 60% quality topsoil + 40% compost works well in most climates.
What to avoid: anything labeled “garden soil” for use in a container or raised bed — it compacts, drains poorly, and often contains weed seeds. See our potting soil vs topsoil guide for exactly what the labels mean.
💡 Don’t skimp on the compost portion
Compost is doing more work in this mix than its volume suggests — it’s the component supplying most of the actual nutrients and the beneficial microbial life that makes everything else in the bed function well.
A mix that’s heavy on topsoil and light on compost will drain and structure fine, but it asks for considerably more supplemental fertilizing through the season than a properly compost-rich mix does.
Step 4 — Choose What to Grow (Start With This List)
For a first garden, grow things you actually eat and things that are genuinely easy to grow. This is not the year to attempt watermelons or artichokes.
Here’s the beginner-friendly shortlist that produces reliably and teaches the most useful skills:
| Vegetable | Difficulty | Why It Works for Year 1 |
|---|---|---|
| Tomatoes (Cherry type) | Easy–Medium | Sungold or Sweet 100 produces prolifically; very forgiving; teaches staking |
| Lettuce (looseleaf) | Easy | Fastest to harvest; cut-and-come-again; builds confidence quickly |
| Zucchini | Easy | Almost impossible to fail; teaches harvest frequency lesson |
| Green beans (bush) | Easy | Direct sow; fast; teaches the full growing cycle in 50 days |
| Kale | Easy | Nearly indestructible; extended harvest; teaches cut-and-come-again |
Limit yourself to 3–5 types of vegetables in year one. You’ll grow each crop better, learn its quirks, and not feel overwhelmed by the maintenance of a dozen different plants with different needs. Add 2–3 new crops each subsequent year as you build confidence.
💡 The 3-5 crop rule for year one
Limit yourself to 3–5 types of vegetables in year one. You’ll grow each crop better, learn its quirks, and not feel overwhelmed by the maintenance of a dozen different plants with different needs.
Add 2–3 new crops each subsequent year as you build confidence. For a deeper look at exactly which five plants make the gentlest possible starting point, our what to plant first guide breaks down the reasoning behind each pick.
Why This Specific List Works for a First Season
It’s worth noticing what these five crops have in common beyond simply being “easy.” Each one gives you visible feedback fast — tomatoes and zucchini in particular reward attention with dramatic, hard-to-miss growth, while lettuce and beans let you practice the harvest-and-resow rhythm that becomes second nature in later seasons.
None of them demand precise temperature windows or heavy disease management, which matters enormously in a first season when you’re still learning to read your specific yard’s quirks rather than following a textbook example.
This combination also covers a genuinely useful cross-section of techniques: staking (tomatoes), direct sowing (beans), transplanting (lettuce and kale), and harvest-frequency management (zucchini).
A gardener who’s grown all five competently by the end of a first season has, almost without realizing it, picked up the core mechanical skills that every more advanced crop builds on.
Step 5 — Plan Your Planting Layout
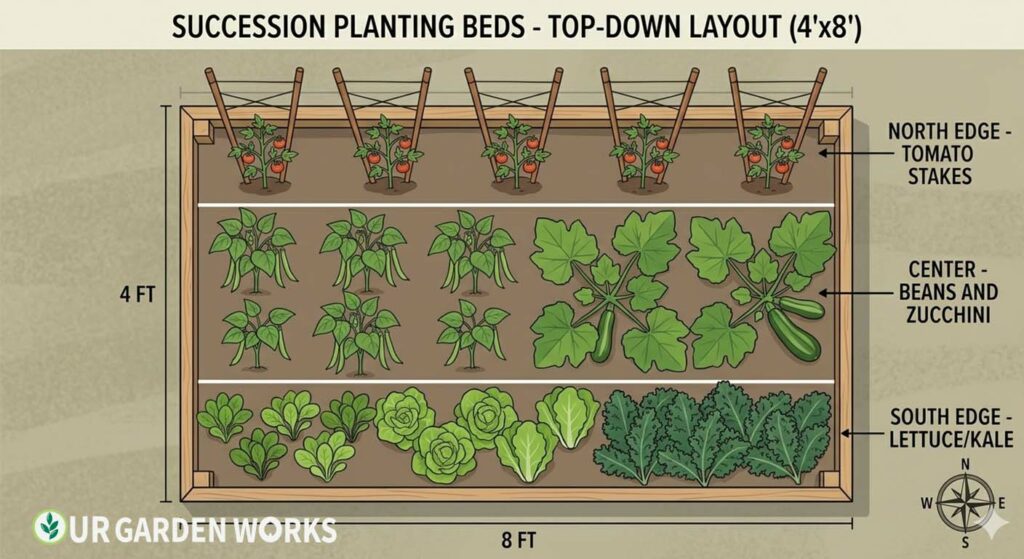
In a 4×8 bed with 5 crops, here’s a layout that works:
- North side (trellis or stake height): 1–2 cherry tomato plants staked at the back so they don’t shade shorter plants
- Center section: Bush beans in a double row; 1 zucchini plant (it needs room — plant at one end)
- Front/south side: Lettuce and kale — these tolerate slight shade from taller plants and need easy access for frequent harvesting
Try our free tool: Garden Layout Designer — Plan Your Beds Visually Before You Dig
Planning by Season
One of the most underused strategies in beginner vegetable gardening: sequential planting.
Plant cool-season crops (lettuce, kale, peas) in early spring, harvest them, and replace with warm-season crops (tomatoes, beans, zucchini) in the same space. One bed, two or three crops through the season.
See our succession planting guide for the full approach.
Step 6 — Water, Feed, and Observe
Watering: Most vegetables need 1 inch per week. In raised beds without mulch, this often means watering 2–3 times per week in summer. Apply 2–3 inches of straw mulch to dramatically reduce this frequency. The most important watering skill: check before you water. Push a finger 2 inches into the soil — if it feels moist, wait. If dry, water deeply.
Feeding: Mix a slow-release granular fertilizer (10-10-10) into your soil at planting. Supplement with a liquid fertilizer every 2–3 weeks once plants are established and actively growing. See our soil and fertility guide for the complete fertilizing framework.
Observing: Walk through your garden every day. Not to work — just to look. You’ll notice problems early (pests, disease, wilting) when they’re easy to address. The gardeners who have the best-producing gardens are always the ones who spend the most time simply observing.
💡 Build the daily walk-through into an existing habit
The gardeners who keep up the observing habit long-term almost always attach it to something they were already doing daily — coffee on the porch, letting the dog out, walking to the mailbox.
A walk-through that requires a separate, deliberate trip outside is far more likely to get skipped on a busy day than one that piggybacks on a routine you can’t easily forget.
What to Expect in Your First Few Weeks
Knowing roughly what’s normal during establishment helps you tell the difference between a plant that’s struggling and one that’s simply doing what newly transplanted or newly germinated plants do.
Transplants often look slightly wilted or sulky for the first few days after going into the ground — this is normal transplant shock as roots adjust to their new environment, not a sign of failure.
Direct-sown seeds like beans and zucchini may seem to do nothing for the first week, then suddenly emerge all at once once soil temperature and moisture align correctly. Resist the urge to dig around and check on seeds that haven’t sprouted yet; disturbing the soil during this window does more harm than the wait itself.
Frequently Asked Questions
How big should a first vegetable garden be?
One 4×8 raised bed is the perfect first garden. It’s small enough to manage without overwhelm, large enough to grow a meaningful variety of vegetables, and teaches all the fundamentals.
Most gardeners who start with more than two beds in year one feel overwhelmed by midsummer. Start small — expand in year two with confidence.
How much does it cost to start a vegetable garden?
A basic raised-bed setup (one 4×8 bed, lumber, soil, basic tools, and seeds) runs $200–400, depending on lumber quality and soil choices. Prefab raised bed kits run $50–150 for the frame alone. Soil is often the largest single expense — quality growing medium for a 4×8 bed (12 inches deep) is typically $100–150 in bagged form.
When should I start my vegetable garden?
Build your bed and prepare soil in fall for a spring start, or in early spring (as soon as you can work the ground) for a same-year start. Cool-season crops (lettuce, kale, peas) can be planted while you’re still waiting for warm-season planting weather — giving you something to harvest while the soil warms for tomatoes and peppers.
Is it normal to lose a few plants in my first season?
Yes, genuinely normal — nearly every experienced gardener killed something in their first year, sometimes several somethings. A lost seedling or two isn’t a sign you’re doing it wrong; it’s part of how the skill of reading your specific garden’s conditions gets built. Treat early losses as information rather than failure, and try again.
Do I need to test my soil before starting a raised bed?
Not strictly necessary if you’re filling a raised bed entirely with a quality purchased mix, since you’re starting from known, controlled ingredients rather than unknown native soil.
Soil testing becomes more valuable for in-ground beds, where existing soil chemistry and contamination history are unknowns worth understanding before you plant anything you intend to eat.
Related Articles in Our Vegetable Gardening Guide
- How to Grow Vegetables in Raised Beds – Complete Setup & Planting Guide
- 10 Best Raised Garden Beds For Small Spaces – Buying Guide (2026)
- Succession Planting: What It Is, How to Do It, and Why It Transforms Your Garden
- What to Plant First in a Garden — Best Picks for New Gardeners
- How to Start Seeds Indoors: Complete Step-by-Step Guide (2026)
- When to Start Seeds Indoors — Region-by-Region Schedule (2026)
- 25 Easiest Plants to Grow for Beginner Gardeners
- Free Frost Dates by ZIP code tool
- Vegetable Gardening Guide
Free Tools to Plan Your First Garden
Final Thoughts
We hope this guide has turned a daunting project into a manageable plan.
Year one is about building confidence and learning your specific growing conditions — every experienced gardener goes through it, and most will tell you it was one of the most rewarding things they’ve started.
For all our vegetable growing guides, our vegetable gardening guide is always the right place to start.
Share this post with a fellow gardener who’s ready to grow their own — and let us know in the comments what you’re planting in your first garden this season — and how big you’re starting. Happy growing!
