

Have you ever walked past a neighbor’s lush garden and wondered, “How did they do that?”
Are you tired of buying expensive, tasteless produce from the grocery store when you could be growing vibrant tomatoes and crisp lettuce right outside your door? Do you want to create a beautiful outdoor space but have absolutely no idea where to begin?
I get it. I was there too! I was going to figure out this whole gardening thing, and I was determined to make it work.
Now? My garden produces enough vegetables to feed my family all summer, with plenty to share with neighbors.
Starting a garden from scratch isn’t just about growing food or flowers. It’s about creating something with your own hands, connecting with nature, and experiencing the pure joy of watching tiny seeds transform into thriving plants. It’s therapeutic, rewarding, and honestly? Once you get the basics down, it’s way easier than you think.
That’s why I put this guide together—to give you everything I wish someone had told me when I started.
No confusing jargon, no complicated techniques, just straightforward steps that actually work. Let’s get you growing!
Key Points
- Starting a garden from scratch brings joy, connects you with nature, and offers fresh produce.
- Gather essential tools and choose between raised beds, in-ground gardens, or container gardens based on your specific needs.
- Follow 15 easy steps, from soil testing to planting and maintenance, to create a successful garden.
- Utilize companion planting and organic methods for pest management to enhance the health of your garden.
- Document your gardening journey in a journal to track progress and learn from each season.
What You’ll Need
Essential Tools:
- Garden spade or shovel
- Garden rake
- Hand trowel
- Garden hose with spray nozzle or watering can
- Work gloves
- Measuring tape
Soil & Amendments:
- Soil testing kit ($15-20 from garden centers)
- Compost (2-4 inches for your garden area)
- Organic mulch (straw, shredded leaves, or wood chips)
Plants:
- Seed packets or starter transplants (we’ll cover which ones in the steps)
Optional but Helpful:
- Garden journal and pen
- Wheelbarrow for moving materials
- Soaker hose or drip irrigation system
- Row covers for frost protection
Choosing Between Raised Beds, In-Ground, or Containers
You have three main options for your garden setup, and each has its benefits.
(1) Raised beds are my top recommendation for beginners. They give you complete control over your soil quality, provide excellent drainage, and reduce back strain since you’re not bending down as far.
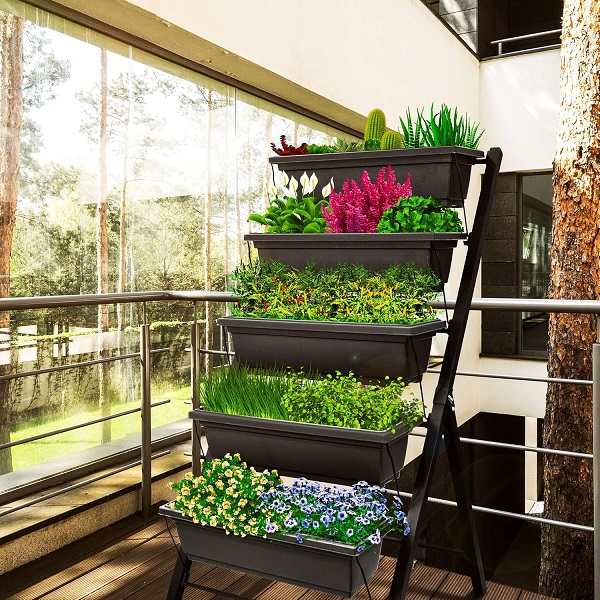
The initial cost is higher ($50-200, depending on materials), but they’re easier to maintain long-term.
I recommend building them 4 feet wide maximum so you can reach the center from either side, and at least 12 inches deep for most vegetables.
(2) In-ground beds are the most budget-friendly option if you’re working with decent existing soil.
You’ll spend more time on soil preparation upfront, and weeding can be more intensive, but there’s no construction required. This works great if you own your property and want a traditional garden feel.
(3) Container gardens are perfect for renters, small spaces, or anyone wanting ultimate flexibility.
You can move containers to follow the sun, bring tender plants indoors before frost, and start fresh with new soil each year.
The downside? Containers dry out faster and require more frequent watering. Use containers at least 12 inches deep with drainage holes in the bottom.
My recommendation? If you’re truly starting from scratch and plan to stay put for a few years, go with raised beds. The improved drainage alone prevents so many beginner problems. But if budget is tight or you’re renting, containers are absolutely viable – I grew amazing tomatoes in 5-gallon buckets my first year!
Deciding Between Seeds and Transplants
(1) Seeds cost less and offer incredible variety – you’ll find hundreds of heirloom tomato varieties as seeds versus maybe a dozen transplant options at your local nursery.
Starting from seed also teaches you the complete growing cycle. However, seeds require more attention, take longer, and some crops (like tomatoes and peppers) need to be started indoors 6-8 weeks before your last frost date.
(2) Transplants (those little seedling plants at garden centers) give you a serious head start and nearly guarantee success with tricky crops.
They’re ready to go in the ground immediately and will produce harvests weeks earlier than seeds. The trade-off is higher cost and limited variety.
My recommendation? Use both strategically! Buy transplants for tomatoes, peppers, and eggplants—these take forever from seed and need a long growing season. Start easy vegetables like beans, peas, carrots, and radishes from seed since they grow quickly and often don’t transplant well anyway. This gives you the best of both worlds without breaking the bank or overwhelming yourself.
How to Start a Garden from Scratch – 15 Easy Steps To Start Your First Garden
Step 1: Observe Your Space for a Full Day
Before you dig a single hole, spend one full sunny day monitoring your potential garden location. Set alarms on your phone for every two hours from sunrise to sunset.
At each alarm, walk outside and note where the sun is hitting your space. Take photos from the same angle each time – you’ll be shocked how much shadows shift!
Mark areas that get full sun (6-8+ hours), partial sun (4-6 hours), and shade (less than 4 hours).
This step saved me from a huge mistake. I almost put my garden in a spot that looked perfect at noon but was completely shaded by my house after 3pm. Vegetables need consistent sun throughout the day, not just at peak hours.
Pro Tip: Do this observation on the spring equinox or later. Winter sun angles are totally different, and that shady winter spot might be blazing hot in summer. Also note where water tends to collect after rain—those spots have drainage issues you’ll need to address.
Step 2: Test Your Soil
Order a soil testing kit online or grab one from your local garden center (around $15-20). Follow the kit instructions exactly – you’ll typically collect small samples from several spots in your garden area, mix them together, and either send them to a lab or use the included test strips.
The test reveals three critical things: pH level (most vegetables prefer 6.0-7.0), nutrient levels (nitrogen, phosphorus, potassium), and sometimes soil composition.
While you’re waiting for results, do the quick texture test. Grab a handful of moist soil and squeeze it.
- Sandy soil crumbles immediately – it drains fast but doesn’t hold nutrients well.
- Clay soil forms a tight ball – it holds nutrients but drains poorly and gets rock-hard when dry.
- Loamy soil (the goldilocks middle ground) holds its shape but breaks apart with light pressure.
Pro Tip: Your local university extension office often provides soil testing services for $10-15, and they’ll give you specific recommendations for amendments based on what you plan to grow. Search “[your state] cooperative extension soil test” to find yours.
Step 3: Remove Existing Vegetation
If you’re converting lawn to garden, you need to kill the grass first—trust me, it will come back with a vengeance otherwise!
The easiest method is sheet mulching (also called lasagna gardening). Mow the grass as short as possible, then cover the entire area with overlapping cardboard pieces or 8-10 sheets of newspaper.
Wet everything thoroughly until it’s soaked. Pile 4-6 inches of compost on top and wait 6-8 weeks. The grass dies, starts decomposing, and actually enriches your soil .
If you need to plant immediately, you’ll have to remove sod manually. Use a flat spade to cut the grass into manageable squares (about 12×12 inches), then slide the spade under each square to lift it up, roots and all. It’s workout, but you can plant the same day.
Pro Tip: Don’t throw away removed sod! Flip the grass sections upside down in a pile, let them decompose for a few months, and you’ve got free compost. Or use them to fill low spots elsewhere in your backyard.
Step 4: Build or Prepare Your Garden Beds
(1) For raised beds, construct frames from untreated cedar, redwood, or composite materials – never pressure-treated lumber near edible plants.
Make them 4 feet wide, 8-12 feet long, and 12 inches deep minimum. Level the ground underneath and line the bottom with hardware cloth if you have burrowing pests like gophers.
Fill raised beds with a mixture of 60% topsoil, 30% compost, and 10% other amendments like peat moss or coconut coir. This creates that perfect fluffy texture plants love.
(2) For in-ground beds, mark out areas 3-4 feet wide with 2-foot paths between them.
When your soil is slightly moist (not soaking wet or bone dry), work that compost deeply into the top 8-10 inches using a spade or garden fork. Break up any large clumps and remove rocks bigger than a golf ball.
Pro Tip: If you’re working with heavy clay soil, add both compost AND coarse sand or perlite – aim for about 2 inches of each worked into the top 8 inches. The sand improves drainage while compost adds nutrients. Don’t add sand alone to clay or you’ll create concrete!
Step 5: Add Soil Amendments Based on Your Test Results
Now that soil test from Step 2 pays off! Add amendments according to your specific needs:
- Low nitrogen? Add blood meal, fish emulsion, or well-rotted manure
- Low phosphorus? Mix in bone meal or rock phosphate
- Low potassium? Use kelp meal or wood ash (use ash sparingly!)
- pH too high? Work in sulfur or peat moss to make it more acidic
- pH too low? Add garden lime to raise pH
Mix amendments thoroughly into the top 6 inches of soil. Water everything deeply and let it settle for a few days before planting.
Even if your soil test came back perfect, add that 2-4 inch layer of compost anyway. Compost improves soil structure, helps retain moisture, and provides slow-release nutrients. It’s basically garden magic in decomposed form.
Pro Tip: Can’t afford a soil test or don’t want to wait? You can still succeed by adding a generous amount of compost and a balanced organic fertilizer (like 5-5-5). This covers most bases for average soil and works for about 80% of garden situations.
Step 6: Plan Your Garden Layout on Paper
Grab graph paper (or use a free online garden planner) and sketch your beds to scale. Each square can represent one square foot.
This prevents the common beginner mistake of overcrowding – plants always need more space than you think!
Group plants by their needs. Put full-sun lovers like tomatoes, peppers, and squash in the sunniest spots. Partial shade crops like lettuce and leafy greens can handle slightly less sun. Place taller plants on the north side so they don’t shade shorter ones.
Note spacing requirements from seed packets. Tomatoes need 24-36 inches between plants. Bush beans need 4-6 inches. Lettuce needs 8-10 inches. Mark these on your plan so you know exactly where everything goes.
Pro Tip: Use companion planting to your advantage! Plant basil next to tomatoes (they help each other grow and repel pests). Put marigolds throughout the garden to deter aphids and other insects. Avoid planting beans near onions – they inhibit each other’s growth. I keep a companion planting chart on my phone for quick reference.
Step 7: Determine Your Planting Dates
First, look up your USDA Hardiness Zone. Our Garden Works team has developed a tool called the USDA Hardiness Zone Finder.
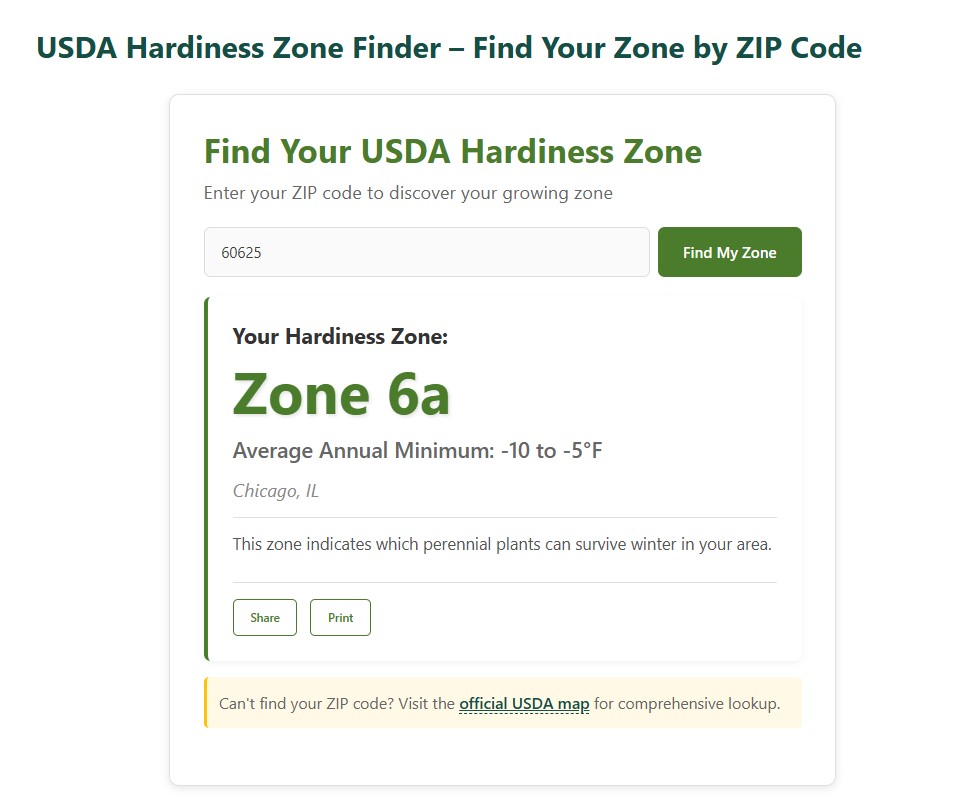
Our tool helps you identify your zone by using your zipcode and understand what it reveals about your growing conditions, as well as provide some plant recommendations tailored to your zone.
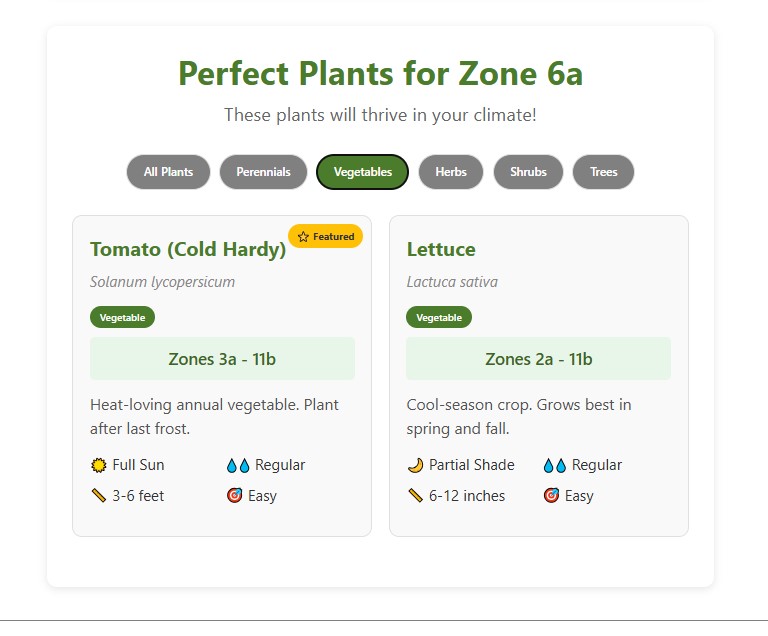
Second, know your average last spring frost and first fall frost dates – the two most important dates in gardening!
- Frost-tender crops (tomatoes, peppers, cucumbers, squash, beans) go in the ground AFTER your last frost date. Plant them too early and one cold night wipes them out. I learned this the expensive way!
- Cool-season crops (lettuce, peas, kale, spinach, radishes) can handle cold and actually prefer it. Plant these 4-6 weeks before your last frost date in spring, and again in late summer for fall harvests.
Mark your calendar with these planting dates so you don’t miss your windows. Most seed packets also list “days to maturity” – this tells you how long until harvest, helping you plan succession plantings.
Pro Tip: Create a simple spreadsheet with three columns: crop name, planting date, and expected harvest date. This keeps you organized and helps you plan what to plant next in empty spaces. I reference mine constantly throughout the season!
Step 8: Plant Your Seeds and Transplants
(1) For transplants: Dig holes slightly larger than the root ball.
Gently remove plants from containers (squeeze the sides first to loosen). Tomatoes can be planted deeper than they were in their pots – bury stems up to the first true leaves and they’ll grow extra roots. Water immediately after planting.
(2) For seeds: Follow packet instructions for depth (general rule: plant seeds 2-3 times as deep as they are wide).
Space them according to packet directions. Cover with soil, pat down gently, and water with a gentle spray so you don’t wash seeds away.
Plant in slightly moist soil, never when it’s soaking wet or completely dry. Water thoroughly after planting to settle soil around roots and eliminate air pockets.
Pro Tip: Plant seeds slightly closer than recommended spacing, then thin seedlings once they’re a few inches tall. This ensures you get full beds even if germination isn’t perfect. I eat the thinned lettuce and spinach seedlings in salads—they’re delicious microgreens!
Step 9: Apply Mulch Around Plants
Once plants are 3-4 inches tall (or immediately after transplanting), apply 2-3 inches of organic mulch around them. Keep mulch a few inches away from plant stems to prevent rot.
The best mulches are straw (not hay – it’s full of weed seeds), shredded leaves, or untreated wood chips. Grass clippings work too but apply them in thin layers or they’ll mat together and smell funky.
Mulch is a garden game-changer. It keeps soil moist so you water less, suppresses weeds by blocking sunlight, regulates soil temperature, and breaks down over time to feed your soil. It also makes your garden look neat and intentional!
Pro Tip: I get free wood chip mulch from local tree trimming companies—they’re often happy to dump a load in your driveway rather than pay to dispose of it. Just make sure it’s from untreated wood and let it age for a few weeks before using around vegetables if it’s fresh.
Step 10: Set Up a Watering Schedule
Most gardens need about 1 inch of water per week total, including rainfall. Stick a rain gauge in your garden or use an empty tuna can to measure.
Water deeply but infrequently – better to water thoroughly twice a week than lightly every day. Deep watering encourages roots to grow down where soil stays consistently moist, creating stronger, more drought-resistant plants.
The best time to water is early morning (6-10 AM). This gives foliage time to dry before evening, reducing disease risk. Evening watering leaves plants damp overnight, inviting fungal problems..
Pro Tip: Before watering, stick your finger 2 inches into the soil. If it’s still moist, wait another day. I killed so many plants by overwatering before I learned this simple test. If you want to really level up, install a drip irrigation system on a timer – I did this year three and it changed my life. No more dragging hoses around!
Step 11: Monitor and Manage Pests
Check your plants every few days for problems. Look under leaves – that’s where pests hide! Common culprits include aphids (tiny green or black bugs), tomato hornworms (huge green caterpillars), and cucumber beetles.
Start with the gentlest solutions first. Hand-pick large pests like hornworms and drop them in soapy water. Spray aphids off with a strong stream from your hose. For stubborn infestations, use insecticidal soap or neem oil, following label directions.
Plant flowers like alyssum, yarrow, and dill to attract beneficial insects – ladybugs, lacewings, and parasitic wasps that eat the bad bugs. This natural pest control is way better than chemicals!
Pro Tip: Make a DIY pest spray by blending one garlic bulb with a cup of water, straining it, and adding a drop of dish soap. Spray on affected plants. It won’t harm beneficial insects but deters many pests. I keep a spray bottle of this mixed up all season.
Step 12: Weed Regularly
Here’s the truth about weeding: 10 minutes every few days beats 2 hours once a week, and it beats 6 hours once a month!
Catch weeds when they’re small and they pull out easily. Let them establish deep roots and you’ll be wrestling with them.
The best time to weed is after rain or watering when soil is moist. Weeds pop out root and all instead of breaking off at ground level (which just makes them regrow).
Focus on weeding when plants are young and vulnerable to competition. Once your vegetables get established and that mulch fills in, weeding becomes minimal.
Pro Tip: Learn to identify seedlings of plants you’re growing versus weed seedlings. I take photos of young vegetable plants each season as reference. This prevents the rookie mistake of weeding out your actual crops! Also, some “weeds” are edible—lamb’s quarters and purslane are both delicious in salads.
Step 13: Feed Your Plants
About 3-4 weeks after planting, give your plants their first feeding. Use a balanced organic fertilizer (the three numbers should be roughly equal, like 5-5-5) or fish emulsion diluted according to package directions.
Heavy feeders like tomatoes, peppers, and squash benefit from feeding every 2-3 weeks once they start flowering. Lighter feeders like beans, peas, and root vegetables rarely need supplemental fertilizer if you started with good compost-enriched soil.
Always water before fertilizing to prevent burning roots, and follow package directions exactly. More is NOT better—overfertilizing causes excessive leafy growth at the expense of fruits and can actually harm plants.
Pro Tip: Make compost tea by steeping a shovel-full of compost in a 5-gallon bucket of water for 24-48 hours. Strain it and use the liquid to water plants. It’s gentle, effective, and you can’t overdo it. I make a batch every other week during peak growing season.
Step 14: Harvest at the Right Time
This is where all your hard work pays off!
Most crops taste best when harvested young and tender. Check your garden every morning during peak season—things grow fast in summer heat!
- Lettuce: Pick outer leaves when they’re 4-6 inches, leaving the center to keep producing
- Tomatoes: Harvest when fully colored and slightly soft to gentle pressure
- Beans: Pick when pods snap crisply—bendy beans are overripe
- Zucchini: Harvest at 6-8 inches long; they’re more tender than giant ones
- Peppers: Can be picked green or left to ripen to red/yellow for sweeter flavor
The more you harvest, the more plants produce! This is especially true for beans, cucumbers, and zucchini. Pick every 2-3 days to keep production going strong.
Pro Tip: Harvest in the morning after dew dries but before the heat of the day. Vegetables are crisp, hydrated, and at peak flavor. Bring a basket and scissors – clean cuts are better than tearing, which can damage plants. I keep my harvest scissors on a hook right by the back door so they’re always handy.
Step 15: Extend Your Season and Plan Ahead
Don’t let your garden sit empty! As spring crops finish, plant heat-loving summer crops in their place. When summer crops wind down, plant cool-season crops again for fall harvests.
Use row covers or old sheets to protect plants from light frosts, extending your season by weeks.
I’ve harvested lettuce on Thanksgiving this way! Cold frames (basically a bottomless box with a clear lid) can keep greens growing well into winter in many climates.
Keep a garden journal throughout the season. Note what you planted where, when you planted it, harvest amounts, and problems you encountered. This becomes your personalized reference guide that improves your garden every year.
Pro Tip: Take tons of photos! They help with crop rotation planning (don’t plant the same family in the same spot next year), and they’re motivating when you’re planning next year’s garden in January. I also photograph pests and diseases so I can research solutions without having to remember what that weird bug looked like.
Final Thoughts
So, how did it go? Are you feeling excited and ready to get your hands dirty?
I really hope this tutorial gave you the confidence to finally start that garden you’ve been dreaming about!
Starting a garden from scratch was honestly one of the best decisions I’ve ever made. It’s taught me patience, connected me with nature, and given me the purest satisfaction of eating food I grew myself. Those first tomatoes? They’ll taste better than anything you’ve ever bought, I promise you that.
The beautiful thing about gardening is that it’s a journey, not a destination. Your first year won’t be perfect, and that’s completely okay!
I still make mistakes all the time, and I’ve been doing this for years. Each season teaches you something new, and nature is incredibly forgiving when you mess up.
Remember to start small, focus on those easy-win crops like lettuce, beans, and cherry tomatoes, and don’t overthink it. You’ve got all the information you need right here. Now you just need to take that first step!
I’d love to hear how your garden turns out! Drop a comment below and tell me what you’re most excited to grow.
And if you found this guide helpful, please share it with anyone else who’s been wanting to start a garden but didn’t know where to begin. Let’s get more people growing!
Now get out there and grow something amazing! 🌱
For the broader framework beyond these first steps — what to grow, how to manage pests, and what to do when something goes wrong — our beginner gardening guide is the companion read to this post.

3 thoughts on “How to Start a Garden from Scratch: A Step-by-Step Guide for Beginners”