

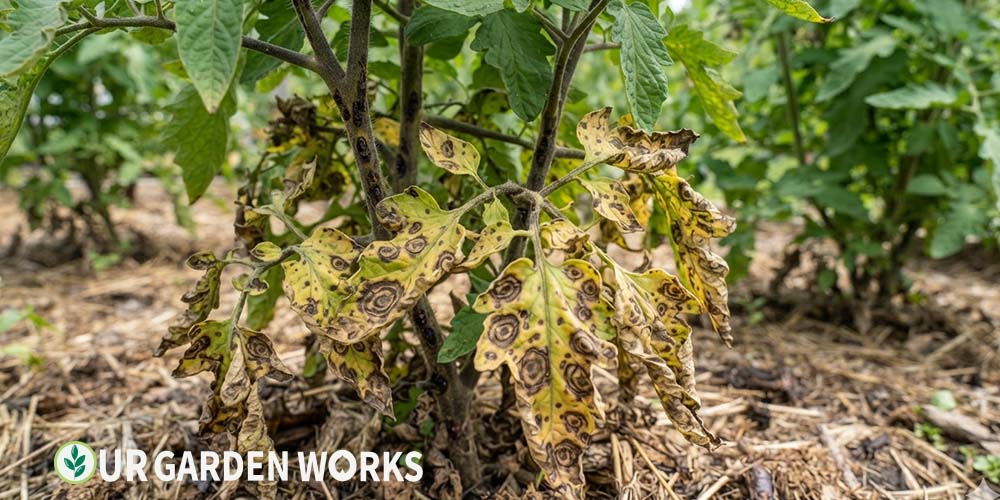
Brown spots on tomato leaves are one of the most common reasons people search for help with their garden.
The frustrating part is that at least four separate problems all produce roughly the same symptom. Get the diagnosis wrong, and you can spend a whole season treating the wrong thing.
The good news is that each cause leaves a slightly different signature once you know what to look for. Spot shape, spot location on the plant, and what’s happening around the spot all tell a different part of the story.
We’ll walk through each one so you can match what’s actually on your plant.
Quick Answer: Brown spots on tomato leaves are most often early blight (concentric “target” rings, starts on lower leaves) or septoria leaf spot (small spots with dark borders and tiny black dots in the center). Bacterial spot and sunscald are less common but possible causes. Identify the spot pattern and location first, then treat accordingly — fungicide for blight and septoria, copper spray for bacterial spot, shade for sunscald.
Cause 1 — Early Blight (Most Common)
Early blight produces brown spots with a distinctive concentric ring pattern, often described as looking like a target or bullseye. It starts on the oldest, lowest leaves first and works upward as the season progresses. A yellow halo frequently surrounds each spot.
How to confirm it’s early blight:
- Spots show visible concentric rings when you look closely
- Lower leaves are affected first and most severely
- Yellowing often surrounds each brown spot
- Spots eventually merge and the whole leaf yellows and drops
- Worse in warm, humid weather with frequent leaf wetness
Fix: Remove affected leaves immediately and dispose of them away from the garden. Apply a copper or chlorothalonil-based fungicide on a 7-10 day schedule once symptoms appear. Improve airflow by pruning lower branches and spacing plants further apart next season.
💡 Early blight overwinters in soil and debris
The fungus survives winter in old plant debris and soil, which is why removing and disposing of infected leaves matters so much. Rotating tomatoes to a different bed location each year, rather than replanting in the same spot, meaningfully reduces how much early blight pressure your plants face the following season.
Cause 2 — Septoria Leaf Spot
Septoria produces much smaller spots than early blight, typically under a quarter inch across, with a distinctive dark brown or purplish border around a tan or gray center. Tiny black dots (the fungus’s spore-producing structures) are often visible in the center of each spot if you look closely.
How to confirm it’s septoria:
- Spots are small and numerous rather than few and large
- No concentric rings — just a defined dark border around a pale center
- Tiny black specks visible in spot centers under good light
- Lower leaves affected first, similar to early blight
Fix: Same general approach as early blight — remove affected foliage, apply fungicide, and improve airflow. Septoria spreads via water splash, so watering at the soil level rather than overhead reduces new infections significantly.
Cause 3 — Bacterial Spot or Bacterial Speck
Bacterial spot produces small, dark, slightly raised or greasy-looking spots, often with a yellow halo, that can appear on leaves, stems, and even fruit. Unlike the fungal causes above, bacterial spots tend to look water-soaked at the edges rather than dry and papery.
How to confirm it’s bacterial:
- Spots look slightly greasy or water-soaked rather than dry
- Spots may appear on fruit as small raised dark scabs, not just leaves
- No concentric rings or tiny black fungal specks
- Spreads rapidly after rain or overhead watering
Fix: Copper-based bactericide is the standard treatment, though it suppresses rather than cures established infection. Avoid working in the garden when foliage is wet, since handling plants while damp spreads bacteria between leaves and plants on your hands and tools.
💡 Bacterial spot vs. bacterial speck
These two closely related bacterial diseases look almost identical to the naked eye and are treated the same way, so distinguishing between them rarely changes your approach. Both favor warm, wet conditions and both spread fastest when gardeners work among wet plants, so the prevention advice for one applies equally to the other.
Cause 4 — Sunscald
Sunscald produces pale tan to brown patches, usually on leaves that were recently exposed to intense direct sun after a period of shade — common after aggressive pruning or after a string of cloudy days breaks into sudden full sun.
Unlike the disease causes above, sunscald spots are irregular and have no defined ring pattern or border.
How to confirm it’s sunscald:
- Pattern correlates with sun exposure, not plant age or position
- Spots are irregular, papery, and bleached-looking rather than dark
- No yellow halo, ring pattern, or black specks
- Often follows a recent pruning session or a sudden weather shift to intense sun
Fix: No treatment reverses existing sunscald damage, but the plant recovers on its own as new, properly hardened foliage grows in. Avoid removing more than 20-25% of foliage in a single pruning session, and prune gradually if a plant has been shaded and needs significant thinning.
Telling the 4 Causes Apart at a Glance
| Cause | Spot Pattern | Location | Texture |
|---|---|---|---|
| Early blight | Concentric rings, yellow halo | Lower leaves first | Dry, papery |
| Septoria | Small, dark border, pale center, black specks | Lower leaves first | Dry, papery |
| Bacterial spot | No rings, may appear on fruit too | Anywhere on plant | Greasy, water-soaked |
| Sunscald | Irregular, no defined border | Recently sun-exposed leaves | Bleached, papery |
Fungicide Timing — Why Earlier Is Always Better
One detail that significantly affects how well any fungicide treatment works is timing relative to symptom onset, and this is worth understanding before you reach for a spray bottle.
Fungicides applied at the very first sign of spotting prevent the disease from establishing further on the plant, while the same product applied after spots have already spread across most of the lower canopy mainly slows further progression rather than reversing existing damage.
This is why a regular preventive spray schedule, started before symptoms even appear in gardens with a known history of early blight or septoria, often outperforms a reactive approach where treatment only begins once spots are already visible.
If brown spots have been a recurring problem in your garden for multiple seasons, switching to this preventive timing the following year is one of the more effective adjustments you can make.
Preventing Brown Spots Before They Start
Most of the disease-based causes above share the same handful of risk factors, which means a few consistent habits prevent the majority of brown spot problems before they ever appear.
Watering at the soil level rather than overhead keeps foliage dry and meaningfully reduces both fungal and bacterial spread, since most pathogens need water on the leaf surface to infect.
Spacing plants generously and pruning lower branches that touch the soil improves airflow, which speeds up how fast leaves dry after rain or dew.
Mulching the soil surface beneath tomato plants also helps, since it prevents soil-borne fungal spores from splashing up onto lower leaves during watering or rain.
Crop rotation matters more than many home gardeners realize, since several of these pathogens survive in soil and plant debris through winter, ready to reinfect tomatoes planted in the same spot the following year.
Moving your tomato bed location even a modest distance, combined with cleaning up all plant debris at the end of each season, breaks this cycle significantly.
When to Worry and When to Relax
A few scattered brown spots on the lowest, oldest leaves of an otherwise vigorous, fruiting tomato plant is rarely cause for serious concern — this is an extremely common, low-stakes situation that most tomato plants experience to some degree every season.
Removing the affected leaves and keeping an eye on progression is usually sufficient at this stage.
Rapid spread up the plant, spots appearing on fruit, or significant defoliation within just a week or two are the signals that warrant more aggressive intervention with fungicide or bactericide rather than just monitoring.
If you’re seeing this kind of rapid progression, treating promptly rather than waiting protects both this season’s harvest and reduces the disease pressure your garden carries into next year.
Frequently Asked Questions
Can I still eat tomatoes from a plant with brown spots on the leaves?
Yes, as long as the fruit itself looks normal and healthy. Leaf diseases like early blight and septoria rarely affect fruit directly, though severely defoliated plants may produce smaller or fewer tomatoes since the plant has less leaf surface to photosynthesize with.
Bacterial spot is the exception, since it can produce small dark scabs directly on fruit — cut these away and the rest of the tomato is fine to eat.
Will brown spots spread to my other vegetables?
Early blight and septoria are tomato- and potato-specific pathogens and generally won’t spread to unrelated vegetables like beans, squash, or lettuce. They can spread between tomato and potato plants, though, since both belong to the same plant family and share several common diseases.
Why do brown spots keep coming back every year even though I treat them?
This usually means the pathogen is overwintering in your soil or in plant debris left over from the previous season, reinfecting new plants each year regardless of in-season treatment.
Thorough fall cleanup combined with crop rotation to a different bed location addresses the root cause far more effectively than fungicide alone, which only manages symptoms during the active growing season.
Are some tomato varieties more resistant to these brown spot diseases?
Yes — many modern hybrid varieties are bred with resistance to early blight and septoria specifically, often marked with codes like “EB” or “ASC” on seed packets and plant tags.
If brown spot diseases are a recurring frustration in your garden, choosing a resistant variety for next season is one of the most effective long-term fixes available.
Related Articles in Our Tomato Guide
- Tomato Leaves Turning Yellow: 7 Causes and Fixes
- 9 Best Tomato Blight Spray Recipes That Actually Work (2026)
- Why Are My Tomato Leaves Curling? 5 Causes + Fixes
- Why Do Tomatoes Crack and Split?
- How to Fix Blossom End Rot on Tomatoes
- How to Grow Tomatoes from Seed to Harvest
- Vegetable Gardening Guide
Final Thoughts
We hope this guide has helped you match what’s actually on your tomato leaves to the right cause, rather than guessing and hoping for the best. Most cases of brown spots are manageable once you know exactly what you’re dealing with.
For all our tomato and vegetable guides, our vegetable gardening guide links to everything.
Share this post with a fellow gardener who’s troubleshooting their tomato plants — and let us know in the comments which cause matched what you found. Happy growing!
