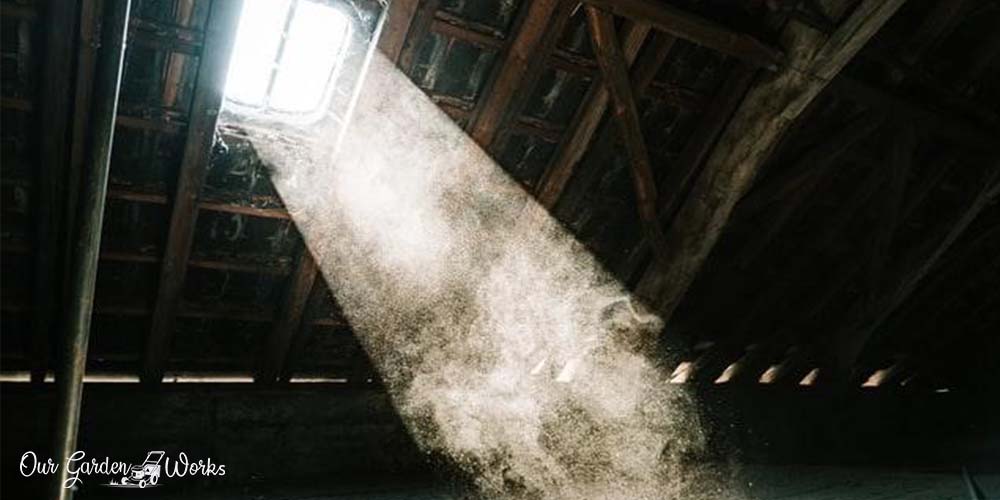
The money that we don’t spend, is the money that we earn. If you’re looking for new ways to spend less on energy bills and choose not to rent a blower, you can achieve both by placing loose-fill insulation by hand
In this post, we’ll discuss the different types of loose-fill insulation, safety tips against itchy fibers, and the two methods that you can try in loose-fill installation.
This DIY project requires safety equipment since loose-fill insulation contains tiny fibers and toxic chemicals.
Okay, let’s start warming up your home!
You could use the table of contents below to jump to the sections that are most important to you.
What is Loose-Fill Insulation?
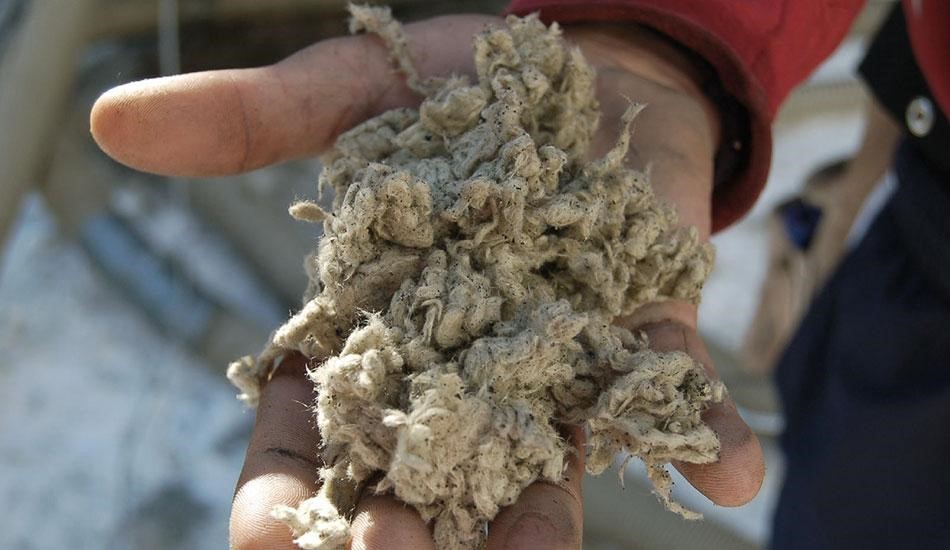
Loose-fill or blown-in insulation is a type of insulation material that is made up of tiny fibers from recyclable materials like paper, plastic, and molten glass and chemicals to make it heat-resistant and environment-friendly. It can adapt to the shape of any space without obstructing the structures of your home.
Loose-fill insulation also contains borax to prevent molds, mildew, and rodent and insect infestations. It can last for 20 to 30 years if properly maintained.
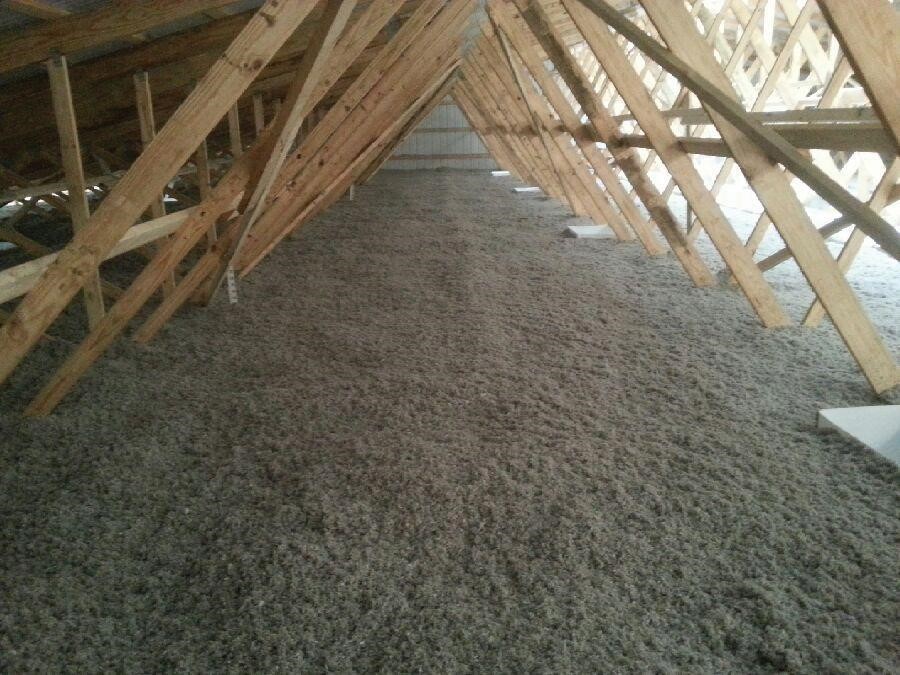
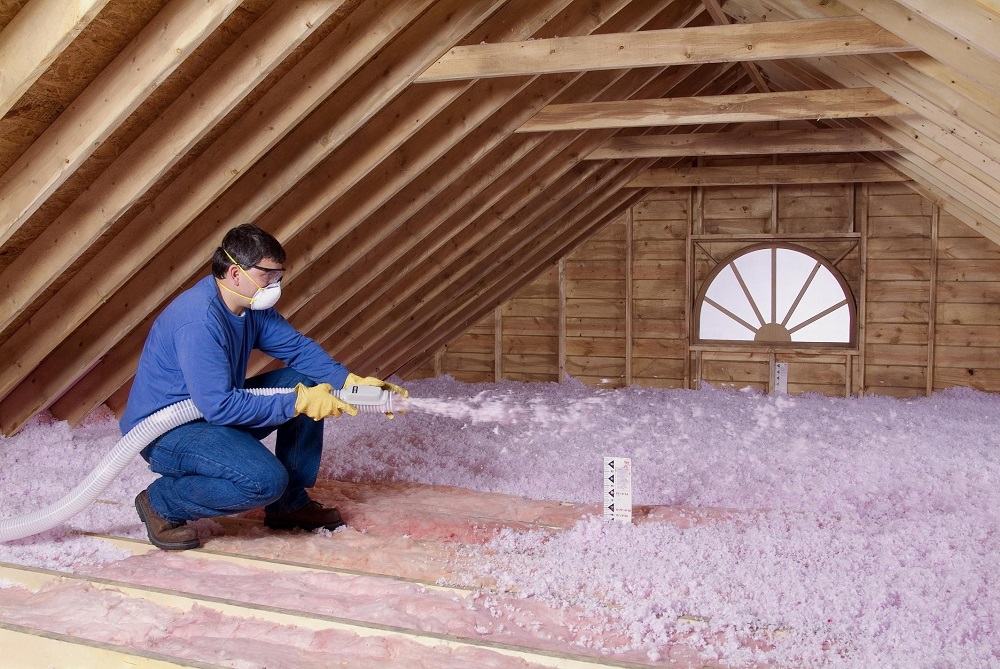
Loose-fill insulation is densely packed in light bales which means a bale can already cover a lot of space. It is typically installed using a blower with a 100-foot hose that churns and breaks down the clumps for your convenience.
The blower can be rented out from shops for a certain minimum of loose-fill insulation. If you’re planning to fill a small attic or a portion of an irregularly-shaped wall, renting a blower may not be the best option since you can do it by hand, unless the area to fill is too large.
Loose-fill insulation is also best for the following scenarios:
- Old homes with pre-existing loose-fill insulation but have settled and became thinner over the years. You’ll know that you have insufficient insulation when you can see the joists in your attic.
- Leak damages
- Home repairs that decreased the thickness of the loose-fill like the installation of light and exhaust fixtures.
What is R-Value?
R-value is the measure that indicates the thermal resistance of loose-insulation per unit area.
This is used to determine the depth of the loose-fill that you need to properly insulate your attic. It is also an indication of how well the insulation can resist heat and keep it inside your home.
We’ll discuss how to measure the amount of loose-fill insulation that you need in the latter part of this post.
You might like: Fireplace 101: 6 Ways To Seal Your Fireplace
What Does IC-Rated Mean?
Insulation contact rate or IC rate is an indication that an appliance or fixture is safe to have direct contact with the loose-fill insulation. Since the loose-fill insulation is made up of combustible materials, recessed light fixtures that can heat up may cause a fire.

Check your recessed light fixtures if they are IC-rated especially before you install the loose-fill insulation. It’s better to be safe than sorry in this step.
Now, let’s head onto the different types of loose-insulation that you can use for the project.
Types of Loose-fill Insulation
Unlike fiberglass insulation, you no longer need to measure and cut loose-fill insulation. However, the materials between these two insulation materials are their composition. They are made of the same fibers and recyclable materials.
Check out the similarities and differences between the two from the different types of loose-fill insulation below:
1.Fiberglass insulation blown-in insulation is made up of sand with 40% to 60% molten glass. It is the most common loose-fill insulation used for residential insulation.
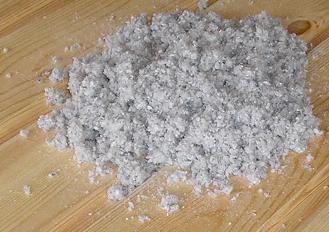
2.Cellulose loose-fill or blown-in insulation is made out of recycled paper like old boxes and newspaper that are broken down to pieces and pulverized. It is mixed with chemicals to resist pests and prevent fire.
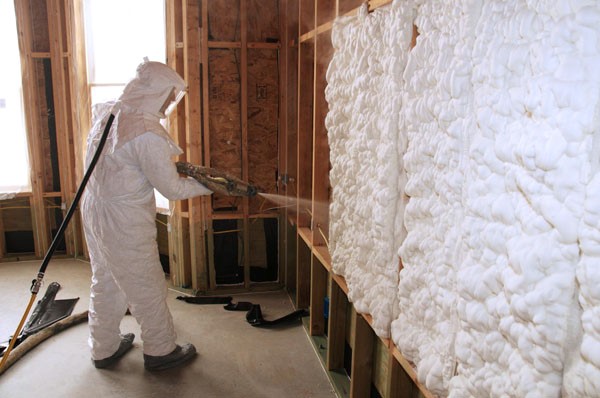
3.Spray foam insulation or spray polyurethane foam (SPF)is also another insulation material composed of isocyanate and polyol resin that reacts when mixed and rises as it adapts the shape of where it was sprayed. This method needs a spray gun.
4.Mineral, rock wool, or slag wool loose-fill or blown-in insulation is made up of molten rock with 75% post-industrial recycled fibrous material like blast furnace slag.
Important Things to Remember
You have three goals in placing loose-fill insulation by hand. These includes:
- Make sure to use an appropriate type of loose-fill insulation in the part of your house that needs insulation. Here’s the recommendation of the Department of Energy:

- You have to achieve the right density and R-values for your attic. When the loose-fill insulation rises or become fluffy, it’s density and weight doesn’t change regardless of its thickness. You have to check the manufacturer chart at the back of the bag of the loose-fill insulation to get the right amount of insulation per square foot.
- You have to secure every part of your skin that may come in contact with the loose-fill insulation. The powdered material can get to your pores and stay in your lungs and that leads us to the safety precautions.
Safety First
The fibers from the Loose-fill insulation materials can get to the lungs and stay there. It can also be dangerous if your house has old loose-fill insulation that typically contains asbestos. When asbestos fiber enters the body, it can cause various health problems like lung cancer.
However, the new loose-fill insulation of today does not contain asbestos anymore. They are usually made of paper and recyclable materials and approved by most building codes.
To keep yourself safe from skin irritation and inhaling fibrous materials, we recommend that you wear the proper safety equipment including:
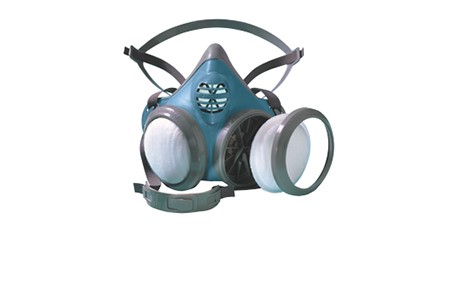
- Rubber face masks with dust filters
- Painter’s suit or jacket and pants(polyester)
- Gloves and socks
- Face and hair covering or face shield
- Shovel so you won’t directly bury your hands in a pile of loose-fill insulation
You might like: Do-It-Yourself: How To Move A Light Switch
How To Place Loose-fill Insulation By Hand
Now that you know what’s at stake in doing this DIY project, it’s time to get moving.
There are two methods that you can use in applying loose-fill insulation by hand. Nonetheless, you need the following steps first to make the installation as smooth as possible.
1. Check The Area
Hold your horses! Don’t open your loose-fill insulation bags just yet! To not waste your effort in setting up your loose-fill insulation, you have to check the following first:
- Check if there are water leaks from the roof, Molds buildup is a sign of moisture so find out where the leak is coming from.
Two things can happen to the loose-fill insulation when it gets wet:
- The cellulose will sag and settle faster.
- Settles loose-fill insulation will have insufficient capacity to properly insulate your home.
- Do you have unwanted pets staying in your attic like rodents and insects? Hope not. But if you do, you have to address that problem first before opening a bale of loose-fill insulation.
- Put a mark on the location of the light fixtures and any electrical wiring. Remember to make the marks taller than the loose-fill insulation so you can spot them right away. Miniflags are a good idea for this.
- You also have to check if the recessed light fixtures are IC-rated and replace them accordingly.
2. Measure The Area and Calculate How Much Loose-Fill You’ll Need
Now. this is the tricky part. First, you have to take the square footage of the space if it’s uninsulated. If it has pre-existing loose-fill insulation take note of its depth.
Loose-fill insulation should be 15” to 22” inches thick to provide the optimal insulation for your home. The Department of Energy recommends an R-60 for an uninsulated home that is equal to 22” of loose-fill depth.
Here’s is the recommended R-value per zone:
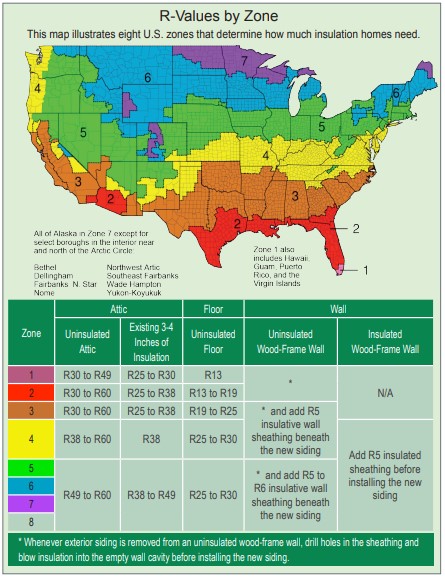
You also have to consider that there are different R-values for each type of loose-fill insulation. The R-value of cellulose fill insulation is from R-3.2 to R-3.8 per square inch while Fiberglass loose-fill insulation is R-2.2 to 2.7 per square inch.
Getting the right measurements is crucial because over insulation can result in heat buildup below the loose-fill insulation and produce moisture. With moisture, a lot of problems can arise like molds and mildew in your home.
So, you might be asking what if I need an R-60 for my home?
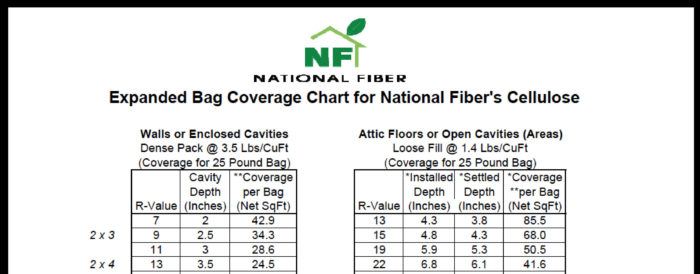
You’ll need to check the back of the loose-fill insulation and see the metrics. From there, you will see the coverage of every bag per square foot and its depth and that can help you identify how many bales you need.
Here’s an example of that:
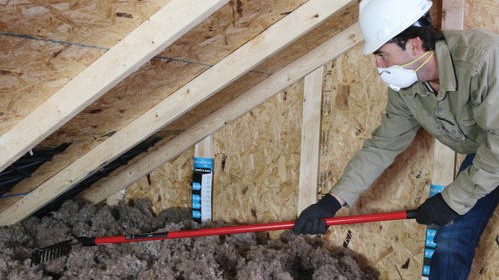
Method 1: Rake Method
Now that you know what type and how much loose-fill insulation to use, let’s get on to your main task – installing the loose-fill insulation by hand.
Here are the materials you’ll need aside from the materials mentioned above:
- Rake
- Small pail and a bigger pail with a depth of 2 to 3 feet
- Mixing tools like an unused pole or a 2 x 2 piece of wood
- Cutter or knife
Procedure:
- Cut the bales open. It will expand as open them since they are densely packed. Put the clumps of the loose-fill insulation and put it inside the large pail.
- Use the rod or wood to break it down to pieces or as they call it fluff. Keep fluffing until no clump is visible.
- Transfer it to the smaller pail and use it to scatter the loose-fill insulation in the area.
- Once all the clumps of loose-fill insulation are broken down to pieces, get your rake, and fluff the loose-fill insulation some more. Do this by moving the rake on top of the fluff from left to right without too much force.
- Continue fluffing the loose-fill insulation until it reaches its desired depth or thickness.
Method 2: Drill Mixer Method
If you don’t want to break too much sweat with this DIY project, you could use the help of your power tools. To make the churning process easier, here are the materials you’ll need:
- Electric drill
- Paint mixer or drywall mixer attachment
- Small pail and a bigger pail with a depth of 2 to 3 feet
- Cutter or knife

Procedure:
- Attach the paint mixer or drywall mixer attachment to your drill. We recommend using a cordless drill if it’s available.
- Cut the loose-fill bag open and place a portion of it inside the big pail.
- Put the paint mixer inside the pail and run the drill in its lowest setting. The insulation particles will scatter around so make sure you keep your face away from the pail.
- Once all the clumps are gone, you can start to scatter them in your attic starting from both sides until you end up with an aisle. Then, back to front.
Pro Tip: If the fill is not broken up into pieces the clumps will leave more empty spaces which will decrease the efficiency of the loose-fill insulation.
Benefits of Placing Loose-Fill Insulation By Hand
Manual work always requires more effort but it also comes with more benefits. Here are the benefits of placing the loose-fill insulation by hand:

- Energy efficiency: You can save up to $600 worth of energy by properly insulating your house. Imagine how much you can save from that money!
- Tax credits: The IRS provides tax credits for making your home energy efficient. You can be eligible for up to $500 or 10% tax credit for insulating your home.
- No rental fees: You don’t have to rent a blower for your loose-fill insulation anymore since you did all the work by yourself. You have saved $200 which is equivalent to a whole day’s rent for the blower.
- New DIY skill added: You learned another skill that you can put under your belt. Experience has always been the best teacher and you got that experience with loose-fill insulation while saving money as well.
- Warm home: You’ll enjoy a warmer home with your family and say goodbye to cold nights.
- Exercise: Instead of being glued to your phone all-day, you gave your body a chance to move and get the exercise that it needs by taking care of the loo-sill insulation job.
You might like: How to Replace An Outdoor Faucet or Spigot
Frequently Asked Questions (FAQs)
Should I remove the old loose-fill insulation?
No, it will serve as the base of the ones you’re about to install. The R-value measurements will change though. You’ll need to take the depth of the old insulation and deduct it from the bales that you’re about to buy.
What are the disadvantages of using loose-fill insulation?
Since lose-fill insulation is made up of microscopic fibers, it’s impossible not to see small traces of dust around the house. Also, it sets over time but can last for 20 to 30 years. You just need to add more when you noticed that it has all settled below the joists.
Final Thoughts
We hope that this article helped you have an idea of how you can install loose-fill insulation by hand.
If other DIY junkies made it, you can do it too. You just have to make sure that you have enough safety equipment to keep yourself safe from the chemicals and ultra-tiny particles.
If you find this post helpful, share this with your friends and family and help them save more from energy costs and maintenance fees.
How did this DIY project help insulate your home? Let us know in the comments below.
For more design ideas, project guides, and planting inspiration, our backyard design guide links to every outdoor project and design article we’ve published.
I think number 3. spray foam is my favorite option. It has the highest R-value for insulation options out there and it has lots of other great benefits! Great article, very useful information!
Could you use a leaf blower to add insulation he fan wheel would break up the chunks
I have done that. However, doing so in the loft creates too much dust in the confined space. I found that using the leaf blower outside and dumping the discharge into large plastic trash bags worked better. It was a bit of a chore to take the bags up to the loft but it was time well spent.
Pail not pale.
I recently attempted this project to add addition fiberglass blown-in insulation to our attic. Methods tried were the rake method and drill mixer method. I was diligent and spent a long time with both but neither could get a similar light consistency of the other blown in insulation in the attic. It was decent, but still off. I’m all for the DIY approach here, but after spending a couple hours and a couple trips to the store with one bag of fiberglass fill, I finally called it quits and will be renting the blowing machine to ensure the proper insulation consistency.
I do wonder if the “by hand” method would be more effective for cellulose fill, but haven’t tried and didn’t want to mix materials in our attic since I hear mixed reviews about cellulose over fiberglass for density reasons. Good luck all on your DIY projects!