Seed starting trays look interchangeable until you’re three weeks into the season with root-bound pepper seedlings in cells that were too small, or with tiny basil seedlings flopping around in cells built for tomatoes.
Tray size, cell depth, dome height, and material all affect germination, seedling health, and how smoothly the entire process runs.
This guide cuts through the options: what the numbers mean, which tray type works best for which crops, what “self-watering” actually does and whether it’s worth the extra cost, and the complete setup for a home gardener starting 2–6 trays per season.
What’s the Best Seed Starting Trays?: For most home gardeners: start with 72-cell trays for tomatoes, peppers, herbs, and flowers — they’re the most versatile. Use 50-cell trays for cucumbers, squash, and anything that needs more root space. Get the 7-inch tall dome, not the standard 2-inch one. Reusable plastic trays last 3–5 seasons and cost far less per use than peat pots.
Understanding the Numbers — What 72-Cell and 50-Cell Mean
The cell count refers to how many individual cells fit on a standard 10×20 inch tray. More cells = smaller cells. The tradeoff is straightforward:
| Cell Count | Cell Size | Best For | Volume per Cell |
|---|---|---|---|
| 128-cell | Very small (penny-sized) | Flowers, fine herbs, plugs for commercial growers | ~0.5 oz |
| 72-cell | Medium (1.5 inches square) | Tomatoes, peppers, basil, broccoli, kale, most vegetables | ~1.5 oz |
| 50-cell | Large (2 inches square) | Cucumbers, squash, melons, large-seeded crops | ~2.5 oz |
| 32-cell | Very large (3+ inches) | Pumpkins, large squash, long-term indoor growing | ~5 oz |
| 6-cell | Full “six-pack” size | Single varieties, testing new crops, minimal setups | ~8 oz |
The Rule: Match Cell Size to Root Development Speed
Fast-growing crops with large root systems (cucumbers, squash, melons) become root-bound in 72-cell trays within 2–3 weeks and don’t transplant well when root-bound.
These need 50-cell or larger from the start. Slower-growing crops (tomatoes, peppers, herbs) do fine in 72-cell trays for their 6–8 week indoor period before being potted up.
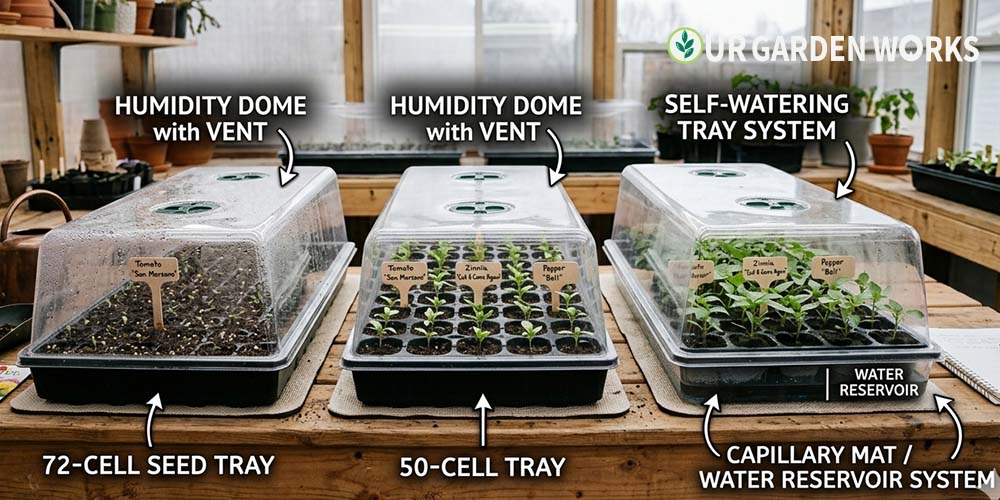
The Components — What Actually Comes in a Tray System
A complete tray system has three parts. Most gardeners buy them together, but understanding each one helps you mix and match effectively as your collection grows.
The Three Parts
- Bottom tray (no holes): The watertight base. Used for bottom watering (filling with water and letting cells draw moisture up), as a drip tray, and as the structural support for the flimsy cell insert. Get at least 2–3 of these — they outlast everything else in the system.
- Cell insert: The actual growing cells — the part that wears out fastest and needs replacing most often. This is where your cell count choice matters (72-cell vs 50-cell). Get 2× as many inserts as you have bottom trays so you can have one set germinating while another is being cleaned.
- Humidity dome: Clear plastic cover that holds moisture during germination. Critical during germination; removed immediately after seedlings emerge. The 7-inch tall dome is dramatically more useful than the 2-inch standard dome — it fits over seedlings well past the germination stage and gives you more flexibility.
Types of Seed Starting Trays
Standard Plastic Reusable Trays — Best All-Around
The industry standard for a reason. Rigid black plastic (often polystyrene or ABS), reusable for 3–5 seasons with proper cleaning, widely available, and the cheapest per-use option. Clean between seasons with a diluted bleach solution (1 part bleach : 9 parts water) to kill any lingering disease pathogens.
What to look for: The bottom tray should be genuinely rigid — cheap trays flex and spill when full of wet soil. Cell inserts should have drainage holes at the base of each cell. The dome should fit snugly over the tray without gaps at the edges.
Our pick: Bootstrap Farmer 72-Cell Starter Kit — heavy-duty BPA-free, 5″ dome, made in the US by a working farm family. Lasts 5+ seasons.
Self-Watering Trays — Worth It for Hands-Off Growers
Self-watering trays have a water reservoir in the base that wicks moisture up through the cell inserts via capillary action. You fill the reservoir every 2–4 days rather than watering individual cells.
Honest pros and cons:
- ✅ Eliminates overwatering — water level is controlled, cells never sit in standing water for long
- ✅ Less frequent attention needed — good for gardeners who travel or forget to water
- ✅ Reduces damping off risk compared to overhead watering
- ❌ More expensive ($$ vs. $ for standard)
- ❌ Reservoir can breed algae if left for extended periods
- ❌ Less intuitive to know when cells are dry vs adequately moist
Our verdict: worth it if you find watering consistency difficult or travel during seed-starting season. Standard trays with a bottom-watering practice (set tray in a shallow dish of water for 20 minutes, remove) achieve the same benefit at lower cost.
→ VIVOSUN Self-Watering Seed Starter Tray on Amazon
Peat Pots and Biodegradable Cells
Biodegradable pots made from peat, coconut coir, or paper pulp that you transplant directly into the ground — pot and all. The theory is zero transplant shock since roots aren’t disturbed.
The honest assessment: Peat pots work, but they need to be fully moistened before going in the ground and planted slightly below the soil surface — a dry peat pot rim above soil level wicks moisture away from roots. They cost significantly more per season than reusable plastic.
For most crops, careful transplanting from plastic cells causes no meaningful transplant shock with proper technique. Biodegradable pots make the most sense for crops genuinely sensitive to root disturbance: cucumbers, melons, and squash.
Soil Blocks — Best for Experienced Growers
Compressed cubes of soil mix created with a soil blocker tool. No container — the compressed soil holds its shape. Roots air-prune at the block surface rather than circling, producing exceptional root systems. Zero plastic waste.
Why not to start here: Soil block mix requires specific ingredients and ratios to hold together (peat, compost, specific moisture level). The technique has a learning curve. For a first or second season of seed starting, standard plastic trays give more predictable results. Soil blocks are a worthwhile upgrade once you have the process dialed in.
→ Ladbrooke 2-Inch Soil Blocker on Amazon
Complete Recommended Setup — Home Gardener Starting 3–6 Trays
| Item | Quantity | Approx Cost | Notes |
|---|---|---|---|
| 10×20 bottom trays (no holes) | 4 | $$ | Rigid construction — test by pressing the center |
| 72-cell inserts | 4–6 | $ | More inserts than trays = always have clean ones ready |
| 50-cell inserts | 2 | $ | For cucumbers, squash, melons only |
| 7-inch tall humidity domes | 4 | $$ | Taller dome is dramatically more useful than standard 2-inch |
| Plant labels | 1 bag (100) | $ | Permanent marker on white plastic — essential |
| Total | $40–66 | Lasts 3–5 seasons with cleaning |
💡 The label system that actually works
Write directly on the cell insert with a permanent marker for the primary label. Use a plastic plant label in the tray as backup. Tape a piece of paper to the outside of the bottom tray with the tray contents and sowing date. Three-label redundancy sounds excessive until you’ve mistaken a tray of peppers for tomatoes and transplanted them at the wrong time.
The Exact Products We Recommend
📋 Product Note
The products listed below are the specific items referenced in this article — real Amazon listings we’ve verified. Prices change frequently; links go directly to the product page so you can check current pricing and reviews.
| Product | Price Range | Rating | Link |
|---|---|---|---|
| Bootstrap Farmer 72-Cell Starter Kit — Tray + Dome + Insert (2-Pack) The sturdiest consumer-grade tray kit on Amazon. Heavy-duty BPA-free plastic, 5″ tall dome (not the useless 2″ one), cells 1.5″ wide × 2.25″ deep. Made in the US by a family farm. Won’t crack after one season like cheap trays. | $$ | 4.8 | View on Amazon |
| VIVOSUN 10″ × 20.75″ Seedling Heat Mat (pair with trays) Not a tray — but listed here because it pairs directly with standard 10×20 trays. UL certified, 20W, fits one standard tray. Essential for tomatoes and peppers. Combine with the tray kit above for a complete germination setup. | $$ | 4.6 | View on Amazon |
(Prices vary — check Amazon for current pricing. Links above are to the specific products we’ve referenced in this guide.)
Frequently Asked Questions
How many times can I reuse plastic seed starting trays?
Bottom trays (solid): 5–10 seasons with careful handling. Cell inserts: 3–5 seasons — they become brittle over time and cells can crack when you push seedlings out. Humidity domes: 3–5 seasons. Always wash before reuse with diluted bleach solution (1:9 bleach to water), rinse thoroughly, and air dry completely before storing. Skipping cleaning between seasons is the main reason trays fail early — from fungal damage, not physical wear.
Do I need a dome if I'm using a self-watering tray?
Yes — the dome’s job during germination is humidity retention, which is separate from the self-watering system’s job (consistent moisture in the growing medium). Use the dome during germination regardless of tray type. Remove it the moment seedlings emerge.
Can I use egg cartons instead of buying trays?
For a season or two on a very small scale, yes. Cardboard egg cartons hold moisture and can be planted directly. Limitations: cells are small (limiting root space), cardboard becomes structurally weak when wet (hard to move without spilling), and the cardboard can harbor mold. For more than 12–24 seedlings, proper trays are worth the $15–20 investment.
🥬 Related Articles in Our Vegetable Gardening Guide
- Seed Starting Guide — Complete Hub (Start Here)
- How to Start Seeds Indoors — Step-by-Step
- Vegetable Gardening Guide: Grow More Food with Less Frustration
- When to Start Seeds Indoors — Region-by-Region Schedule (2026)
- 15 Seed Starting Mistakes That Kill Seedlings
- How to Harden Off Seedlings — 7-Day Schedule
- Seed Starting Mix vs Potting Mix — What’s the Difference?
- How to Set Up a Seed Starting Station for Under $100
- Beginner’s Guide to Gardening: How to Grow Your First Garden This Season
Final Thoughts
We hope this breakdown saves you from the wrong tray purchase at the start of the season — because the right setup genuinely makes the whole process easier.
72-cell for most crops, 50-cell for the fast-rooting cucurbits, the tall dome everywhere, and rigid bottom trays that don’t flex and spill.
For everything else about the seed starting setup, our seed starting station guide covers lights, heat mats, and mix. And for the full cluster of articles, our Seed Starting Guide hub links to every stage.
Share this post with a fellow gardener who’s ready to get growing — and let us know in the comments which tray type you’re using and whether you’ve switched tray sizes for different crops. Happy growing!