Edging is the part of a garden path most people only think about after the path itself starts misbehaving. Gravel migrates into the lawn. Mulch washes out after a hard rain. Grass creeps in along the borders within a single season.
A good edge solves all of that quietly, and it does double duty as a design element that frames the whole path.
The range of options is genuinely wide — from a $15 roll of plastic edging to a hand-laid brick border that takes a full weekend.
We’ve organized this list by material category so you can find something that fits your budget, your climate, and the overall style of your garden, rather than scrolling through 30 photos with no logic to the order.
By the end, you’ll have a clear sense not just of what looks good, but of what will actually hold up in your specific yard for years to come.
Editor’s Note: For budget and speed, metal or plastic strip edging installs in an afternoon and holds a clean line for years. For a more permanent, higher-end look, brick, stone, or poured concrete edging costs more and takes longer but lasts decades. For a softer, cottage-garden feel, living edges of low groundcover or dwarf shrubs frame a path beautifully without any hard material at all.
Metal and Plastic Edging — Fast, Affordable, Effective
#1 Steel Landscape Edging
Steel edging holds a perfectly straight or gently curved line better than almost any other material, and it develops a soft, weathered patina over time that many gardeners actually prefer to a shiny new finish. It’s a strong choice for modern or minimalist garden styles where a crisp, unobtrusive border is the goal.
#2 Aluminum Edging
Aluminum offers the same clean lines as steel without the risk of rust, making it a better fit for humid climates or anyone who prefers a low-maintenance finish that won’t change color over the years. It’s lightweight enough to install solo even on longer paths.
#3 Black Plastic Strip Edging
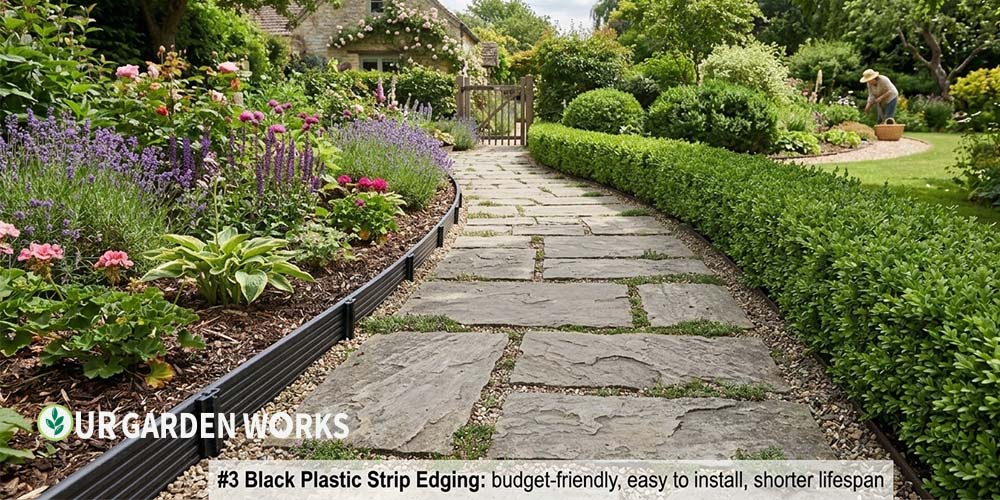
The most budget-friendly option on this entire list, plastic strip edging is sold in long rolls and stakes into the ground in an afternoon. It won’t last as long as metal or stone, typically needing replacement after 8–12 years, but the low upfront cost makes it a sensible choice for a path you’re not yet sure will be permanent.
#4 Recycled Rubber Edging
Made from reclaimed tire rubber, this edging flexes around curves more easily than rigid plastic and resists cracking in freeze-thaw climates significantly better. It’s a particularly good match for a no-dig gravel path, since it can be staked directly over fabric without much ground disturbance.
#5 Corrugated Metal Edging
A slightly more industrial-looking option, corrugated metal edging adds visual texture along a path border rather than the flat profile of standard strip edging. It pairs particularly well with gravel paths in a modern farmhouse or industrial-style garden.
Brick and Masonry Edging — Classic and Permanent
#6 Soldier Course Brick Edging

Bricks set on their narrow end in a single upright row, side by side, create a clean and traditional border that suits almost any garden style. This is one of the most recognizable edging styles, and reclaimed or antique brick gives it an instantly established, lived-in look.
#7 Sailor Course Brick Edging
Bricks laid flat on their wide face rather than standing upright create a lower-profile, slightly more relaxed version of the classic brick border. It’s a good option where you want definition without a tall, visually heavy edge.
#8 Diagonal “Sawtooth” Brick Edging
Bricks set at a 45-degree angle, alternating points up and down, create a decorative zigzag border that’s more ornamental than a straight brick line. It takes longer to install precisely but adds genuine visual interest to an otherwise simple path.
#9 Cobblestone Border
Small, rounded cobblestones set tightly together create a rustic, old-world edge that works beautifully alongside flagstone or gravel paths. The irregular, tumbled look pairs especially well with cottage garden and Mediterranean-style landscaping.
#10 Poured Concrete Curbing
A continuous poured concrete border, sometimes installed with a specialized curbing machine, creates a seamless, permanent edge that won’t shift or need periodic re-leveling the way individual units can. It’s a bigger upfront investment but essentially maintenance-free for decades.
Natural Stone Edging — Organic and Long-Lasting
#11 Fieldstone Border
Irregular fieldstones, stacked or set in a single row along the path edge, create a naturalistic border that looks like it belongs in the landscape rather than something added on top of it. This pairs especially well with a flagstone path using the same or a complementary stone type.
#12 Dry-Stacked Stone Wall Edge
For a path that sits slightly above the surrounding grade, a low dry-stacked stone wall (no mortar) provides both structural retention and a beautiful, rustic border simultaneously. It requires real skill to build well, but the technique has been used for centuries and ages better than almost any other edging material.
#13 River Rock Border
Smooth, rounded river rocks lined along a path edge create a soft, natural-looking transition between the path and surrounding planting beds. They’re easy to install (no mortar or staking required for a simple border) but can shift over time and need occasional repositioning.
#14 Granite Setts
Small, rectangular cut granite blocks, traditionally used in European streets and squares, make an exceptionally durable and elegant path border. They’re among the most expensive options on this list but are essentially permanent once installed.
#15 Mixed Stone Rubble Edge
Rather than uniform stone, a rubble edge uses leftover or mismatched stone pieces from other projects, set together for a charmingly imperfect border. It’s a budget-conscious and sustainable option if you already have stone material on hand from another part of the property.
Wood Edging — Warm and Natural
#16 Pressure-Treated Lumber Border
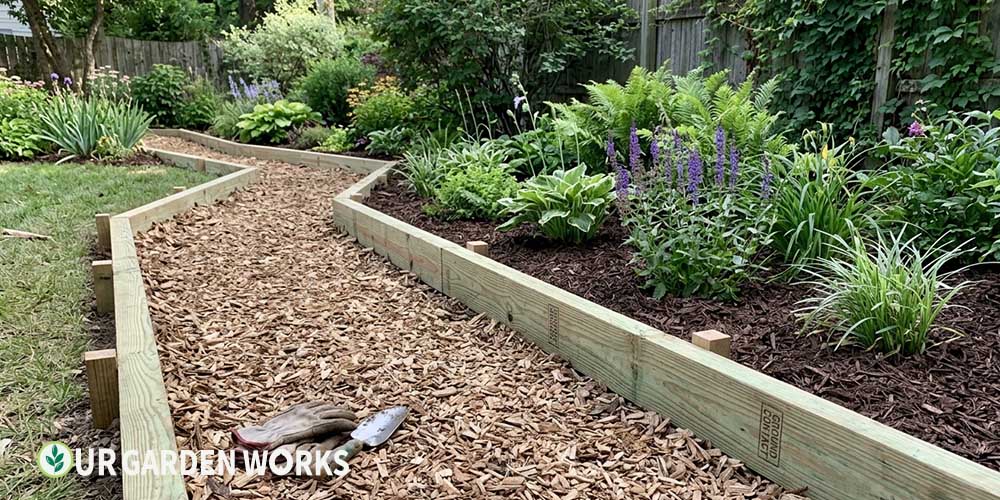
A simple, low border built from pressure-treated lumber is one of the most affordable DIY edging projects and pairs well with mulch or wood-chip paths. Choose rot-resistant treated lumber rated for ground contact to maximize lifespan.
#17 Log Roll Edging
Sold in flexible rolls of small connected logs, this edging curves easily around informal, winding paths and has a distinctly rustic, woodland-garden character. It’s a popular choice for paths through naturalized or native plant areas.
#18 Bamboo Edging
Bamboo poles set vertically side by side make an attractive, fast-growing-feeling border well suited to Asian-inspired or tropical garden styles. It needs replacement sooner than treated lumber but is inexpensive and easy to refresh.
#19 Reclaimed Railroad Ties
Large reclaimed railroad ties create a substantial, rugged border well suited to wider paths or paths through a more rustic or homestead-style landscape. Older creosote-treated ties should be kept away from edible plantings due to chemical leaching concerns.
#20 Cedar Edging Boards
Cedar naturally resists rot and insects better than most untreated woods, making it a good choice for anyone who wants a wood border without pressure-treated chemicals. It weathers to an attractive silver-gray over time if left unsealed.
Living Edges — Plants as the Border
#21 Boxwood Hedge Border
Low, clipped boxwood is the classic formal garden edge, creating crisp green lines along a path that look intentional and tidy year-round, even in winter. It requires regular trimming to maintain its shape but rewards that effort with an enduringly elegant look.
#22 Lavender Border
A row of lavender along a path edge offers fragrance with every brush of a passing leg, plus pollinator activity and silvery foliage that contrasts nicely with most path materials. See our guide to plants for garden paths for more fragrant border options.
#23 Creeping Thyme Edge
Low-growing creeping thyme spills slightly over a path’s edge, softening the hard line between path and bed while releasing fragrance when brushed or stepped on lightly. It tolerates some foot traffic better than most groundcovers.
#24 Liriope (Lily Turf) Border
Liriope forms a tidy, grass-like clumping border that stays evergreen in mild climates and provides a low-maintenance, defined edge without the regular trimming a hedge requires. It tolerates both sun and partial shade well.
#25 Dwarf Mondo Grass Edge
An extremely low, fine-textured grass that creates a soft green ribbon along a path edge, dwarf mondo grass is especially popular in Japanese-inspired garden designs alongside stepping stones or gravel.
Decorative and Specialty Edging
#26 Scalloped Concrete Border Pavers
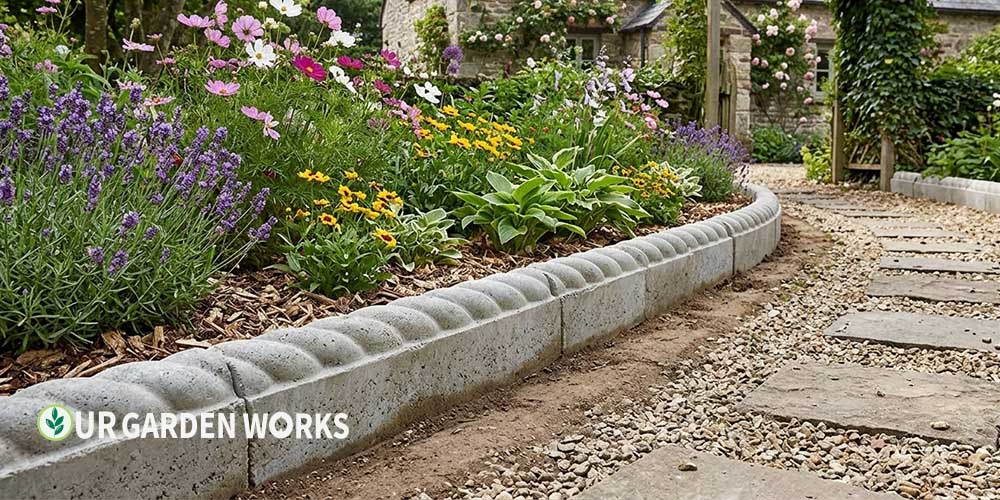
Pre-cast concrete edging units with a decorative scalloped or rope-twist top profile add a Victorian or cottage-garden character at a price point well below natural stone. They’re widely available and simple to install in a shallow trench.
#27 Glass Bottle Border
An old homesteading technique, glass bottles buried neck-down in a row create a surprisingly durable and visually striking border, especially when colored glass catches afternoon light. It’s an inexpensive, upcycled option with genuine personality.
#28 Wattle Fencing Border
Woven willow or hazel branches in a low wattle fence style create a charming, cottage-garden border that’s biodegradable and needs periodic replacement every few years. It’s a beautiful, low-cost option for anyone drawn to traditional craft techniques.
#29 Solar Light Border
Not a structural edging material on its own, but small solar path lights set along the border of any of the materials above add both definition and functional nighttime visibility. This is a popular finishing touch layered on top of a hard or living edge rather than a standalone border choice.
#30 No Edge — Mowing Strip Instead
For paths bordered directly by lawn, a simple mowing strip (a narrow band of flush-set brick or concrete just wide enough for a mower wheel) eliminates the need for a raised edge entirely while still preventing grass from creeping into the path material. It’s a practical, nearly invisible solution for low-maintenance gardens.
What Edging Actually Costs — A Realistic Budget Breakdown
Cost is often the deciding factor once the visual appeal of several options looks roughly equal, so it’s worth laying out real numbers rather than vague price symbols.
For a 30-foot path edge, plastic strip edging runs $25–50 total in materials — by far the cheapest entry point on this entire list. Metal edging (steel or aluminum) for the same length runs $80–150, reflecting both the material cost and its considerably longer lifespan.
Brick edging costs more in materials but the real expense is often labor and time if you’re hiring it out — expect $200–500 for a 30-foot soldier-course brick border installed by a landscaper, or considerably less if you’re comfortable doing the digging and setting yourself over a weekend.
Natural stone sits at the top of the cost range, with fieldstone or fitted stone borders for the same length running $300–700 depending on stone type and local availability.
Living edges are deceptively cheap upfront — a row of liriope or creeping thyme plugs for 30 feet might run $40–80 — but carry an ongoing cost in time rather than money, since regular trimming and occasional replacement of plants that don’t establish well adds up over years in a way the one-time cost of metal or stone never does.
Edging Choices by Climate and Region
Not every edging material performs equally well everywhere, and choosing based on appearance alone without considering your specific climate is one of the more common regrets gardeners report a few years into a project.
In regions with significant freeze-thaw cycling — much of the upper Midwest, Northeast, and mountain West — rigid materials like brick set without a proper footing, or thin concrete edging, are prone to heaving and cracking as the ground expands and contracts through winter.
Flexible materials (rubber edging, well-anchored metal strip) tolerate this movement far better, as does brick or stone set in a proper sand or gravel bed rather than rigid mortar.
In hot, dry climates, wood edging faces a different challenge — UV exposure and low humidity accelerate splitting and graying faster than in more temperate regions, making cedar or composite materials a better long-term investment than basic pressure-treated pine.
Coastal and high-humidity climates favor rot- and corrosion-resistant choices specifically: aluminum over steel (to avoid rust), and naturally rot-resistant woods like cedar or tropical hardwoods over standard treated lumber, which can degrade faster in consistently damp ground.
If you’re unsure which category your climate falls into, your local extension office or a nearby landscape supplier can usually tell you which edging materials they see holding up well in your specific area over time.
How to Choose the Right Edging for Your Path
With 30 options on the table, narrowing down to the right one comes down to answering a few practical questions before you fall in love with a particular look.
What’s your path material? Gravel and mulch need contained, raised edging to prevent migration, while flagstone or pavers can often get away with little to no formal edging at all.
What’s your climate? Freeze-thaw regions favor flexible materials (rubber, well-set brick) over rigid ones that crack under ground movement.
What’s your maintenance appetite? Living edges look wonderful but need ongoing trimming, while metal, stone, and concrete options are essentially set-and-forget once installed.
| Edging Category | Cost | Lifespan | Maintenance |
|---|---|---|---|
| Metal/Plastic Strip | $ | 8–25 years | Very low |
| Brick/Masonry | $$$ | 30+ years | Low |
| Natural Stone | $$$$ | 50+ years | Very low |
| Wood | $$ | 10–20 years | Low–moderate |
| Living Edge | $ | Ongoing | High (regular trimming) |
Common Edging Installation Mistakes
A handful of mistakes show up repeatedly across edging projects regardless of which material you choose, and most of them are easy to avoid once you know to look for them.
The most common is installing edging too shallow — anything less than 2 inches into the ground tends to work itself loose within a season or two as foot traffic, lawn mowing, and seasonal ground movement gradually push it out of position.
The second common mistake is failing to follow the path’s actual grade. Edging installed without accounting for slope can end up trapping water against one side of the path rather than allowing it to drain naturally, which leads to soggy gravel, washed-out mulch, or standing puddles after rain.
Walk the path’s full length and note where water naturally wants to flow before committing to edging height and placement.
A third frequent issue is mismatching edging height to path material. An edging set too high above a gravel or mulch path creates an awkward lip that catches feet and mower wheels; an edging set too low fails to actually contain loose material, defeating its entire purpose.
The edging’s visible height above the path surface should typically be no more than 1–2 inches for a clean, functional look.
Frequently Asked Questions
Do I need edging if my path is made of flagstone or pavers?
Not always — flagstone and large pavers are heavy and stable enough to hold their position without containment. Edging on these path types is usually a design choice rather than a structural necessity, mainly used to define the transition into surrounding lawn or beds and keep grass from creeping into the joints.
What's the easiest edging to install myself?
Plastic or metal strip edging is the simplest DIY option — it typically just requires digging a shallow trench, setting the edging in place, and securing it with stakes driven through pre-made holes along the strip. Most home gardeners can edge a 30-foot path in an afternoon with no special tools.
Can I combine a hard edge and a living edge along the same path?
Yes, and it’s a popular layered approach — a low metal or stone edge contains gravel or mulch structurally, while a row of lavender, liriope, or another groundcover is planted just behind it for softness and color. The hard edge does the functional work while the planting does the visual work.
How deep should I set edging material?
Most rigid edging (metal, plastic, brick) is set 2–4 inches into the ground, with stakes or a shallow trench providing additional stability. Anything shallower tends to shift or get pushed out of alignment by foot traffic, lawn equipment, or seasonal ground movement over a few years.
Will tree roots damage rigid edging over time?
Yes, this is a real risk near established trees, especially fast-growing or shallow-rooted species. Rigid materials like poured concrete or fitted stone can crack or heave as roots expand beneath them, while flexible options like metal strip edging or a living border are more forgiving of this gradual movement. If your path runs near mature trees, factor root growth into your material choice rather than assuming the ground beneath will stay stable indefinitely.
How do I keep grass from creeping under or over my edging?
Setting edging deep enough (2–4 inches, as covered above) handles most below-ground creep from rhizomatous grasses. For grass creeping over the top of low edging, a periodic edging trim with a half-moon edger or string trimmer along the border keeps the line crisp — this is an ongoing maintenance task regardless of which edging material you choose, since lawn grass will always attempt to encroach on a bordering path over a growing season.
Related Articles in Our Garden Paths Guide
Final Thoughts
We hope this list has given you a clearer sense of just how many directions a simple garden path border can take — from a $15 roll of plastic edging to a hand-built stone wall, there’s a version of this project for every budget and skill level.
For all our backyard and landscaping guides, our backyard design guide hub links to everything in this series.
Share this post with a fellow gardener who’s ready to start their own path project — and let us know in the comments which edging style fits your garden best. Happy growing!