(Set your garden bed dimensions, then drag and drop crops into the grid. The designer automatically enforces correct spacing for each crop, flags companion planting conflicts, and shows how many plants fit.)
The best time to fix a garden layout mistake is before anything is in the ground. Discovering mid-June that your indeterminate tomatoes are shading your peppers, or that you planted fennel next to your beans, or that your bed is overcrowded by 40%.
These are all problems that a few minutes of planning prevents entirely. The layout designer lets you make those mistakes on a screen instead of in the soil.
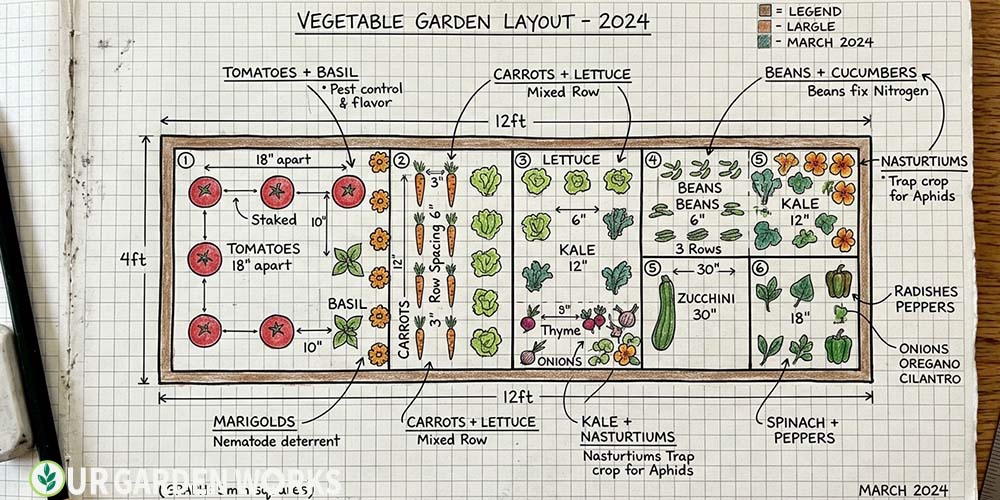
Editor’s Note: The designer uses the same square foot spacing standards as our plant spacing calculator — 1 tomato per 4 square feet, 4 lettuces per square foot, 9 beans per square foot. Place crops from tallest (north end of bed) to shortest (south end), companions near their partners, and the designer flags any spacing or companion conflicts as you place them.
Layout Planning Principles — What the Designer Applies Automatically
Sun orientation: Tallest crops go at the north end of the bed so they don’t shade shorter crops. The designer orders a north-to-south height gradient automatically based on your crop selections.
Square foot spacing: Each crop type has a defined footprint based on its mature size. The designer prevents overlap and shows exactly how many of each crop fit in the available space.
Companion conflict detection: Some crop combinations actively harm each other — fennel near most vegetables, onions near beans and peas, potatoes near tomatoes. The designer flags these conflicts when you place conflicting crops in adjacent squares.
Companion suggestions: When you place a crop, the designer suggests which companions work well nearby — so you can fill empty squares with plants that actively benefit their neighbours rather than neutral fill plants.
For the manual reference version of these rules, our companion planting tool and companion planting chart cover every major crop. Our vegetable garden planner gives you plant counts and spacing data for any bed dimension.
A Step-By-Step Layout Planning Process
Step 1 — Set Your Bed Dimensions
Enter length and width in feet. Standard raised beds: 4×4 (beginner), 4×8 (most versatile), 4×12 (maximised production). Width should never exceed 4 feet — you should always be able to reach the centre from either side without stepping in the bed.
Step 2 — Enter Your Zone and Frost Dates
The designer uses your frost dates to flag crops that are seasonally appropriate for your current planting window — so you can plan for spring, summer, and fall sections of the same bed in sequence. Use our frost dates tool to get your exact dates.
Step 3 — Place Tall Crops First
Start with your tallest crops at the north end and work south. Tomatoes, trellised cucumbers, pole beans — these define the structure of the bed. Everything else fills in around them.
Step 4 — Fill with Companions and Utilitarian Plants
The gaps between and around your main crops are where companions earn their keep. Basil between tomatoes, marigolds at the edges, sweet alyssum at the front edge for beneficial insect attraction, chives along the sides for aphid deterrence.
Step 5 — Plan the Succession
Before you commit, note which crops will finish early (spring lettuce, peas, radishes) and what will replace them in the same space (summer transplants, bean succession). The layout becomes a timeline as much as a spatial plan.
Frequently Asked Questions
My layout looks crowded — is that okay?
If the designer says it is not overcrowded (all spacing requirements are met), then a visually dense layout is correct for intensive raised bed gardening. Dense planting suppresses weeds by shading the soil surface, keeps the soil cooler in summer, and is the hallmark of productive intensive gardens. If the designer is flagging spacing violations, those are worth addressing — but denseness that complies with spacing requirements is a feature, not a problem.
Can I plan a fall garden in the same layout as my spring garden?
Yes — the best layouts plan both seasons in the same bed. Use the succession toggle to show two layers: what occupies each square in spring, and what replaces it in late summer for the fall harvest. The spring layer (peas, lettuce, spinach) clears out by June; the fall layer (broccoli, kale, carrots) goes in for August–November harvest. Planning both at once prevents the gap that leaves productive bed space empty through July.
Free Tools & Guides:
Final Thoughts
We hope the layout designer saves you from the mid-season discoveries that send experienced gardeners back to the drawing board. Planning on screen takes 10 minutes; fixing a crowded, conflicting bed mid-summer takes all season. For the companion planting reference that feeds the designer’s conflict detection, our companion planting chart is the complete guide.
Share this free tool with a fellow gardener who has been sketching garden layouts on paper and making the same spacing mistakes year after year — and let us know in the comments how it helped. Happy growing!