

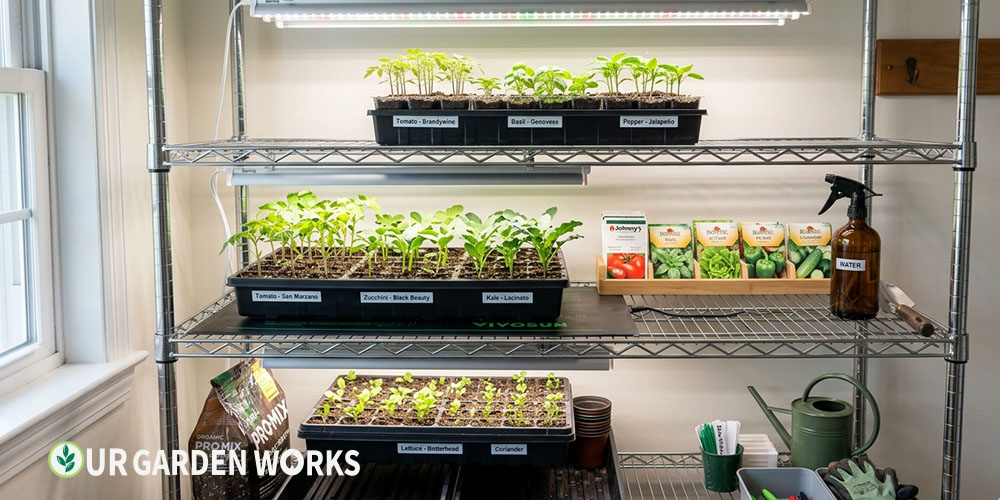
Walk into any gardening store in January and you’ll find seed starting setups that cost $300, $500, or more — elaborate grow tent systems with programmable lights, humidity controllers, and enough equipment to make a home gardener feel like they need a greenhouse budget just to start a few tomatoes.
We’ve been starting seeds for years on a $60 setup that outperforms what most beginner gardeners buy.
The expensive stuff exists, but it’s not necessary for a home garden. What matters is getting 3 things right: light, warmth, and moisture. You can nail all three for under $100 — and we’re going to show you exactly how.
In this guide we’ll walk through every component you need, the affordable products that actually work, and the ones you can skip entirely.
By the end, you’ll have a complete shopping list and a setup that will serve you for the next 10 years.
How to Set Up a Seed Starting Station for Under $100: A functional seed starting station needs: (1) a grow light ($$), (2) a heat mat ($$), (3) seedling trays with domes ($$), (4) seed-starting mix ($$), and (5) a spray bottle ($5). Total: $82–$118. Everything else is optional. The grow light is the most important purchase — don’t save money here.
In a Hurry? Here are the 5 essentials you need:
(We are reader-supported. We may earn commissions when you purchase through our links)
The 5 Things You Actually Need
Strip everything back and a functional seed starting station has exactly five components. Everything else is an upgrade, not a requirement.
1. Grow Light — Don’t Skip This One
This is the non-negotiable. A south-facing window provides 4–6 hours of usable light on a good winter day. Vegetables want 14–16 hours for compact, strong growth. The gap produces the pale, leggy seedlings that every beginning gardener recognizes — the ones that fall over, transplant poorly, and never fully catch up.
The good news: grow lights have gotten dramatically cheaper and better in the last five years. You do not need a $150 full-spectrum commercial fixture. A basic LED T5 or T8-style grow light does the job reliably.
💡 Recommended Grow Lights (Budget Range)
- Barrina T5 LED grow light strip (4-pack): The most recommended budget option by home gardeners. Four 2-foot strips connected in a chain. Covers a standard 10×20 seedling flat. Clip or hang 2–4 inches above seedling tops. Full-spectrum, low heat, easy to hang.
- MARS HYDRO TS 600 or similar panel: A step up in intensity and coverage. Good choice if you’re growing 3–4 trays simultaneously or have a dedicated shelf setup.
- Avoid: Single incandescent or CFL “plant bulbs” in desk lamps — insufficient coverage and intensity for starting more than 1–2 plants.
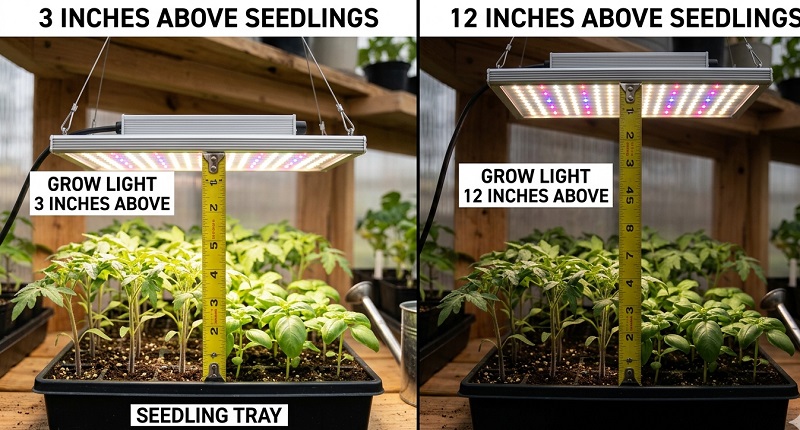
Positioning rule: The light should be 2–4 inches above the tops of your seedlings, not 12 inches above the shelf. As seedlings grow, raise the light. The difference in intensity between 3 inches and 12 inches is enormous — a light that works well at 3 inches may be nearly useless at 12.
Timer: A basic outlet timer ($8–12) is essential. Set it for 14–16 hours on, 8–10 hours off, same time every day. Consistent photoperiod matters. Don’t rely on remembering to turn it on and off.
2. Heat Mat — Especially for Peppers and Tomatoes
A heat mat sits under your seedling trays and warms the growing medium to 70–80°F — the ideal germination temperature for most vegetables. Seeds that take 14+ days without bottom heat germinate in 5–7 days with it. Peppers in particular are dramatically affected by soil temperature at germination.
This is a one-time purchase that lasts for years. Basic heat mats without thermostats work for most home setups — they typically raise the growing medium 10–20°F above ambient room temperature, which is sufficient when your house is around 65°F.
Editor’s Note: Remove trays from the heat mat once seedlings have germinated and moved to the grow light. The heat mat is for germination — not for the entire seedling growing period.
3. Seedling Trays and Humidity Domes
Standard 10×20 inch seedling trays with cell inserts and a clear plastic dome are the industry standard for a reason — they’re inexpensive, reusable for many seasons, and the dome holds the humidity seedlings need during germination.
- 10×20 bottom tray (no holes): The base — used for bottom watering and as a drip tray. Get 2–3.
- Cell inserts: 72-cell for most vegetables, 128-cell for flowers and small seeds, 50-cell for cucumbers and squash (they need more root space). Get one or two of each type.
- Clear domes: One per tray. The taller 7-inch domes work better than the standard 2-inch for tomatoes and peppers that grow quickly after germination.
- Cost: $10–18 for a full tray + insert + dome set.
4. Seed-Starting Mix
Do not use potting mix or garden soil to start seeds. Buy a bag of proper seed-starting mix — fine-textured, sterile, and formulated specifically for germination. One large bag ($$) is enough for 2–3 full-sized trays.
For a detailed comparison of what to buy and why the difference matters, see our seed starting mix vs potting mix guide. Or if you want to make your own, we have a DIY seed starting mix recipe that costs about half as much per batch as commercial mix.
5. Spray Bottle
A 5 bucks adjustable spray bottle for misting the surface during germination and for the first week of seedling growth. After that, you’ll switch to bottom watering (setting trays in a shallow dish of water). The spray bottle stays useful for the whole season.
The Optional Upgrades (Worth Having, Not Required)
Wire Shelving Unit ($$)
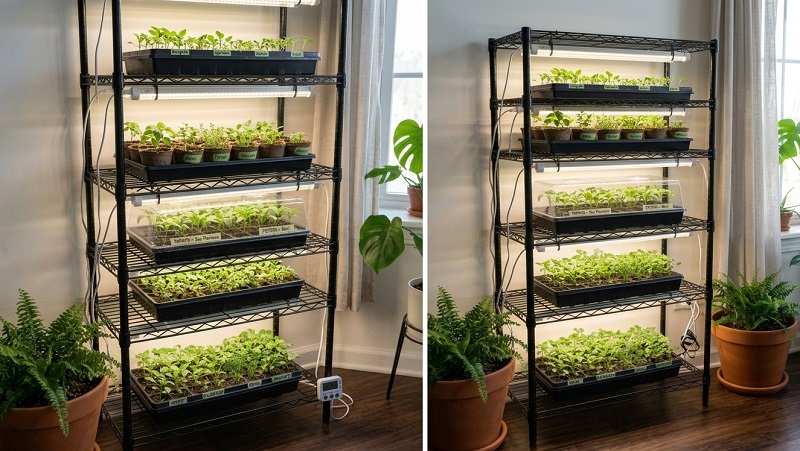
A wire shelving unit with adjustable shelves lets you set up multiple tray levels — one per shelf, one grow light per shelf. This turns one corner of a basement, garage, or spare room into a legitimate seed-starting station with 4–6 trays of capacity. The wire allows good airflow between shelves.
A standard 5-tier metal wire shelf ($$ at any home improvement store) with grow lights mounted to the underside of each shelf is the setup we use and recommend for anyone growing more than 2 trays at a time.
Small Fan ($$)
A small clip-on or desk fan aimed gently at your seedlings does two important things: it prevents the still, humid air that leads to damping off (the fungal disease that kills seedlings at the soil line), and it causes gentle stem movement that stimulates stronger, thicker stem development. Seedlings grown with airflow transplant better and stand upright more reliably after going outside.
Set the fan on its lowest setting and direct it toward (not directly onto) the seedlings. Even 2–3 hours of gentle airflow per day makes a measurable difference.
Thermostat for Heat Mat ($$)
A heat mat thermostat lets you set an exact soil temperature rather than relying on the mat’s fixed output. Useful if your growing space runs warm (the mat might overheat without a thermostat) or if you want to dial in germination temperatures precisely for specific crops. Not necessary for most home setups where room temperature is between 60–70°F.
Complete Full Shopping List — Under $100
| Item | Budget Option | Approx. Cost |
|---|---|---|
| Grow light (essential) | Barrina T5 LED 4-pack or similar | $$ |
| Outlet timer | Any basic 2-prong outlet timer | $ |
| Heat mat | VIVOSUN Seedling Heat Mat 10″ × 20.75″ | $$ |
| Seedling trays + inserts + dome | 72-cell starter kit (tray + insert + dome) | $$ |
| Seed-starting mix | Espoma Organic Seed Starter (16 qt) | $$ |
| Spray bottle | Any 32 oz adjustable spray bottle | $ |
| Total (essential only) | $90–120 | |
| Wire shelving (optional) | 5-tier metal wire shelf | $$ |
| Small fan (optional) | Clip fan | $$ |
| Total with optional upgrades | $140–190 |
💡 Build vs. buy the complete kit
Buying the 5 essentials separately from the list above runs $85–120 total and lets you choose quality at each category. Pre-assembled “seed starting kit” bundles at similar prices often include a cheap single-strip grow light (insufficient for a full tray) and a no-name heat mat. Separating the purchases means you get the right light intensity and a certified heat mat — the two items where quality actually matters.
💡 Where to save money
Seedling trays are reusable for 3–5 seasons with proper cleaning (diluted bleach solution between seasons). The heat mat lasts for years. The grow light, if it’s LED, lasts 5+ years. These are one-time purchases that amortize to almost nothing per year. The only recurring costs are seed-starting mix and seeds — both very inexpensive per season.
Setting Up the Station — Step by Step
How to Set Up Your Station
- Choose your location. Seed-starting stations work in basements, garages, spare rooms, or any space with a power outlet. Temperature should be 60–70°F ambient. You don’t need natural light — the grow light provides everything.
- Set up your shelving (if using). Assemble the wire shelf and place it where you have access to a power outlet. Leave 12–18 inches between shelf levels for the seedling trays + dome height + grow light clearance.
- Mount the grow light. Hang or clip the grow light to the underside of the shelf above, or directly above the growing surface. Adjust so the light sits 2–4 inches above where your seedling tops will be. You’ll raise it as plants grow.
- Connect the timer. Plug the grow light into the timer. Set to run 14–16 hours on, 8–10 hours off. Set it to turn on in the morning — consistency matters more than the specific hours.
- Place the heat mat. Set the heat mat on your growing surface. It goes under the seedling trays during germination only.
- Label everything. Before you sow a single seed, prepare labels. Seedlings are completely indistinguishable for the first 2 weeks. Unlabeled trays = mystery plants.
- You’re ready to sow. Pre-moisten your seed-starting mix, fill trays, sow seeds, dome, place on heat mat. For complete sowing instructions, see our full seed-starting guide.
Frequently Asked Questions
Can I use a regular LED bulb instead of a grow light?
A regular white LED has some useful spectrum but lacks the intensity and coverage a seedling tray needs. You might successfully grow one or two plants directly under a bright white LED, but for a tray of 72 seedlings, you need a purpose-designed grow light with adequate intensity across the full tray. The $35–45 grow lights recommended above provide intensity that regular LEDs can’t match.
Do I need a grow tent?
No. Grow tents are designed for plants that need maximum light intensity (cannabis, high-light tropicals) or for situations where you need temperature and humidity control. For starting vegetable seedlings, an open shelf setup with a good grow light works perfectly well and costs far less. Don’t buy a tent unless you have a specific reason beyond seed starting.
How many trays can I run on one grow light?
One 4-strip T5 LED set (like the Barrina 4-pack) effectively covers one standard 10×20 tray when positioned 2–4 inches above. For two side-by-side trays, get two sets of strips or a panel light with a larger footprint. More light is better for seedlings — if in doubt, add another strip rather than spreading one light over more area.
Where should I put the seed starting station if I don't have a basement?
Any room works — the grow light provides all the light you need regardless of the room’s natural light. Good options: a spare bedroom corner, a closet with the door open, a bathroom with good circulation, a laundry room. The only requirements are ambient temperature of 60–70°F and access to a power outlet. A garage works in mild climates but can get too cold in January in Zone 5 and colder.
Read our Full Seed Starting Guides:
- Seed Starting Guide: From First Seed to First Transplant
- How to Start Seeds Indoors — Complete Setup Guide
- 15 Seed Starting Mistakes That Kill Seedlings
- Seed Starting Mix vs. Potting Mix — What’s the Difference and When to Use Each
- Best Seed Starting Mix — DIY vs. Store-Bought
- When to Start Seeds Indoors — Region-by-Region Schedule (2026)
- Vegetable Gardening Guide
Final Thoughts
We hope this guide has taken the mystery (and the unnecessary expense) out of setting up your first seed starting station.
The three things that matter — enough light, bottom heat during germination, and consistent moisture — are all achievable for under $100, and the equipment pays for itself in the first season of transplants you don’t have to buy from a garden center. For timing help — when to set everything up and start sowing — our free seed starting calculator gives you exact dates for your ZIP code.
Share this post with a fellow gardener who’s ready to get growing — and let us know in the comments what your setup looks like and how much you spent — we love seeing the creative solutions readers come up with. Happy growing!
