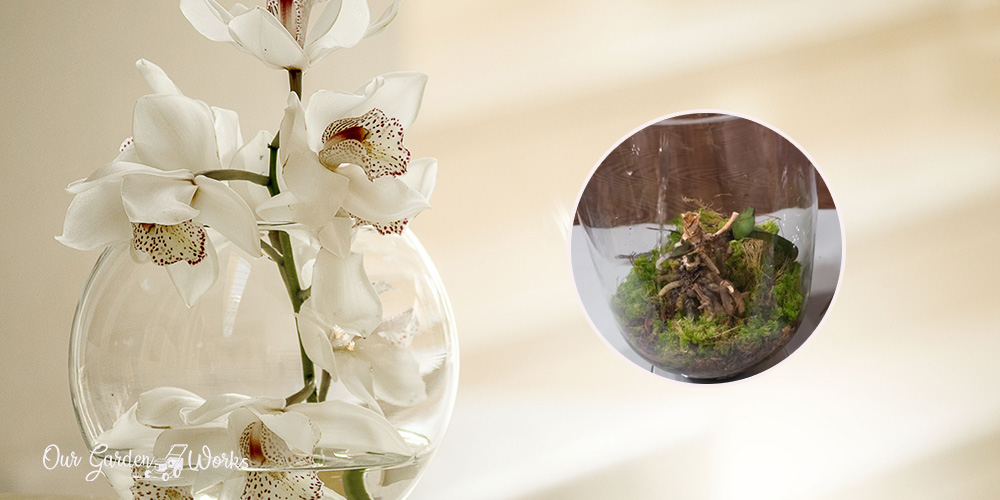
Orchids have a reputation as tough houseplants. However, one thing that you should know about them is their resilience. Novice orchid owners who don’t know how to revive a dying orchid often throw them in the trash without even trying to save them.
Editor’s Note: Most orchid “deaths” are recoverable if you catch them early enough. This guide walks through the most common causes and their fixes. Orchids are just one of dozens of houseplants covered in our complete plant care guide — which includes diagnosing yellow leaves, brown tips, drooping, and root rot across every common indoor species.
In this post, we will share how to check if the orchid can still be saved and help it on the path to recovery to bloom again.
However, you should note that not all dying orchids have a big chance of survival. Before you dig into the rabbit hole of saving your orchids, inspect the orchids first if you can still save them.
(You could use the table of contents below to jump to the sections that are most important to you.)
Can you still save your orchid?
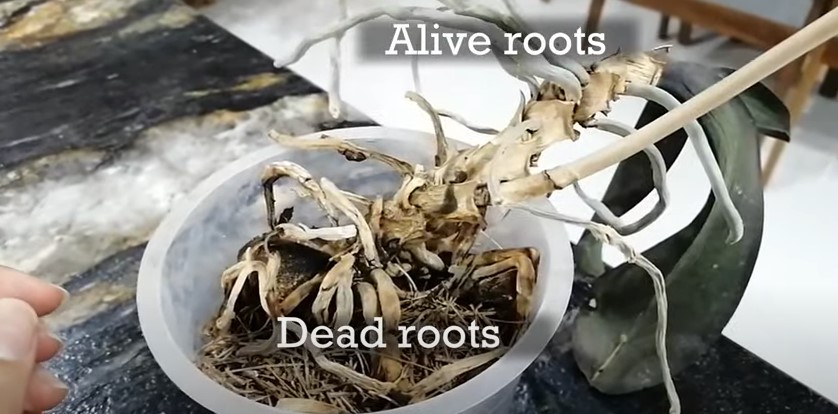
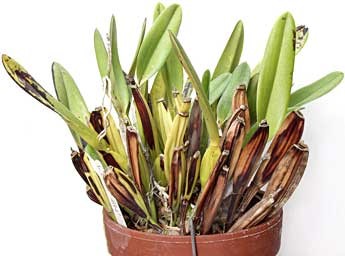
Not all orchids with green and hard roots can still be saved. Consequently, not all dying orchids with the most rotting roots are already dead.
As you pull up the orchid to inspect its roots, check out the signs if it’s still worth reviving or not:
How to check if the orchids can still live
Keep in mind that an orchid’s core stem is essential to its revival. It is the powerhouse that allows the plant to generate new roots and stems.
Good roots are also essential to keep the whole plant alive. Without either of the two, the orchid will have a slim chance of survival.
(1) As you remove the substrate or potting medium, check for the health of the core. Touch it and verify if it’s hard and still has some colors to it.
If the core has already dried up, even if it has multiple viable roots, it can no longer be saved.
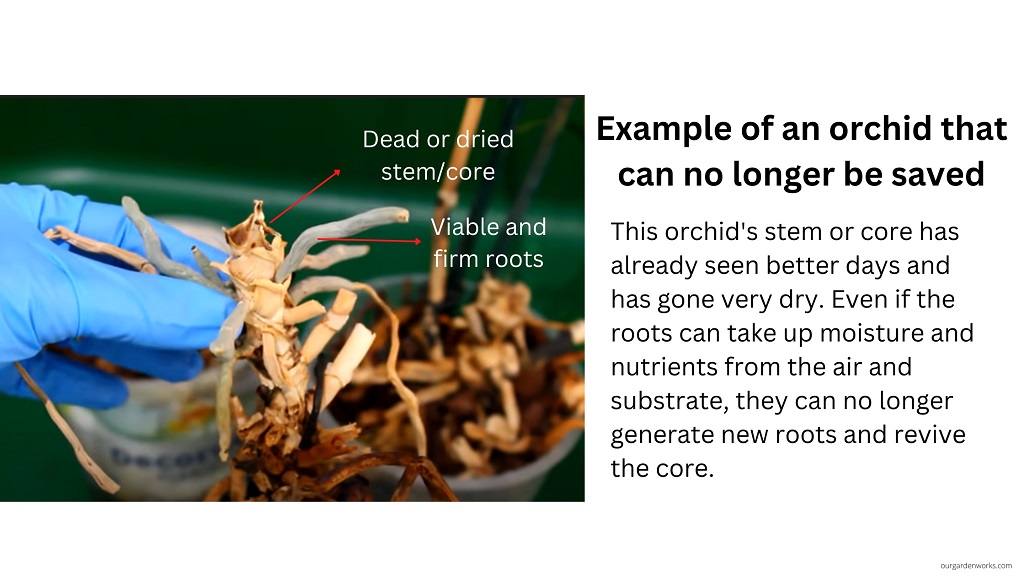
Dried and rotten core is a common problem involved with crown rot or stem rot. Always remember that good and firm roots are not enough to guarantee that the orchid can survive.
(2) If the orchid has a dead core and dead roots but still has a surviving Keiki, it can still survive. The Keiki should have enough roots to grow into a new plant.
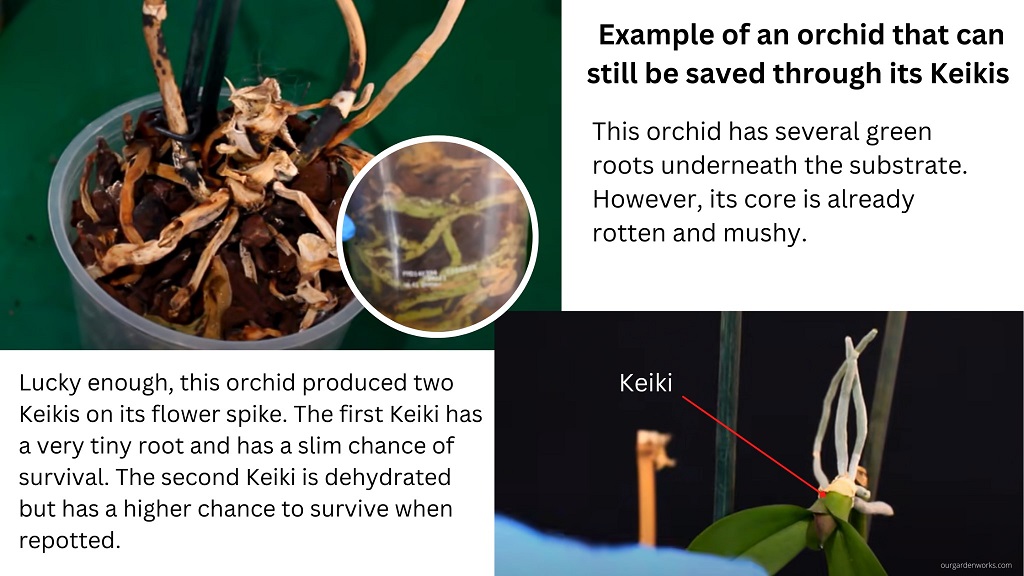
Keiki is a Hawaiian term that means the little one. It is a plant produced from a mother orchid asexually. It is an exact clone of the mother orchid plant and can still grow into a new plant when detached from the mother.
(3) If an orchid has a healthy and firm stem, intact leaves, and a couple of viable roots, it has a very high chance of survival.
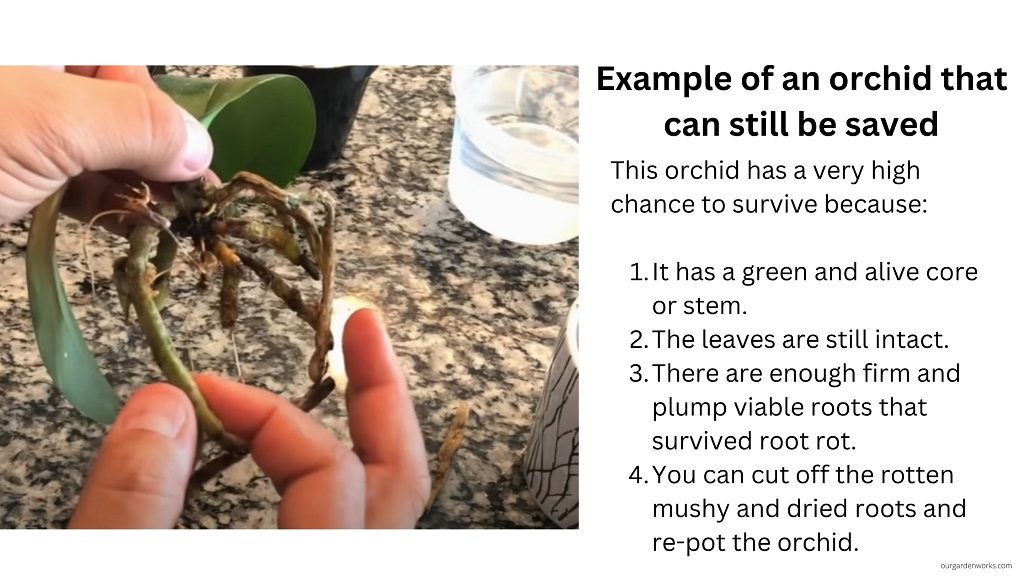
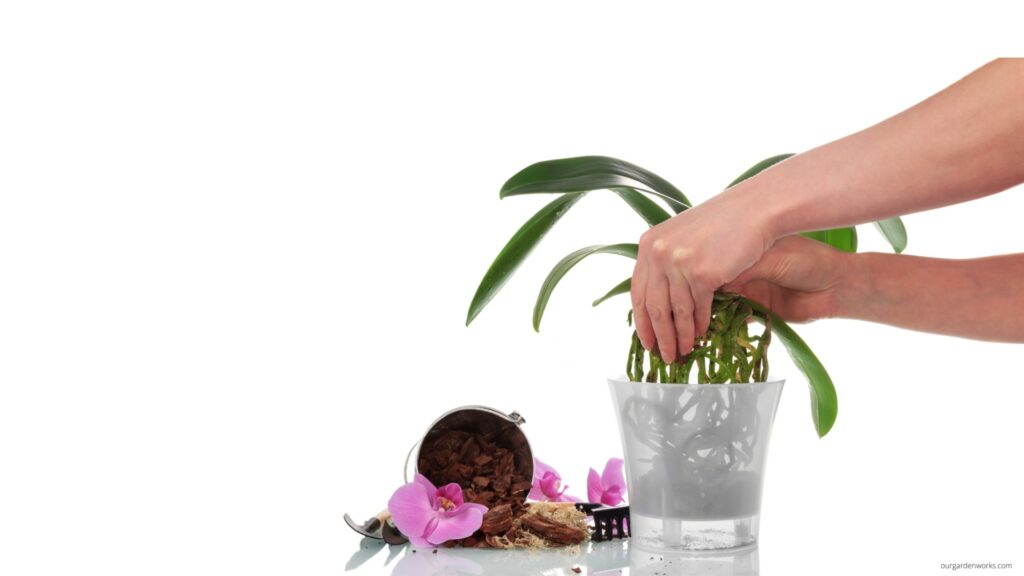
All you need to do is get rid of the rotten parts and re-pot them in a specialized potting medium to help them recover.
How to revive orchids and make them bloom again
Once you notice that there’s still a ray of hope for your orchid, figure out the reason why it died. Then, start placing it in its new home and let it recover for a couple of days or weeks.
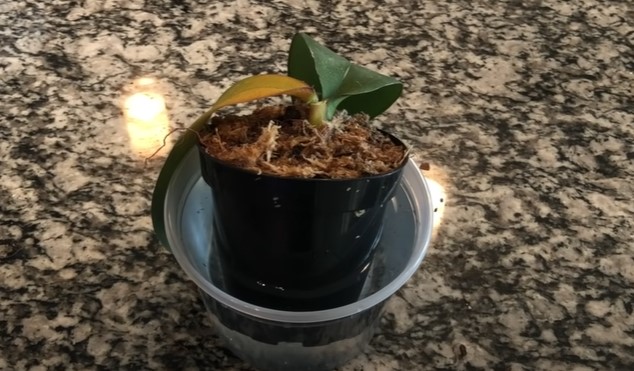
Here are some step-by-step processes and some images to help you save your orchids:
1. Find the root cause of the problem
Every sick orchid is different and it takes a special approach to improve its health.
Finding the root cause of the problem allows you to come up with the best solution and prevent it from experiencing plant stress again.
Problem #1: Overwatering
Too much love can kill orchids, especially with excessive watering.
Overwatering is the most common cause of killing an orchid because they have a unique process of accumulating moisture. Orchids absorb moisture in the air and its substrate but prolonged exposure to moisture can cause root rot.
Signs of an overwatered orchid
- Mushy and rotten roots.
- Yellowing leaves.
- No blooms.
- Bad smell.
- Limp leaves (you can fold the leaves)
The common cause of overwatering is the practice of frequent watering or misting and using a no-drainage orchid pot. The roots of orchids require more air and space to breathe and placing them in a breathable pot can help them thrive.
Most orchids bought from nurseries come with a very packed peat moss which can constrict the airflow and cause overwatering and rotting issues.
Make sure to pull the orchid from the pot after buying them and reduce the compaction of peat moss to let the roots breathe well.
Problem #2: Underwatering
Lack of love can also kill your orchids. Underwatered orchids often happen when there’s not enough moisture in the air or it didn’t have any water for a couple of weeks.
Though orchids can absorb moisture in the air, if most of their roots are attached to a substrate in a pot, they will suffer drought stress.
Signs that an orchid is underwatered
- Dry and shriveled roots.
- Limp and stressed leaves.
- Roots on top of the pot are thriving.
Compared to the mushy roots of an overwatered orchid, under-watered orchids have very dry roots wherein you can fold and squeeze them. The folded leaves lack moisture that keeps them from getting plump.
Problem #3: Too much water retention or overpotting
Orchids need to be potted in a container that is just enough for their roots to grow.
Planting a small orchid in a very big pot can drain slowly and retain too much water. Prolonged exposure of orchid roots to moisture will end up in root rot.
The rule of thumb in potting an orchid is to ensure that the roots and substrate are in an equal ratio. There should also be enough air pockets in the substrate that will allow the roots to absorb oxygen.
To check if you got the right ratio, the water should be drained immediately an hour or two after you water them.
If it’s still soggy then you have to replace the pot with a smaller size or add variety to the substrate like 50% pine bark and 50% coconut fiber.
Problem #4: Low humidity
The natural habitat of orchids is in tropical forests where moisture is abundant in the air.
Most types of orchids require around 60% to 80% humidity and they’ll need more during the hot summer season when the air is too dry.
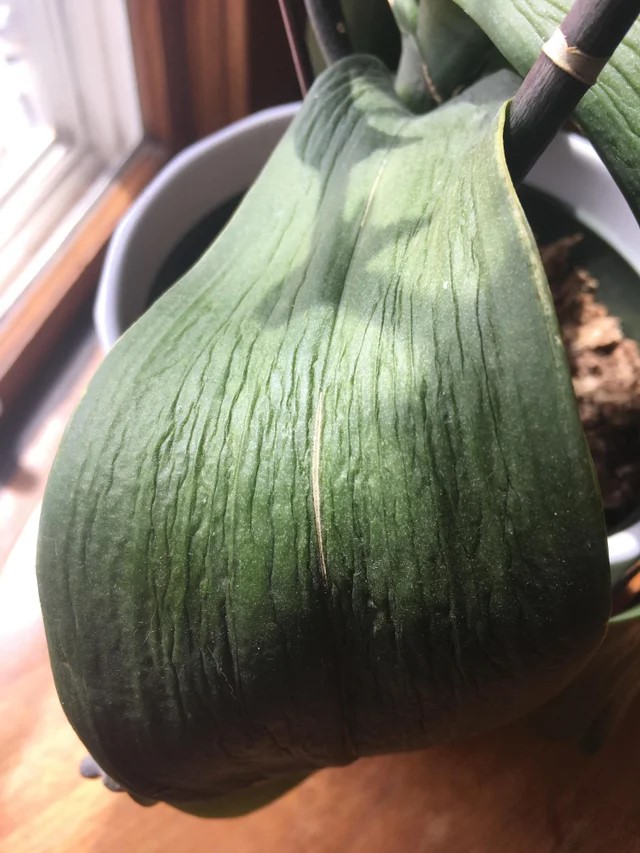
Signs that an orchid needs more humidity in the air
- Wrinkled leaves
- Deformed buds or bud blasts
Misting is the most common way to improve indoor humidity. Other options include adding some houseplants indoors, placing some humidity trays underneath the orchid pots, and investing in humidifiers.
Problem #5: Too much airflow, extreme temperatures, or temperature fluctuations
Ventilation and temperature are crucial factors that contribute to the overall health of orchids. Moderate airflow helps retain the microclimate in the orchid pot and keeps the leaves happy from the humid air.
However, too much airflow and cold drafts can shock and stress the orchids.
Optimal airflow helps orchids to:
- Continuously absorb carbon dioxide to make plant tissues during the day.
- Cool down the leaf surface when it’s receiving bright light and the air temperature is hot.
- Manage the photosynthetic processes by preventing the leaves from reaching their heat limit wherein stops the chlorophyll process.
Extreme heat and cold can also kill orchids. According to the American Orchid Society, the ideal temperature for orchids is 50°F to 80° F (10° to 27° C) as long as there’s no threat of frost.
Cold or chill injury in orchids often shows up not during the cold temperature occurred but after. Cold and chill injury symptoms include:
- Stunted growth.
- Browning of leaves and roots.
- Leaf lesions.
- Sunken areas on the leaves.
- Rapid death.
- Cold burns on the leaves.
- Necrotic spots.
To treat cold-stressed orchids, place them in a humid location and allow the potting mix to dry. Keep them away from direct sunlight. Let them recover and produce new roots before you start watering again with water.
When new roots start to emerge, you can start watering them with minimal fertilizer.
Heat-stressed orchids take some time to recover. They’ll need frequent watering and high humidity from misting to avoid drying out due to the dry airflow.
You should also use fertilizers sparingly and flush the substrate after fertilization to avoid the accumulation of fertilizer salts. Too much salt in the substrate worsens the stress of orchids due to chemical burns on the roots.
Temperature-stressed orchids are particularly vulnerable to fungal diseases and pests. Make sure to apply preventive fungicides to keep them safe from contaminants.
Pro tip: Some orchids need an occasional winter chill. The cold helps enhance bud sprouting and flowering.
Problem #6: Too much or not enough sunlight
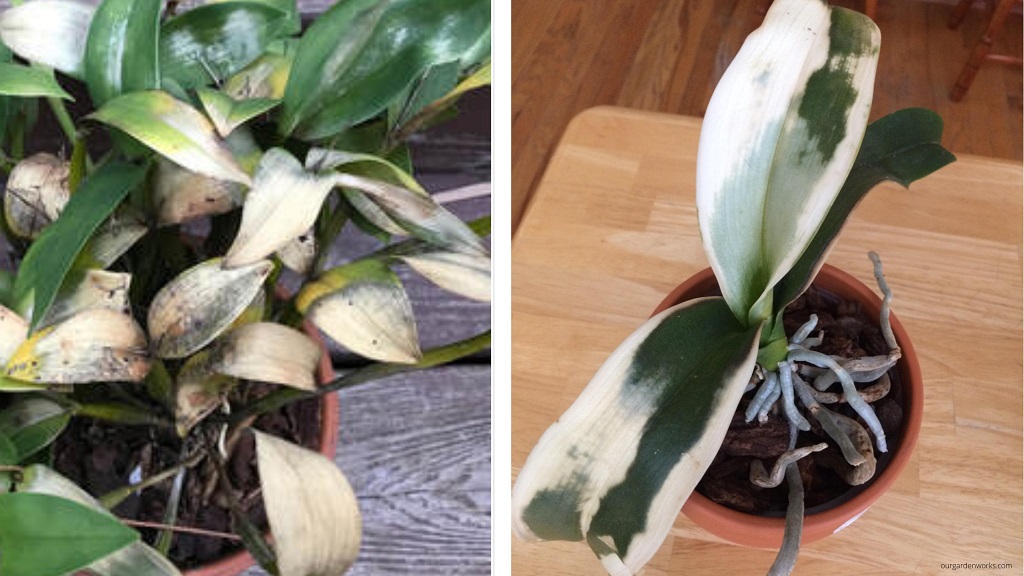
Orchids will likely die from too much sun than not receiving any. No sunlight will not kill your orchids but will prevent them from developing blooms.
Shade is your orchid’s best friend because it allows them to cool off its leaves.
Orchid leaves heat up and shade and humidity help prevent leaf burns. It is one of the reasons why they thrive under the shade of trees in their natural habitat.
When orchids are exposed to direct sunlight, the leaves will start to yellow and then turn white due to burns. Eventually, they will die due to heat stress.
If caught early, heat-stressed orchids can still be saved as long as there are still some healthy leaves, the stem is still alive and plump, and there are multiple viable roots.
To treat dying orchids due to heat stress, place them in shade with low light as they recover. Increase indoor humidity and re-pot them in a clay pot. The moisture in the clay pot can help improve the humidity in the microclimate around the roots.
Problem #7: Crown rot and stem rot
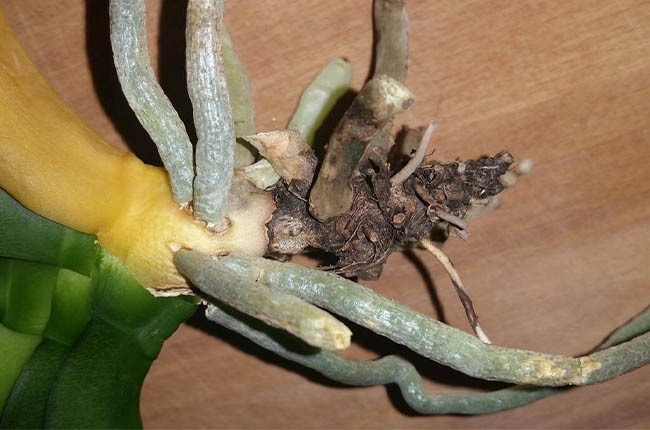
Orchid crown rot and stem rot often occur due to overhead watering.
The water will become stagnant around the leaves and accumulate bacteria that cause rotting. Usually, the problem starts as crown rot affecting the base of two leaves.
If crown rot is left untreated, the rot will progress and become stem rot. The orchid can still be saved if some parts of the stem are still intact.
To revive an orchid dying from both crown and stem rot, you have to remove it from its potting mix and cut the infected parts.
Some people spray it with hydrogen peroxide but it can still survive without doing so. Pinch the roots and the stem to know if they are still viable. A plump and firm stem and roots mean the orchid has a chance to survive.
Once the orchid is disinfected, let it air dry in an empty container before repotting it in a new potting medium.
2. Create an “Orchid ICU” a.k.a recovery pots
Orchids recovering from stem rot, underwatering issues, and those that are almost dead require a special recovery area or the orchid ICU.
These mediums or practices can help severely stressed orchids recover before you can place them back to their usual potting medium.
Moss symbiotic tank: Best for worst-case scenario – dead-looking orchids
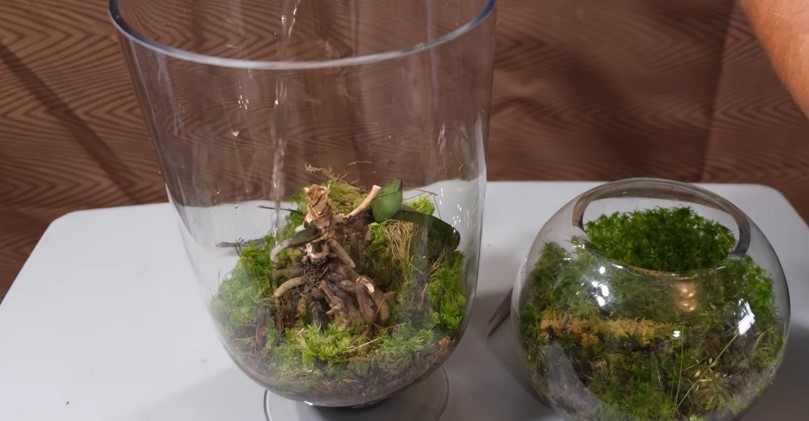
The idea behind this orchid ICU is based on the nature of orchids. Orchids use their roots to absorb moisture from the air and to gain support from the trees.
Dying orchids with viable roots can get the moisture and optimal humidity that they need in a vase filled with moisture-absorbing sphagnum peat moss.
The beauty of this method for almost-dying orchids is it gently allows optimal airflow to the roots without constricting their need for humidity and water.
Here’s how to build a moss symbiotic tank:
- Pull up the dying orchid and clean it by removing all the dead and infected parts.
- In an open-mouth vase place, pour two to three cups of water and place live sphagnum moss. Upon placing the moss, you will notice that it will immediately absorb the water in the vase. The moss will help increase the humidity in the vase and create an acidic environment for the orchid.
- Place the orchid on top. Do not push it into the peat moss. You should keep the vase open to allow optimal airflow.
- Leave the orchid for a few days to recover. You’ll know that it has fully recovered when there are new roots and even keikis sprouting from the stem. You may cut the keikis and re-pot them in a new container.
Fur bark & styrofoam potting mix: Best for dying orchids with a crown or stem rot
For waterlogged orchids that have been weakened by rotting parts, repotting them in an efficiently draining medium is key to fast recovery.
In this method, the orchid ICU contains a double layer of drainage through a combination of orchid potting mix and styrofoam.
Here’s how you can try this at home:
- Trim the infected parts of the orchid. Make sure it has some viable roots and stems to survive. Then, set it aside to try.
- On the new pot, place some mini styrofoam cubes at the bottom to serve as additional drainage for the pot. This is on top of the pot’s bottom holes.
- Layer the big bits of pine bark on top of the styrofoam for additional drainage.
- Then, place the orchid on top and loosely spread the sphagnum moss and fur bark around the roots. You can use a stick or chopstick to lightly squeeze them around the roots.
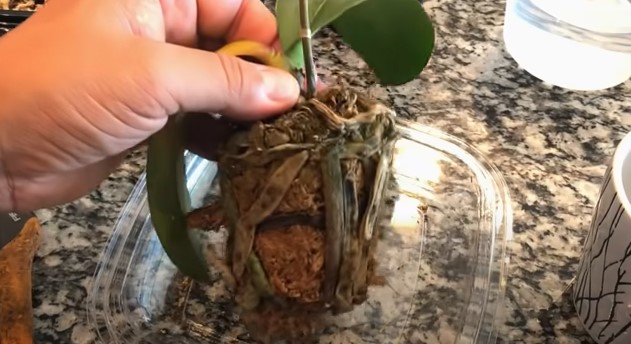
Microfiber isolation technique: Best for dehydrated and under-watered orchids

Extremely dehydrated and under-watered orchids require a gradual introduction to moisture to survive.
In this method, some parts of the orchid are wrapped with moist microfiber to nourish the roots and improve the humidity inside the cup.
After 7 days, you will notice that the leaves will become plumper which means it is gradually recovering.
Here’s how to revive a dying orchid using this method:
- Remove the dead parts of the orchid and check for viable roots.
- Cut mini strips of microfiber cloth and loosely wrap them around the stem and roots of the orchid. Make sure that there are still exposed parts of the orchid to ensure optimal aeration.
- Place the wrapped orchid in an orchid cup that has holes at the bottom and place it on top of a saucer.
- Pour about ½ to 1 inch of water just enough for the microfiber to absorb it inside the cup.
- Leave the orchid for 7 to 14 days until all of its parts recover and become firm and plump.
- Once the orchid looks healthy, you may now re-pot it to its new home.
Final Thoughts
Not a lot of gardeners know how to revive a dying orchid because it takes some experience to recognize the signs if they can still regrow.
We hope this post equips you with the techniques and knowledge to save your orchids so you no longer need to run to orchid doctors.
Let us know in the comments how many orchids were you able to save using the techniques in this post.
Spread the word about these orchid revival techniques and prevent people from throwing out their saveable orchids.