

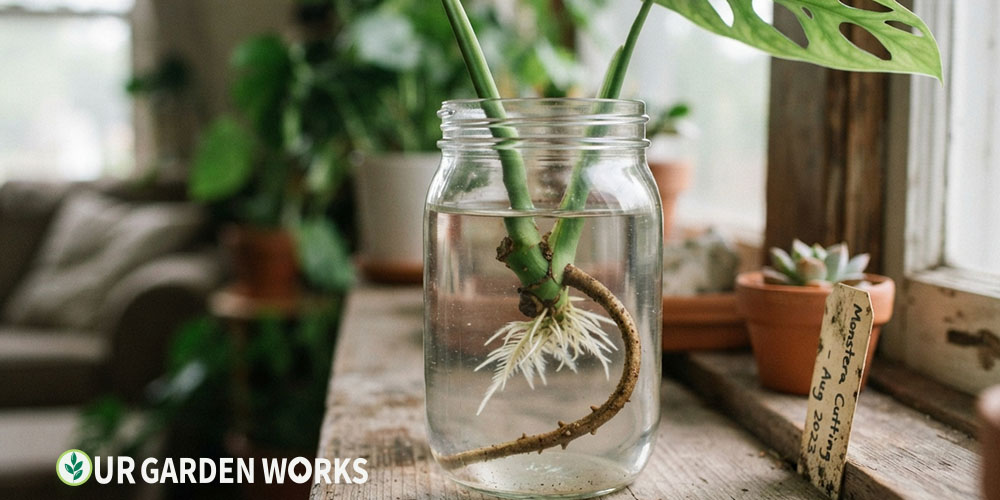
Monstera deliciosa propagates well from stem cuttings, but success depends heavily on a detail many first-time propagators miss entirely: the cutting needs an intact node, and ideally an aerial root, to root reliably.
Skip this and you’re left with a leaf that looks healthy for weeks before eventually declining with no roots to show for it.
How to Propagate Monstera – Quick Guide: Cut a stem section that includes at least one node (the point where a leaf and often an aerial root emerge) and one healthy leaf. Place in water or moist sphagnum moss until roots reach 1–2 inches, then pot in well-draining, chunky soil. Rooting typically takes 3–6 weeks.
Why the Node — and Especially the Aerial Root — Matters So Much
Monstera is an aroid, a plant family that naturally produces aerial roots along its stem as a climbing adaptation in its native rainforest habitat — these roots normally anchor the plant to trees and absorb moisture from humid air.
Each node on the stem is a growth point capable of producing both a new leaf and a new aerial root, and it’s this same node tissue that activates to produce the substantial root system a cutting needs once separated from the parent plant.
A cutting that already has a visible aerial root at its node has a meaningful head start, since that root can sometimes continue elongating and absorbing moisture almost immediately, while the node simultaneously develops the finer root system needed for soil. A cutting without any node at all has no growth point to work from and essentially cannot root, regardless of how healthy the leaf looks.
Why Monstera’s Climbing Habit Shapes Everything About Propagation
It’s worth understanding the connection between Monstera’s natural growth habit and why its propagation works the way it does, since this context explains a few details that otherwise seem arbitrary.
In its native rainforest, Monstera deliciosa germinates on the forest floor and then climbs toward the canopy by attaching aerial roots to tree trunks as it grows upward — a single plant might extend many feet, anchored at multiple points along its length.
If a section of that climbing vine breaks away from the parent — from storm damage, animal disturbance, or simply old growth dying back at the base — the plant’s evolutionary strategy depends on that broken section being able to root and continue growing independently wherever it lands.
This is precisely the biological background that makes Monstera stem cuttings so viable: you’re recreating a scenario the plant is already adapted to survive, rather than asking it to do something unusual.
This same context explains why fenestrations — the characteristic holes and splits in mature Monstera leaves — typically only appear once a plant has reached a certain level of maturity and vertical growth, mimicking the increased light exposure the plant would naturally experience as it climbs toward the canopy in the wild.
A young propagated cutting’s first several leaves are often solid, unfenestrated, and only begin showing the iconic splits as the plant matures past its initial establishment phase, which is a normal part of the growth process rather than a sign anything has gone wrong with the propagation.
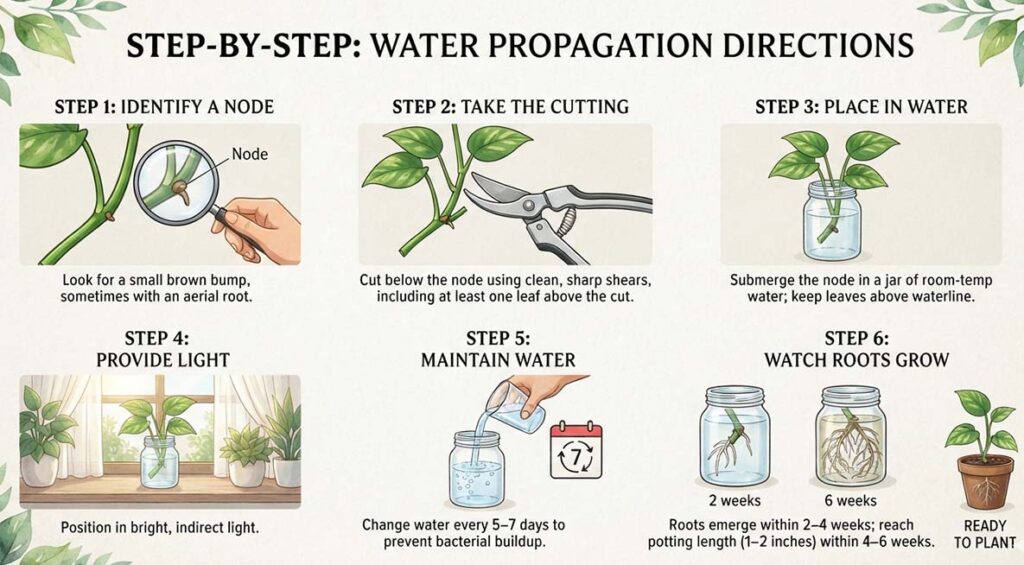
Step-by-Step: Water Propagation
Directions
- Identify a node along the stem — look for a small brown or tan bump, sometimes already with a visible aerial root growing from it.
- Cut below the node using clean, sharp shears, including at least one leaf above the cut.
- Place the cutting in a jar of room-temperature water with the node submerged, but keep leaves above the waterline.
- Position in bright, indirect light. Change the water every 5–7 days to prevent bacterial buildup.
- New roots typically emerge from the node within 2–4 weeks, reaching potting length (1–2 inches) within 4–6 weeks total.
Watch the node closely during the first couple of weeks — you’ll typically see small white bumps appear before they elongate into actual root threads, and this early stage is the best confirmation that the cutting is responding correctly.
If several weeks pass with absolutely no change at the node, even a slight one, it’s worth checking that the node itself wasn’t damaged during cutting.
Step-by-Step: Sphagnum Moss Method
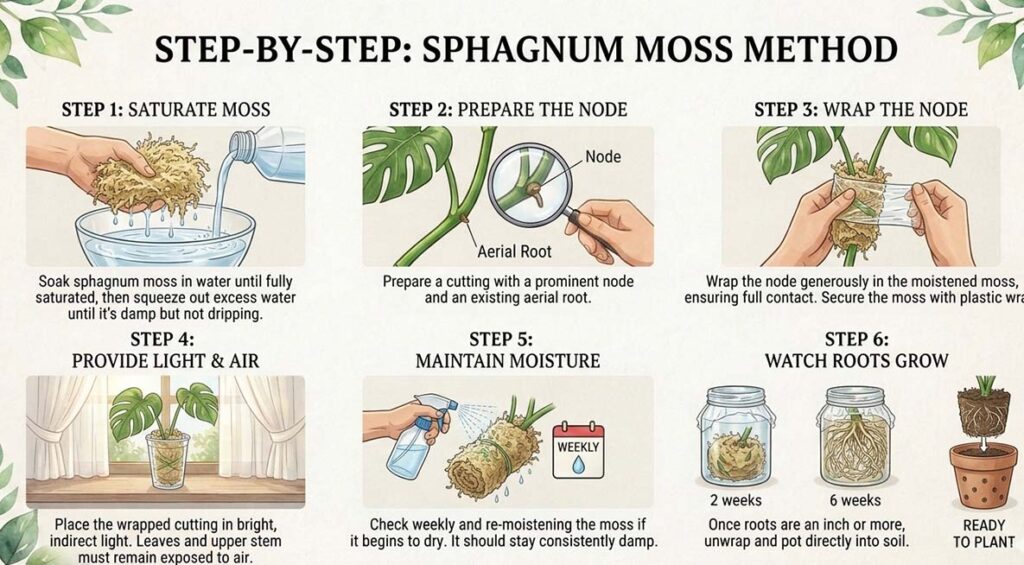
Many experienced Monstera growers prefer moss over water, since it more closely mimics the humid, airy conditions roots develop in naturally and tends to produce a slightly sturdier root structure before the move to soil.
Directions
- Soak sphagnum moss in water until fully saturated, then squeeze out excess water until it’s damp but not dripping.
- Wrap the node generously in the moistened moss, ensuring full contact around the node and any existing aerial root.
- Secure the moss in place with plastic wrap, leaving the leaf and upper stem exposed.
- Check weekly, re-moistening the moss if it begins to dry out. It should stay consistently damp throughout the rooting period.
- Once roots are visible through the moss and have reached an inch or more, unwrap and pot directly into soil.
This method tends to suit cuttings taken from larger, more mature stem sections particularly well, since moss provides more physical support around a thicker node than a simple water jar can offer, reducing the risk of the cutting shifting or the node losing consistent moisture contact.
💡 Don’t bury the leaf when potting
Once roots are ready for soil, plant just deep enough to cover the node and root mass, keeping the leaf and stem fully above the soil line.
Burying stem tissue that isn’t meant to be underground invites rot rather than helping the plant establish.
Choosing the Right Cutting From a Mature Plant
Not every section of a mature Monstera vine makes an equally good cutting candidate. Older, woodier stem sections near the base of the plant tend to root more slowly than younger, more actively growing sections closer to the newest leaves, since younger tissue generally retains more of the hormonal responsiveness that drives rapid root formation.
A cutting taken from just behind the newest unfurled leaf, including the node immediately below it, is often the most reliable choice — young enough to root readily, but mature enough to have a fully developed node and leaf rather than still-forming growth that hasn’t hardened off yet.
Frequently Asked Questions
Can I propagate Monstera from just a leaf with no stem or node?
No — a leaf alone, with no node attached, has no growth point capable of producing roots. It may stay green for a surprisingly long time on stored moisture, but it will not develop into a new plant no matter how long it’s left in water.
My cutting has no aerial root at the node — will it still root?
Yes, an existing aerial root simply gives the cutting a head start, but it isn’t required. The node itself is the essential structure; it will produce new roots on its own timeline even without a pre-existing aerial root attached.
How long should I wait before fertilizing a newly potted Monstera cutting?
Wait at least 4–6 weeks after potting before introducing fertilizer. A newly potted cutting is still establishing its root system, and fertilizer at this stage can burn the fragile new roots rather than help the plant grow faster.
Can I take a cutting that includes multiple nodes at once?
Yes, and this can be a useful strategy — a longer cutting with 2–3 nodes gives you multiple potential rooting points along the same stem section, providing some insurance if one node fails to activate. Once rooted, a multi-node cutting also tends to produce a fuller-looking plant faster than a single-node cutting would.
My cutting's leaf turned yellow and dropped before any roots formed — is the cutting dead?
Not necessarily, though it’s a less promising sign than a leaf simply yellowing slightly at the edges. A cutting can sometimes continue developing roots from the node even after losing its original leaf, particularly if the node itself still looks firm and green rather than soft or blackened. Give it another 2–3 weeks before discarding, checking the node specifically rather than judging solely by the leaf’s condition.
Common Reasons a Monstera Cutting Fails to Root
A handful of specific issues account for the majority of failed Monstera propagation attempts, and most are avoidable once you know what to watch for.
Cutting without a node: By far the most common mistake, especially among gardeners propagating for the first time without a clear sense of what a node actually looks like.
Take time to identify the small, slightly raised bump on the stem before cutting — it’s usually visually distinct enough to spot once you know what you’re looking for, often appearing as a faint ring or slight color change around the stem.
Water that’s too cold or changed too infrequently: Cold water slows the metabolic processes driving root formation, while stagnant water allows bacterial growth that can damage the node before it has a chance to root. Room temperature water, changed weekly, addresses both issues at once.
Insufficient light during the rooting period: While Monstera tolerates lower light once established, a cutting trying to generate new roots needs reasonably bright, indirect light to fuel that growth process.
A cutting left in a dim corner can survive for a surprisingly long time without rooting, simply because it lacks the light energy to drive the process forward.
Related Articles in Our Plant Care Guide
Final Thoughts
We hope this gives you everything you need to propagate Monstera with confidence — the node really is the whole story here, and once you can spot one reliably, the rest of the process takes care of itself.
For troubleshooting the parent plant in between cuttings, our plant care guides cover common Monstera issues in depth.
Monstera’s popularity as a propagation project isn’t an accident — between the relatively forgiving rooting timeline and the satisfaction of watching those characteristic leaves develop on an entirely new plant, it remains one of the more rewarding houseplants to multiply, whether you’re keeping every cutting for yourself or building up a stock to share with friends.
Either way, you now know exactly what to look for before you make the first cut, which is genuinely the only barrier separating a confident propagator from someone who keeps wondering why a leaf-only cutting never worked, season after disappointing season.
Share this post with a fellow gardener who’s ready to get growing — and let us know in the comments how your Monstera cutting is coming along. Happy growing!
