During the pandemic, many of us had the opportunity to reinvent the spaces we have at home. Learning how to build a pitching mound is among the smartest ways for you to maximize your empty backyard.
Building a pitching mound is not only good for the upkeep of your property but also encourages your family to practice your pitch and be more physically active.
There are available ready-to-use pitching mounds online. However, if you want to be a little bit resourceful and frugal, you can always count on your wooden scraps at home.
Plus, building your stuff at home adds value and meaning to them. You also harness your craftsmanship even to the smallest detail.
Let us start building!
(You could use the table of contents below to jump to the sections that are most important to you.)
How To Build A Pitching Mound – The Complete Guide
Before you build your pitching mound, there are certain things that you need to consider. To enjoy a fair game and fully use your new project, you have to evaluate the following:
Location:
You may want to make sure that the ground is flat for your pitching mound.
It should be free from any rocks or debris to make the ground safe for running and prevent the players from tripping.
Player’s Level:
If your kids use the pitching mound, the measurements and distance to the home plate should be different from what adults use.
The mound should be comfortable for the pitcher to reach the rubber as they throw the ball.
The pitching mound for kids should be around 48 inches x 36 inches (4ft. X 3ft.) while 96 inches x 48 inches (8 ft. x 4ft.) for high school and adults.
Distance To The Home Plate:
Here are some of the measurements from the baseball and softball league:
Baseball
- Baseball Little League (kids): 46 feet distance from the home plate
- Baseball Intermediate League 50 feet distance from the home plate
- Baseball for high school and adults: 60 feet distance from the home plate
Softball
- Baseball Little League (kids): 35 feet distance from the home plate
- Baseball Intermediate League 40 feet distance from the home plate
- Baseball for high school and adults: 43 feet distance from the home plate
Physical Blocks:
The pitching area should be far from any trees or clotheslines. You should also consider anything that can be possibly damaged by a flying ball or running feet like plants or any obstruction in your field.
Pitching Mound Direction:
The direction of the pitching mound should be away from any windows or cars that may break when you start playing.
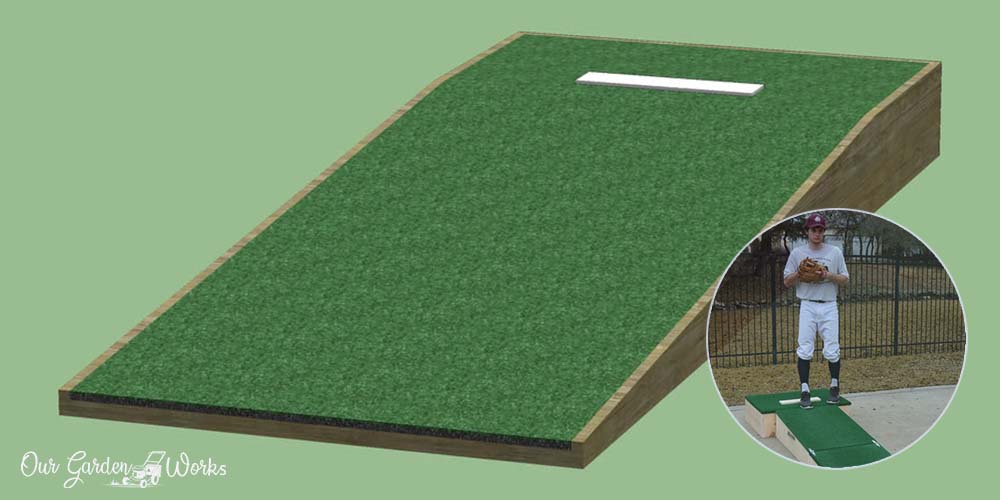
Pitching Mound Measurements:
In this post, we will use the measurement for a high school or adult baseball pitching mound.
Here are the dimensions:
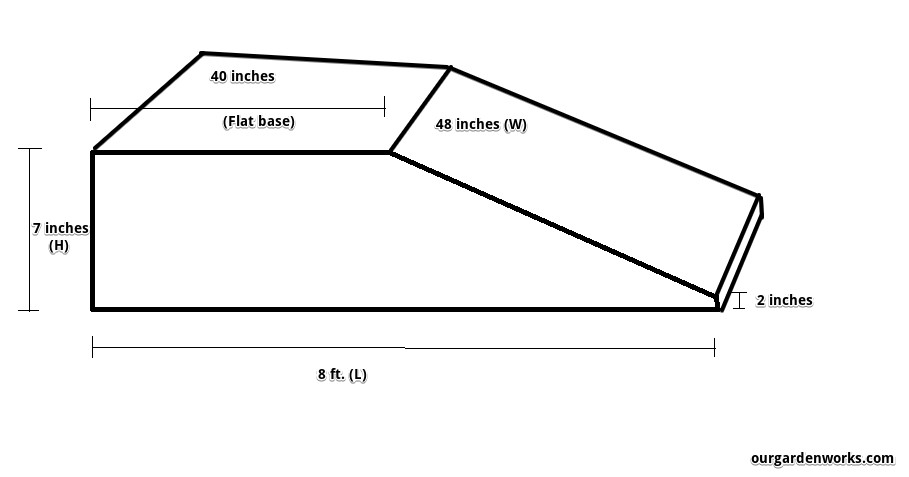
- Sideboards (height above ground): 7 inches
- Backboard: 48 inches
- Sideboards length: 8 feet
- Base length: 40 inches from the back
- Height at the end of the slant: 2 inches from the ground
Materials:
- Circular saw
- Power screwdriver
- Table saw
- Screws
- Paint or artificial turf
- 4 pieces of 4 x 2 Particleboard
- Tape measure
- Level
- Sanding machine (in good condition)
- Gloves
- Safety glasses
Procedure:
A. Sideboards
- First, build the sideboards by measuring the wood. Two sideboards should be 8 feet long and 7 inches high.
- Cut the two boards using the table saw for a straighter cut. You may also use the circular saw but you will need to mark a line for your guide.
- Once done, measure 40 inches for the flat base from the end of the board and mark it with your marker.
- On the other end of the board, measure 2 inches from the sides to the center and mark it. That line would be the lowest end of the incline.
- Using a straight wood or a ruler and a marker, draw a diagonal line connecting the two marked points.
- Use the circular saw to cut the diagonal line.
- Use the sanding machine to smoothen the sideboards.
- Repeat the procedure for the second board.
B. Backboard
- Measure your wooden boards by 48 inches using your tape measure.
- Cut the board using your table saw.
- Make the surface smoother using the sanding machine
C. Mainframe
- Connect the two sideboards and the backboard using the power screwdriver.
- You may want to make sure that the two sideboards are parallel both in height and in length.
D. Supporting boards
- Since the pitching mound will take on some weight, you have to make sure it has supporting boards underneath. Cut 3 excess wooden boards at a length of 48 inches x 3 inches using the circular saw.
- Then, measure the height of the middle part of the incline or slanted part. Cut two boards based on two sections on the slanted part. More likely, it would be around 48 inches x 4.5 inches and 48 inches x 3 inches. These will support the slanted area of the pitching mound.
- To cap off the frame, cut a wooden board at 48 inches x 2 inches.
- Once all the supporting boards are measured and cut, use the sanding machine to smooth them out.
E. Building The Mound Frame
- Place the supporting boards inside the mainframe horizontally.
- They should be elevated from the ground and will be touching the top boards of the pitching mound. You can use a level to see if both ends are at the same height.
- Use support below the support boards so you can screw them to the sideboards comfortably.
- Screw all the support boards up to the 48 x 2-inch front board.
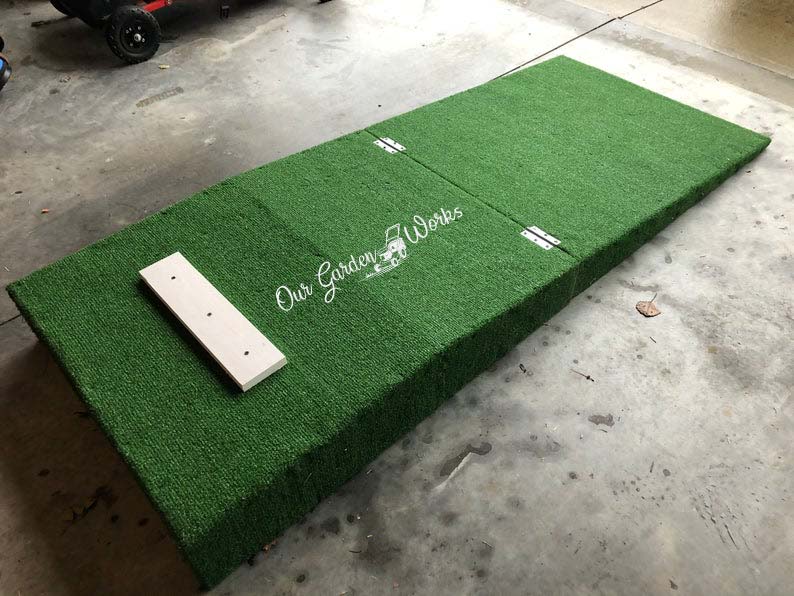
F. Applying The Surface Boards
- Use the 2 x 4 ft. particle boards as the top and bottom cover of your pitching mound.
- Place them on the frame horizontally and screw them on the sideboards, backboard, and supporting boards of the mound.
- Keep the boards close to each other so there would be no gaps on the platform.
G. Finishing Touches
- It is recommended to paint the pitching to keep it weather-proof. Initially paint it with base paint and then follow it up with your desired paint color.
- You may also opt to cover it with turf grass to blend with your lawn and make it less slippery.
- Also, don’t forget to apply the pitching rubber on top. Enjoy pitching!
How To Build a Pitching Mound in The Ground

If you have the space and some baseball players in your family, fixing a pitching mound in your backyard can spare you from the frequent trips to the baseball field.
Before we start building, it is important to identify the dimensions that you will use for your age group or your child’s program.
Baseball Dimensions According To Programs
Find the right dimensions for your backyard pitching mound according to Little League.org recommendations below.:
- Tee Ball (Ages 4 to 7): It is an entry-level baseball program for young kids who are aspiring to play baseball in their junior year. The pitching distance is 30 to 40 feet.
- Minor League Baseball (Ages of 5 and 11): Usually played by both girls and boys, this program uses a pitching distance of 35 feet.
- Little League Baseball, or Major Division(Ages 9 to 12): The pitching distance is 40 feet. However, in some local baseball games, adults are playing in the majors and usually use varying dimensions.
- Intermediate 50/70 League(Ages 12 and 13): This age group uses a 50-foot pitching distance. It is a preparatory program to help players adjust to the new leagues and grow out of the junior leagues.
- Junior, Senior, and Big Leagues( Ages 12 and up): The Junior League is for 12 to 14-year-old kids, the Senior League is for the 14 to 16-year-olds and the Big League is for players up to age 18. It uses a pitching distance of 43 to 60-feet.
Materials:
Now, that you have an idea of the dimension for your new DIY project, it’s about time to know the materials you will need below:
- Tape measure
- Clean fill dirt or pre-made mound clay mixture
- Pitching rubber
- Home plate
- Spade
- White spray paint
- Landscape fabric
- Landscape staples
- Hammer
- Stake
Directions:
- Find a level spot in your backyard and make sure to fill any holes in the ground. If there is a low terrain in your desired location, you can fill it with clean fill.
- Choose the dimension of the pitching mound appropriate for your family and measure your backyard.
- Use the spray paint to mark the distance between the home plate from the pitching mound.
- Draw a circle around the pitching mound by measuring the diameter of the pitching mound. Mark the circle using spray paint.
- Dig the weeds within the circle and remove the rocks to level the ground. Try to get rid of any roots to prevent them from sprouting again.
- To make sure that no weeds will grow on your pitching mound, you can use a landscape fabric to block the sun. Without sunlight, weed seeds will not be able to germinate and grow on your pitching mound.
- Once the location of the pitching mound is cleared, measure the ideal height of the mound by marking it with a stake. The ideal height of the mound is 7 to 10 inches.
- Apply the pre-made mound clay 1 inch at a time. Tap it with a spade or step on it to keep it compact. Continue applying the mound clay until you reach the mark in the stake.
- Smooth the mound by tapping it into your desired shape and fill any low areas.
- When the mound is smooth enough, it’s time to place the pitching rubber on top of the mound. Use the stake to mark the dimensions of the rubber.
- Measure the height of the pitching rubber and divide it into two to get the depth you need to dig in the soil.
- Dig the mound clay using your spade until you reach half of the height of the pitching rubber. Some people prefer to bury the whole rubber and leave the top uncovered.
- Place the pitching rubber and make sure that it is fixed on the mound and not moving.
- Lastly, measure the distance between your pitching mound to your home plate. Your child’s age will determine the distance of the mound to the home plate. Mark it with spray paint.
- Place the home plate and enjoy your first pitching practice!
Frequently Asked Questions (FAQs)
How high is a high school pitching mound?
The height of the pitching mound for high school is 10 inches. The diameter of the circle is 18 feet. It is also the dimensions used for college-level and pro baseball leagues.
How far is a pitching mound to home plate?
The distance of the pitching mound to the home plate depends on the baseball program you chose.
Here are the dimension based on your baseball program:
- Minor League: 46 feet
- Little League – Major Division: 46 feet
- Intermediate (50/70): 50 feet
- Junior/Senior Division: 60 feet
Why does baseball have a mound?
The pitcher’s mound is made to compensate for the extended distance of the pitcher’s position. It is higher than the other mounds to give the pitcher the momentum needed for a good service.
How far do 11-year-olds pitch from?
Kids ages 5 to 11 are under the Minor League. The pitching distance from this program is at 46 feet. It is the final qualifying age for Minor League.
Once they turn 12, they can play for the Intermediate 50/70 League or the Junior, Senior, and Big Leagues.
How far is the pitcher mound for 9-year-olds?
Baseball programs are divided into different age groups. With every program the dimensions are different and the size of the playing field gets bigger as the child grows.
A 9-year-old kid is under the Little League program where the pitching mound is at 46 feet.
Final Thoughts
The pandemic has given us a lot of opportunities to revamp our backyards and turn them into a more interesting place to play.
We hope that this post has helped you have an idea of how to build a pitching mound in your yard. It may look intimidating, but it is easier than you think.
If you find this post informative and easy to follow, please don’t forget to share it with your friends.
Also, share your experience with us in the comments below! We’re excited to see your new pitching mound.
For more design ideas, project guides, and planting inspiration, our backyard design guide links to every outdoor project and design article we’ve published.