Gardening is fun but soil preparation is a different story. It’s on another level of physical labor. This is why tools like broadfork are such a lifesaver for small-scale farmers and gardeners.
If you want to save money on gardening tools, you can make your DIY Broadfork instead of buying the ones available in the market which are more expensive.
In this post, we’ll share with you how to make a DIY Broadfork using recycled metals and other materials.
We believe gardening doesn’t have to be expensive. You only need a curious and creative mind to make the most of what you have.
First, let’s learn more about Broadforks and how it works.
(You could use the table of contents below to jump to the sections that are most important to you.)
What Is a Broadfork?
Broadfork or U-bar is a digging tool used to open the soil for air, moisture, and beneficial microorganisms. It is a low-cost solution for most small-scale gardeners today.
This tool can speed up your soil preparation two hours faster than your usual routine. It also doesn’t require too much force than manually digging the soil by hand or spade.
Broadfork started as a design requested by John Jeavons to two Stanford engineering students.
Since then, it has become widely used in fields and farms. Some farmers modified the initial design of the Broadfork and patterned it based on their needs. So, if you search for Broadfork designs online, you will find a lot of different versions.
The changes in the design of the Broadfork are usually due to:
- Availability of materials
- The physical capacity of the user
- Weight preferences
- Function preferences
How Does a Broadfork Work?
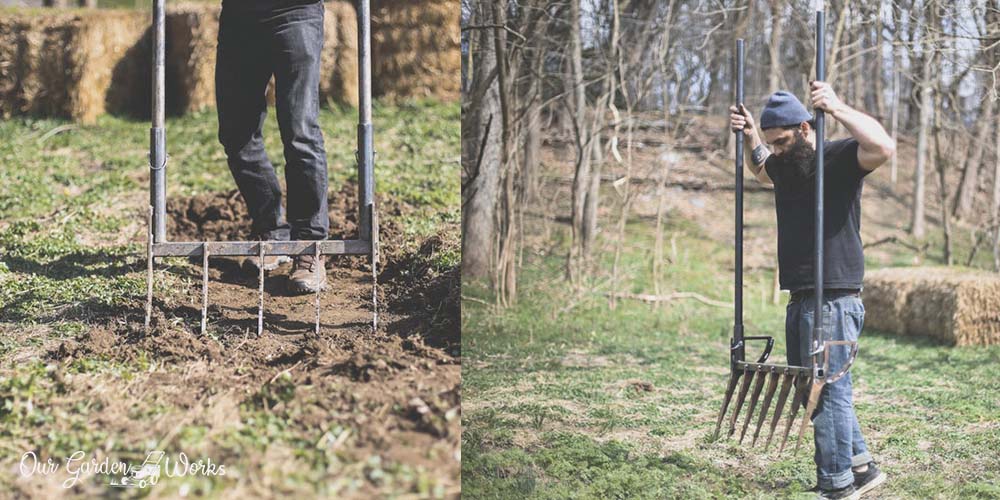
Broadfork helps you use gravity to your advantage and increases the force you need to dig compacted or settled soil.
There are two handles to help you balance and a step where you’ll put on your weight. The tines are angled to help decrease the pressure on your back when you use the Broadfork.
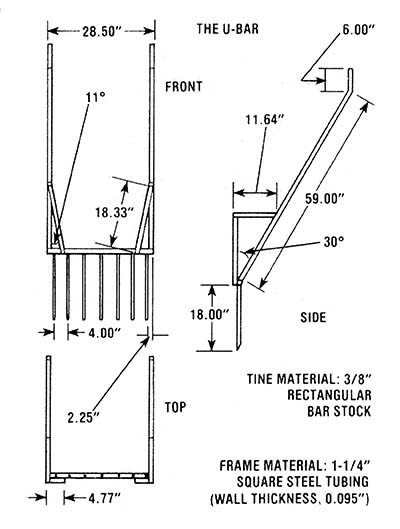
Standard Broadfork Design
Design features:
- Angled tines
- 7 Tines (18”)
- Total height 82”(including tines and handles)
Main Parts of The Broadfork
Here are the parts that you should take note of when you find the materials you’ll need.
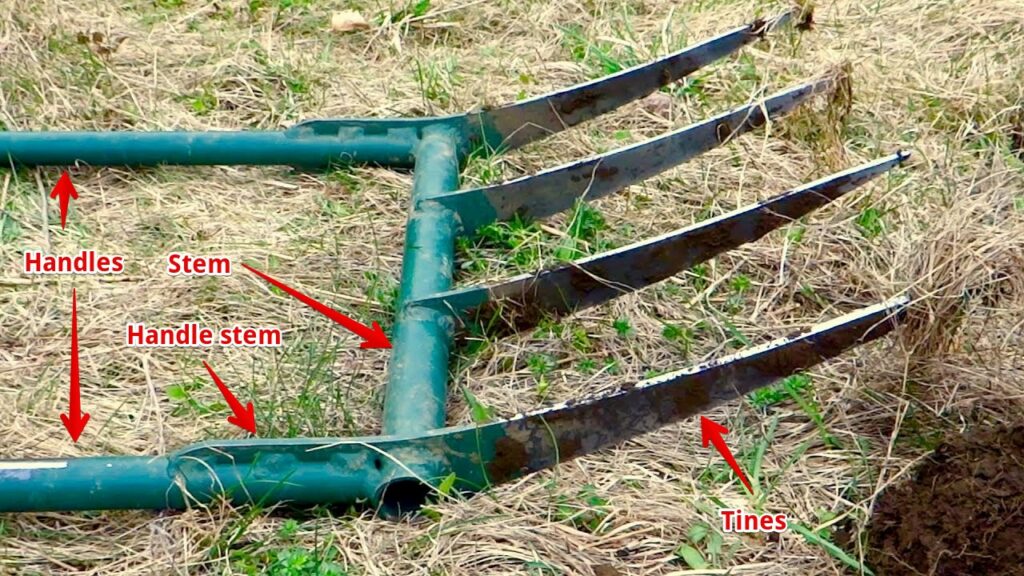
There are a lot of potential old tools that you can recycle to build each part of your Broadfork. Check out the parts, their function, and some recycled material ideas that you can use.
1. Crossbar or Step
The mainframe of the Broadfork is the step. It is the metal you’re going to step on to allow the pressure of your weight pushes the tines into the soil.
The materials that you should use for the step should be able to handle your weight for your safety. The last thing you’ll want to happen is for the step to break the moment you put all your weight on it and cause an accident.
Materials you can use:
- Rectangular tube stock
- Superstrut metal framing channel
2. Tines
Tines are the flat metal that serves as the teeth of your broadfork. It is shaped with pointed tips like that of a knife to make it easier to stick into compact soil. It is welded to the step at a 30-degree angle to boost the level of ease in using the tool.
Materials you can use:
- Old flat steel from an old gate
- Old steel plate from old tractors
3. Handles
You have a lot of options on what type of handle to use on your Broadfork.
Just remember that using a metal pipe as handles can contribute to the overall weight of the Broadfork. You should also consider how much weight the user can bear.
Materials you can use:
- Old handles of other tools like old spade
- Old steel pipes
4. Handle Stem or Collar
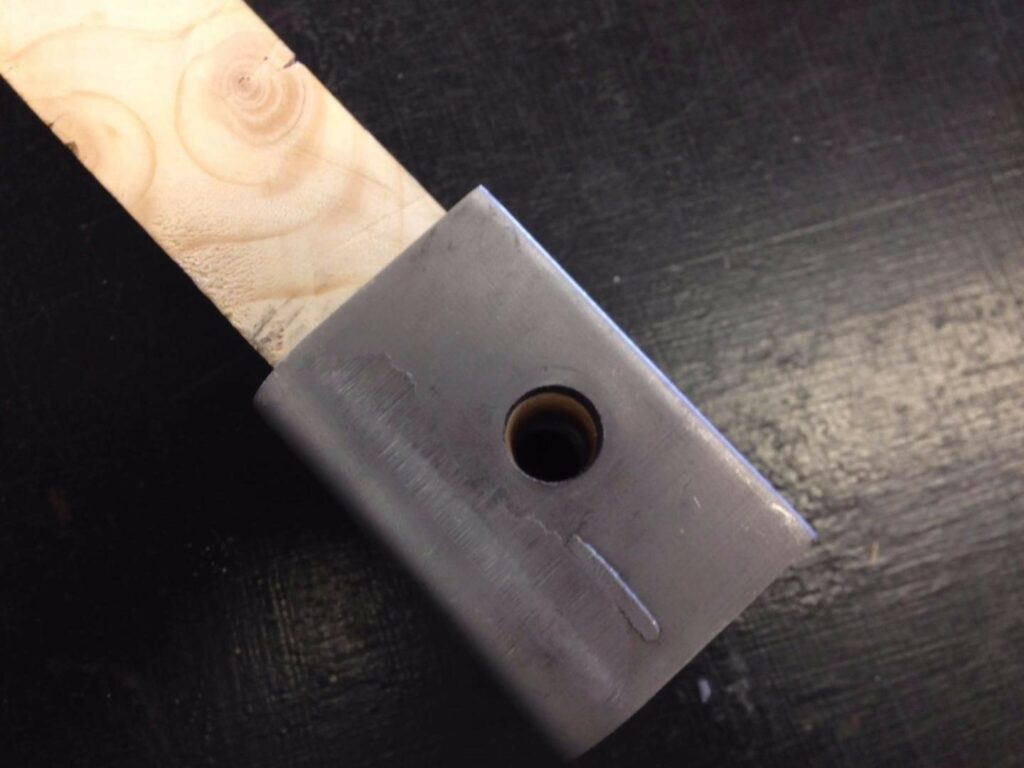
The tricky part is what material should you use to connect the fork and the handle. You can either use a metal collar for the handles or a handle stem that will support the handles a few inches higher than a collar.
A collar is a metal placed at the end of the handles connected through screws. The two collars will be the ones you’ll use to weld the fork and the handles together.
You might also like: 15 Best Gardening Tools Every Beginner Needs (2026)
How To Make a DIY Broadfork
Now, it’s time to craft your first DIY Broadfork. Feel free to use any materials you want for each part. For this guide, we will use the simplest tools possible.
Materials
Here are the materials you’ll need:
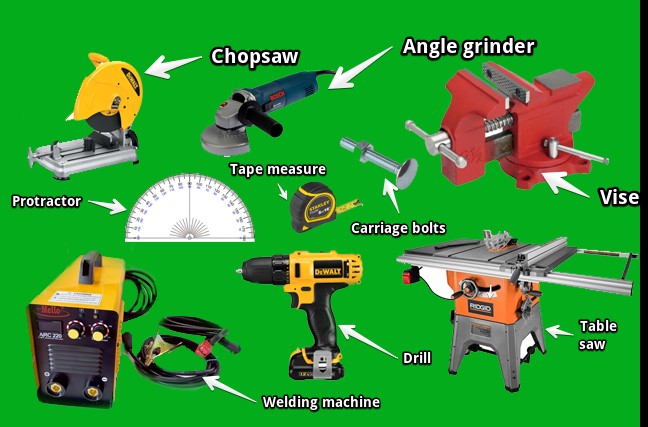
- Angle grinder with: Cutting wheel; Polishing wheel; Grinding wheel
- Chop saw
- Table saw
- Welder
- Vise
- Drill
- Tape measure
- Metal for step: Superstrut or rectangular steel tubing
- Handles: Recycled wooden handles or metal pipes
- Collar or handle stem: Scrap metals
- Tines: Old flat steel plate or old steel gate
Procedure
Building The Step
Step 1: Measure the superstrut or rectangular tube and mark it at 20” inches. The length of the step will depend on the number of tines you plan to add. Here’s a guide for the right length of step for every number of tines:
- 7 tines: 28-inch step
- 5 tines: 20-inch step
The length of the broadfork should also correspond to the plant bed you’re about to prepare. You only need a small broadfork for newly-built garden beds.
Step 2: Cut the step using the chop saw. Make sure you’re using protective gear while using bladed tools.
Step 3: Measure the space for the tines by marking the stem 4” apart. You should also mark the angle where the tines would be inserted. Make sure that the spaces will keep the tines at a 30-degree angle.
Building The Tines
Step 1: Either you’ll get the tines from an old gate or a metal sheet, a shape guide would be really helpful to keep your cut straight.
You can draw the ideal shape of the tines or use a software like AutoCAD or Adobe Photoshop to visualize the actual measurements.
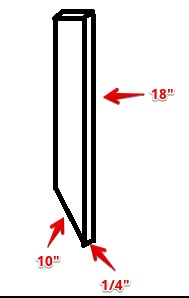
Measurements for the tines are as follows:
- Height: 18”
- Width: 10”
- Thickness: 1/4”
Step 2: Cut the lines using the angle grinder with a cutting wheel. Metal plates that are cut using a laser cutter or a CNC cutter have a smooth finish. With an angle grinder, the edges of the metal plate will be rough which will require some polishing.
Step 3: Replace the cutting wheel with the polishing wheel to smoothen the rough edges of your tines.
Building The Fork
Step 1: Assemble the fork by attaching the tines using a welding machine. Wear a welding mask and use the tool at an arm’s length for your safety.
Step 2: Use the vise to keep the step in place and start welding the tines. Remember to weld the tines at a 30-degree angle and keep them parallel to each other.
Step 3: Polish the finished fork by attaching the polishing wheel to the angle grinder for a cleaner finish.
Building The Collar or Handle Stem
- The only difference between a collar and a handle stem is its length and where you’ll connect the handles. You can cut the excess superstrut or metal tubing using a chop saw.
- Mark the holes where you can insert the carriage bolts and nuts and connect the collars or handle stems to the handles.
- Use the drill to make the hole and insert the carriage bolts to lock the handles and collars together.
Assembling The Step and The Handles
- Connect the collars or stem of the handle to the step using the welding machine.
- The handle should be welded properly as the broadfork will handle your weight. Make sure to cover all the edges properly to make the connection stronger.
- Polish the welded area using the polishing wheel of your angle grinder for a smoother finish.
- For the finishing touch, paint your DIY broadfork to prevent it from rusting or rotting.
Testing out Your Broadfork
Try out your new DIY broadfork with caution. See how your welding job can hold up your weight and the toughness of the compact soil.
You might like: How To Hang A Swing Between Two Trees
Tips in Building a DIY Broadfork
Building a tool from scratch can be intimidating at first. However, as you go along, you’ll realize that it’s doable.
Here are some tips to remember in building and using your broadfork:
- Since broadfork is made for the tough job of loosening the hardened soil, metal handles are the ideal material that you can use. However, it will weigh more and can be too heavy for some gardeners.
- You can bend your broadfork at a 45-degree angle and let your body weight do the work in loosening the soil.
- You may water the soil first before you start your soil preparation to make it softer and easier to till.
- Do not use an all-metal broadfork during a thunderstorm.
- Always clean your tools after a day’s work in your garden to prevent rust and corrosion.
- To avoid harming the good organisms in the soil like earthworms, wiggle your broadfork out as you move to the next part. With a rototiller, all the earthworms and microorganisms are destroyed and get all mixed up.
- Do not leave wooden broadfork out in the rain to prevent the handles from rotting.
- You may use a Hardpan broadfork for tougher and harder soils.
- If you are broadforking a new bed, it can be hard to let the tines sink into the soil as it is not yet mixed with compost and other organic matter. Use it frequently for the first two years until the soil becomes softer and contains more organic components. After that, you can only use it as needed since the soil will be more aerated over time.
- If the soil is too hard, you may rock the broadfork back and forth until it loosens.
- Broadforking a bed works best for plants that grow deep roots. That means it’s a best practice if you’re growing root crops like carrots.
- Store your broadforks inside a tool shed or toolbox to prevent any potential accidents.
- If you are using an all-metal broadfork, always oil it with WD-40 or any mineral oil after cleaning it to make it last longer.
- Placing tines that are too close to each other can clog up the soil which may not give you a great experience in using it in the field. However, it’s still up to you and your needs if what broadfork design would suit you best.
- To know if you need to broadfork the soil or not, use a stick or your hand to see if it sinks into the soil without too much struggle. If there are large clumps of soil, it can cause root problems in your plants and that’s the time a broadfork can become handy. Otherwise, there’s not much need to broadfork the bed.
- Don’t try to bend your broadfork if you encounter large roots and boulders in the soil as it may break the handles and damaged the tines.
- Build a metal broadfork if you’re going to till large fields with tougher soils as wooden handles may not be up for the pressure and may break along the way.
Final Thoughts
Thanks to low-tech tools like broadfork, it’s now easier to loosen up hardened soil and improve its quality for less cost.
These kinds of smart tools can save you from spending on expensive tractors or rototillers, especially if you only work in a small yard or garden. Plus, you also get to have a good workout too!
If you’re not confident in handling a welding machine, you can hire a professional to do the welding job for you. In using sharp tools like broadforks, it’s better to be safe than sorry.
Just remember, before you start connecting the parts and look for materials, figure out what are your preferences and the needs of the soil in your garden beds. This will make every step of the building process easier as the design is clear to you.
We hope that this guide has been helpful for you to get on your creative juices and build your DIY broadfork.
Show your masterpiece in the comments and share with us your experience in building it. Also, don’t forget to spread the word about this guide to your fellow gardeners and help them put those old metal scraps to good use.
For more design ideas, project guides, and planting inspiration, our backyard design guide links to every outdoor project and design article we’ve published.