

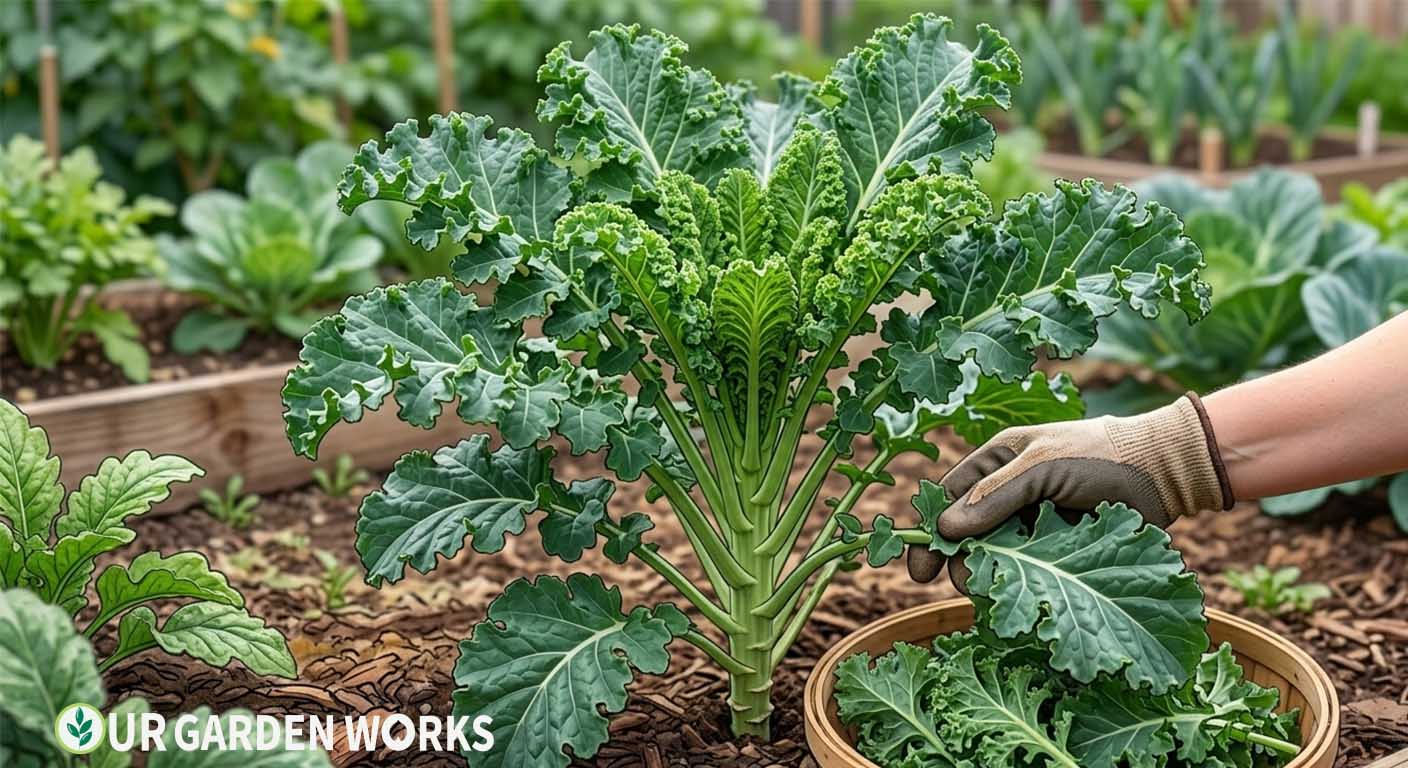
Kale is one of the most productive crops per square foot in the vegetable garden – one plant can produce fresh greens for months if you harvest it correctly.
The key is understanding which leaves to take and which to leave, and never harvesting from the top.
When to Harvest Kale – Quick Answer: Start harvesting kale when plants are 8–10 inches tall and have at least 8 developed leaves. Always harvest from the bottom of the plant upward — the lowest, most mature leaves first. Never remove the central growing tip. Pick 2–3 outer leaves per plant per harvest session.
Why Harvesting Bottom-Up Is the Whole Technique
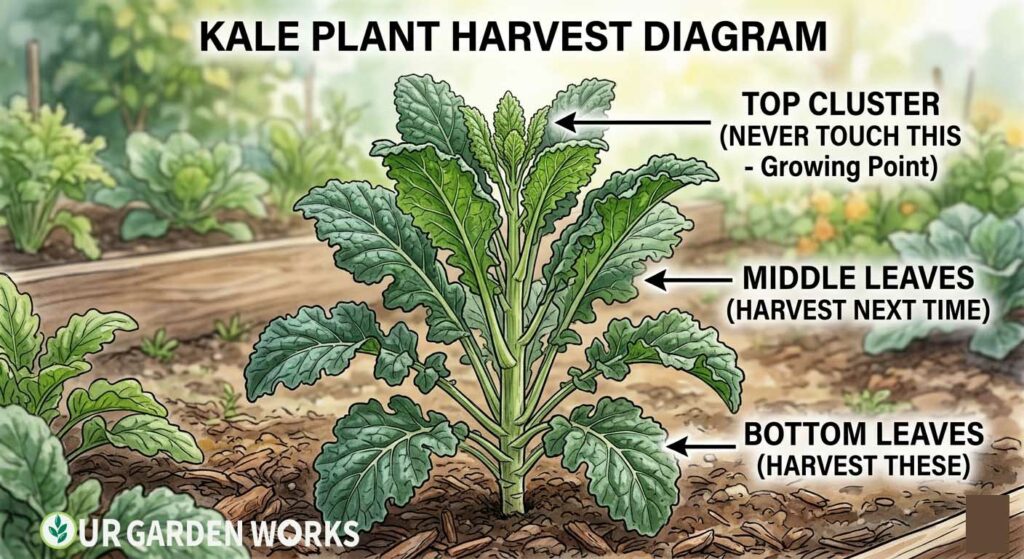
Kale grows the same way many leafy brassicas do — from a single central growing point at the top of the plant, with each new leaf emerging from that point and pushing the older leaves progressively further down and outward as the stalk lengthens.
This means the leaves at the very bottom of the plant are always its oldest, and the small, tightly furled cluster at the top is always its newest and most actively growing tissue.
Removing leaves from the bottom doesn’t interrupt this process at all — those leaves were going to be shed naturally as the plant aged anyway, so you’re essentially harvesting on the plant’s own schedule rather than against it.
Removing the top growing cluster, by contrast, eliminates the only point on the plant capable of producing new leaves.
Once that’s gone, the kale plant has no way to keep growing taller or producing fresh foliage — it’s stuck with whatever leaves remain, slowly aging out with nothing replacing them.
This single distinction is the entire reason one kale plant can feed you for months while a poorly harvested one stalls out after a few weeks.
When Is Kale Ready to Harvest?
- First harvest: When the plant is 8–10 inches tall with at least 8 leaves. Baby kale (more tender, milder) can be harvested earlier at 4–6 inches.
- Leaf size: Target leaves 6–10 inches long — large enough to be useful, not so large they become tough and bitter.
- Color: Deep blue-green (for Lacinato/Dinosaur kale) or dark curled green (for curly kale). Pale or yellowing outer leaves are past their best — remove them regardless.
💡 Frost improves kale flavor
A frost — even a light one — dramatically improves kale’s flavor. The plant converts starches to sugars as a cold-protection mechanism, making the leaves noticeably sweeter. Fall-harvested kale after a frost is markedly better than summer kale. This is why kale is one of the best crops for cold-season gardeners.
The Biology Behind the Frost-Sweetening Effect
This isn’t a folk belief — it’s a genuine, well-documented plant survival mechanism. Water inside plant cells expands when it freezes, and ice crystals forming inside cell walls can rupture them, which is exactly what kills tender summer annuals at the first hard frost.
Cold-hardy brassicas like kale defend against this by converting stored starches into simple sugars as temperatures drop, since a higher concentration of dissolved sugar in the cell fluid lowers its freezing point — essentially the same principle behind why salted roads don’t ice over as easily.
The practical result of this antifreeze strategy is leaves that taste measurably sweeter and milder after exposure to cold, since you’re literally eating a higher concentration of sugar than was present in the same leaf during warm weather.
This is also why many experienced kale growers deliberately plan a fall crop timed to mature right as the first frosts arrive, rather than only growing kale in spring and summer when it never gets the chance to develop this sweetness at all.
Our garden planting calendar works out the right fall sowing date for kale based on your zip code’s typical first frost, which takes the guesswork out of timing that sweetness window.
Some growers go a step further and leave a portion of their fall crop in the ground through several frosts specifically to chase that peak flavor window, rather than harvesting everything at the first opportunity.
Curly, Lacinato, and Red Russian — Does Harvest Timing Differ by Type?
The bottom-up harvesting principle applies identically across kale varieties, but a few practical differences are worth knowing as you’re sizing up your plants.
Curly kale (the ruffled, tightly crinkled type most common in grocery stores) tends to hold its texture a bit better at slightly larger leaf sizes than other types, making it more forgiving if you miss a harvest window by a few days.
Lacinato, also called Dinosaur kale, has flatter, more elongated leaves with a slightly thicker, more savoy-like texture — many cooks find it holds up better to longer cooking times, like braising, than curly types do.
Red Russian and other “Siberian” types tend to be noticeably more tender and milder than curly or Lacinato kale, even at a similar leaf size, which makes them a good choice if you want kale for fresh salads rather than just cooked preparations.
They also tend to bolt a bit faster in warm weather than the tougher curly types, so if you’re growing Red Russian specifically for an extended harvest, prioritizing a fall planting timed around the frost-sweetening window described above pays off even more than it would with a heat-tolerant curly variety.
If you’re growing several types side by side, harvesting them on slightly different schedules based on each variety’s texture and tolerance rather than treating the whole bed identically tends to get you the best result from each.
The Correct Harvesting Technique
Once you understand the bottom-up logic, the actual mechanics are simple enough to do almost without thinking, but a few details make the difference between leaves that snap cleanly and ones that tear and stress the plant unnecessarily.
Directions
- Start at the bottom of the plant — the lowest, most mature leaves are your target every time.
- Grip the leaf where it meets the stem and pull downward and outward in one firm motion. It should snap cleanly. Alternatively, use scissors or a knife to cut the stem flush with the main stalk.
- Take 2–3 leaves per plant per session. More than this slows regrowth significantly.
- Never take the top cluster of small leaves — that’s the growing point. Removing it ends vertical growth and significantly reduces the plant’s total productivity.
- Return in 1–2 weeks for the next harvest as the plant grows upward and new outer leaves reach harvestable size.
The Stripped Stalk Look Is Normal
After several months of correct harvesting, your kale plant will look like a small palm tree — a tall bare stalk with a tuft of leaves at the top.
This is exactly right. The plant is healthy and producing. It’s not diseased or dying. Some of the most productive kale plants in the world look like this by midsummer.
Storing Harvested Kale
Fresh kale keeps reasonably well in the refrigerator — wrap unwashed leaves loosely in a damp paper towel, then place in a perforated bag in the crisper drawer, where they’ll stay usable for 5–7 days.
Washing before storage introduces moisture that accelerates wilting and rot, so hold off until you’re ready to actually use the leaves.
For longer-term storage, kale freezes exceptionally well, arguably better than most leafy greens, since its sturdy texture holds up to the freeze-thaw cycle without turning to mush the way more delicate lettuce would.
Blanch leaves for about 2 minutes in boiling water, plunge into ice water to stop the cooking, squeeze out excess moisture, and pack into freezer bags. Frozen kale works well in smoothies, soups, and sautés for up to 10–12 months, even though it loses the crisp texture needed for fresh salads.
Dehydrating into kale chips is another popular preservation route, and one that actually showcases the leaves’ texture rather than asking you to accept a tradeoff.
Frequently Asked Questions
Can I harvest kale in winter?
Yes — kale is cold-hardy to 10–20°F (some varieties even lower). In Zones 7–11, kale often overwinters completely without protection. In Zones 4–6, a cold frame or row cover extends the harvest well into winter. It’s one of the few crops that genuinely gets better as temperatures drop.
My kale leaves are yellowing at the bottom — should I remove them?
Yes — remove yellowing or damaged lower leaves promptly. They’re past their useful life, take resources from the plant, and can harbor disease and pests. Removing them is part of the harvesting routine, even if you don’t want to eat them.
How long does a kale plant produce?
A single kale plant can produce for 8–12 months with correct harvesting — from spring planting through winter in mild climates, or through fall in colder zones. Spring-planted kale typically bolts in year two as the plant tries to complete its two-year biennial life cycle. Plant new seedlings each season for continuous production.
Is baby kale a different variety, or just harvested young?
Just harvested young — any kale variety can be picked at the baby stage (4–6 inches) for a more tender texture and milder flavor suited to raw salads. Sow seeds more densely than usual if you specifically want a steady supply of baby leaves, and harvest the whole young plant rather than waiting for it to mature into a full-sized, bottom-up harvest plant. This approach trades total yield per plant for speed and tenderness, which is a reasonable choice if salads are your main use for kale.
Can I harvest kale leaves that have small holes or minor pest damage?
Yes, in most cases, minor cosmetic damage from flea beetles or caterpillars doesn’t affect edibility, and a quick rinse plus trimming the most damaged edges is usually all that’s needed. Reserve the cleanest leaves for raw use and save more heavily marked ones for cooked dishes where appearance matters less.
Related Articles in Our Vegetable Gardening Guide
Free Tools for Your Kale Bed
Final Thoughts
We hope this guide keeps your kale plant producing for months rather than weeks. The bottom-up harvesting technique is simple once you know it — and it makes kale one of the best-value crops in the entire garden. For all our vegetable growing guides, our vegetable gardening guide has everything.
Share this post with a fellow gardener who’s ready to get growing — and let us know in the comments how long you’ve kept a single kale plant producing. Happy growing!
