

We’ve killed more seedlings than we care to count. Damping off, leggy stems, root-bound plants that never recover, peppers started two weeks too late, tomatoes started six weeks too early. At some point every gardener goes through a seed-starting season that humbles them.
The good news: seedling failures almost always trace back to one of the same fifteen mistakes. Not bad luck, not a difficult year — a specific, identifiable, fixable thing that went wrong. We’ve made most of them ourselves, talked to thousands of gardeners who made the rest, and put together this list so you can skip the costly trial and error.
Whether you’re starting seeds for the first time this January or you’ve been doing it for years and something keeps going wrong, these are the mistakes most worth knowing about — and each one has a simple fix.
Editor’ Note: The three mistakes that kill the most seedlings: insufficient light (causes leggy, weak plants), overwatering (causes damping off), and wrong timing (starting too early creates root-bound plants, too late wastes the indoor growing advantage). Fix these three first.
Mistakes That Happen Before You Sow
Mistake 1 — Starting at the Wrong Time
This is the most common seed-starting mistake, and it goes both ways. Starting too early is actually more damaging than starting too late.
A tomato seedling that’s been sitting in a 3-inch pot for 12 weeks waiting for outdoor conditions is root-bound, stressed, and significantly harder to establish than one started at the right time. It hasn’t been growing — it’s been surviving. It goes into the ground already behind.
Starting too late costs you growing time, but the plant catches up fast in warm outdoor soil. A 5-week-old seedling transplanted into ideal conditions will outgrow a 10-week-old stressed one within 2 weeks.
The fix: Work backward from your last frost date. Tomatoes: 6–8 weeks before last frost. Peppers: 8–10 weeks. Broccoli, kale: 4–6 weeks. Use our seed starting calculator to get exact dates for your ZIP code, or our regional timing guide for a complete crop-by-crop chart.
Mistake 2 — Starting Crops That Shouldn’t Go Indoors
Not every vegetable benefits from indoor starting. Starting beans, carrots, beets, radishes, or corn indoors and then transplanting them produces inferior results compared to direct sowing — these crops hate root disturbance and gain nothing from a head start. You’ve filled tray space, used growing mix, and created a plant you’ll then transplant poorly.
The fix: Direct sow beans when soil reaches 60°F, carrots and beets 4–6 weeks before last frost, radishes as soon as soil is workable, and corn after last frost. Never start these indoors. See our complete seed-starting guide for the full “never start indoors” list.
Mistake 3 — Using the Wrong Growing Medium
Potting mix, garden soil, and seed-starting mix look similar in the bag. They are not interchangeable for germination.
Potting mix is too coarse for small seeds to make good contact with the medium. Garden soil compacts in trays, suffocates roots, and introduces disease. Neither is sterile — meaning damping off fungus can come pre-loaded.
The fix: Use a proper seed-starting mix — fine-textured, sterile, lightweight. It has low or no nutrients (seeds don’t need nutrients to germinate — they carry their own food), good moisture retention, and excellent drainage. See our full breakdown: seed starting mix vs potting mix.
Mistake 4 — Not Moistening the Mix Before Filling Trays
Dry seed-starting mix poured into trays and then watered from above is one of the most frustrating textures in gardening — it repels water initially, stays dry in the middle, and overflows at the surface. Seeds sown into it germinate unevenly, some in wet spots, some in dry.
The fix: Before filling trays, add warm water to the bag of seed-starting mix and knead it through until it feels like a wrung-out sponge — moist throughout but not dripping. Then fill trays. The moisture is already where it needs to be.
Mistakes During Germination
Mistake 5 — Planting Seeds Too Deep
Each seed packet has a planting depth recommendation. It exists for a reason: seeds planted too deep run out of stored energy before they reach the surface and die in the soil with no sign to tell you what happened. Tiny seeds like lettuce, basil, and snapdragon are particularly vulnerable — they’re surface-sown or barely covered.
The fix: The general rule is to plant seeds at a depth of 2–3 times the seed’s diameter. Tiny seeds (basil, lettuce, celery): surface-sow and barely cover or don’t cover at all. Medium seeds (tomatoes, peppers): ¼ inch. Large seeds (squash, cucumber): ½–1 inch. When in doubt, go shallower.
Mistake 6 — Inconsistent Moisture During Germination
Seeds need consistently moist (not wet) conditions from the moment they’re sown until the seedling is standing.
A single dry period can halt germination that’s already in progress — the seed begins to activate, runs out of moisture, and fails. You’ll find what looks like an ungerminated seed that actually started and stopped.
The fix: Cover trays with a plastic humidity dome immediately after sowing. Check daily. Mist with a spray bottle if the surface looks dry. Remove the dome the moment the first seedlings emerge — do not leave it on after germination begins, or damping off will follow.
Mistake 7 — Not Providing Bottom Heat
Tomatoes germinate in 5–7 days with bottom heat at 75–80°F. They germinate in 14–21 days without it — if they germinate at all.
Peppers are even more temperature-dependent: below 70°F, germination rate drops sharply and inconsistency increases dramatically. Many gardeners assume seeds are bad when they’re just cold.
The fix: A seedling heat mat positioned under trays during germination is the single most impactful piece of equipment after grow lights. Even placing trays on top of a refrigerator (warm from the compressor) improves germination significantly compared to a cool floor or shelf. Soil temperature, not air temperature, is what matters.
Mistakes After Germination
Mistake 8 — Not Moving to Light Immediately
This is the mistake that creates leggy seedlings, and the timing is more critical than most gardeners realize. The moment the first loop of stem breaks the soil surface — before it’s standing upright, before the seed coat has fallen — that seedling needs to be under a grow light.
Waiting until it “looks like a plant” means it has already been stretching toward any available light source for days. The etiolation (stretching) that happens in those first 48 hours under insufficient light can’t be fully reversed.
The fix: Move trays to your grow light or brightest window the moment you see the first emerging seedling, even if the rest of the tray hasn’t germinated yet. Check trays daily and move as soon as you see anything. This one habit change produces more compact, stronger seedlings than almost any other adjustment.
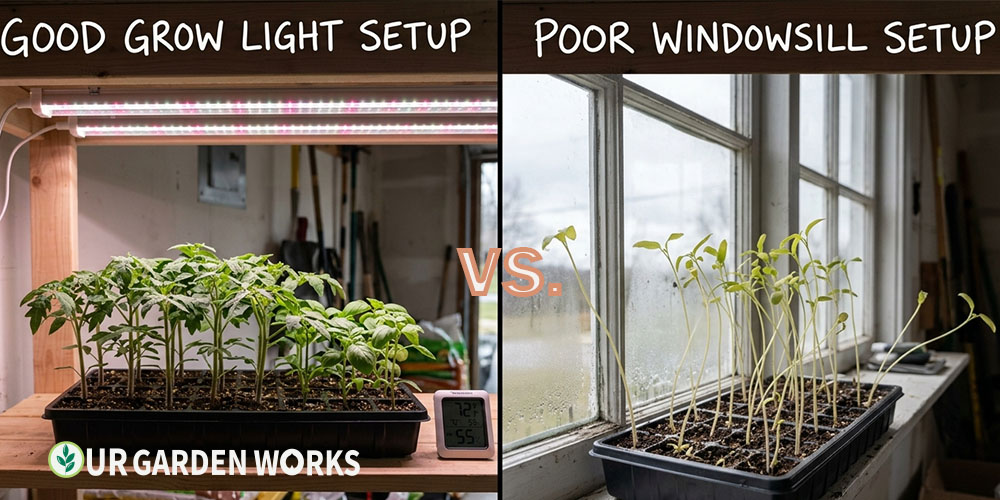
Mistake 9 — Insufficient Light
The most universal seedling problem. A south-facing window gives you 4–6 hours of usable light on a good winter day in most of North America.
Tomatoes, peppers, and most vegetables want 14–16 hours. The result is what every gardener recognizes: pale, tall, thin-stemmed seedlings leaning desperately toward the window. They look alive but they’re already compromised.
The fix: A basic LED grow light positioned 2–4 inches above the tops of seedlings, on a timer for 14–16 hours per day, transforms results. This is not optional equipment for most homes — it’s the difference between seedlings that establish quickly after transplanting and ones that sit sulking for two weeks recovering. See our full guide on setting up a seed starting station for the right light recommendations.
💡 The window test
Hold your hand a foot above a seedling tray in your brightest window at noon on a clear day. If you don’t cast a sharp shadow, there isn’t enough light for seedlings. A grow light casts a sharp shadow at 2 inches. That’s the difference.
Mistake 10 — Overwatering (Damping Off)
Damping off is a fungal disease that strikes seedlings at the soil line — you’ll see healthy-looking seedlings suddenly pinch and topple over as if someone cut them at the base with a tiny knife.
Once it starts in a tray, it spreads rapidly and there’s no recovery for affected seedlings. The cause is almost always overwatering combined with poor airflow.
The pattern: gardener sees soil surface looking dry, waters from above, soil stays wet too long in the closed humid environment of a domed tray, Pythium or Fusarium fungi colonize the stem base, seedling collapses.
The fix:
- Remove the humidity dome immediately after germination
- Switch to bottom watering — set trays in a shallow dish of water for 20–30 minutes, let the mix draw water up, remove and drain
- Let the top ½ inch of soil dry between waterings — it will look alarming but healthy seedlings tolerate this better than constantly wet conditions
- Run a small fan on low near your trays — airflow is the most effective damping off prevention available
- Use sterile seed-starting mix — reusing old mix without sterilizing it introduces pathogens
Mistake 11 — Not Thinning Seedlings
Two seeds per cell is the standard practice — insurance against germination failure. When both germinate (which happens more often than people expect with fresh seed), the temptation is to leave both and see what happens.
What happens: the roots entangle, both plants compete for the same nutrients and water, and you end up with two weak plants instead of one strong one.
The fix: When true leaves appear (the second set — not the seed leaves), snip the weaker seedling at soil level with small scissors. Do not pull it — pulling disturbs the roots of the keeper. Snipping feels brutal the first time. Do it anyway. The one you keep will be dramatically better for it.
Mistake 12 — Forgetting to Feed
Seed-starting mix has little to no nutrients — by design. Seeds carry their own food supply for the first few weeks.
But once true leaves develop (around 2–3 weeks after germination), the seedling has exhausted that supply and is entirely dependent on what’s in the growing medium. Which, in seed-starting mix, is almost nothing. The seedling starts to look pale and grows slowly — gardeners often diagnose this as a light problem when it’s actually hunger.
The fix: Start feeding at quarter strength with a balanced liquid fertilizer (fish emulsion, liquid 10-10-10, or similar) when true leaves appear. Feed at quarter strength for the first two weeks, then move to half strength. Full-strength fertilizer at this stage burns tender roots. Consistent light feeding produces noticeably better seedlings than periodic heavy feeding.
Mistake 13 — Not Potting Up
A seedling that has outgrown its starting cell becomes root-bound — roots circle the pot base, the growing medium dries out within hours of watering, and the plant can’t take up nutrients efficiently.
Root-bound seedlings transplanted outdoors are slow to establish and often never fully recover their potential productivity.
The fix: When a seedling is 3–4 inches tall with two sets of true leaves, move it to a 3–4 inch pot with potting mix (not seed-starting mix — it’s time for nutrients). For tomatoes, bury the stem up to the lowest leaves — roots develop along the buried stem. Do this before the roots are circling, not after.
Mistake 14 — Skipping Hardening Off
A seedling that has spent 6–8 weeks under a grow light in a warm, still, humid indoor environment is completely unprepared for the wind, variable temperatures, direct outdoor sun, and low humidity of the outside world.
Transplanting without hardening off is like stepping out of a gym sauna directly into a February rainstorm. The plant is physically shocked, often wilts severely within hours, and can set back establishment by 2–3 weeks.
The fix: See our complete hardening off guide — but the short version is 7–10 days of gradually increasing outdoor exposure, starting with 1–2 hours of shade and ending with full days and nights outside. Don’t skip this. It’s the bridge between indoor growing and outdoor thriving.
Mistake 15 — Planting Into Cold Soil
The final mistake happens after the seedling has survived everything else — a gardener transplants it into the ground on the “right date” based on the calendar, and then watches it sit there doing nothing for 3 weeks. Not dying, not thriving. Just sitting.
The calendar said it was time. But the soil temperature was 52°F and tomato roots effectively stop functioning below 60°F.
The fix: Buy a soil thermometer. Check at 4 inches deep before transplanting. Tomatoes: 60°F minimum. Peppers: 65°F minimum. Cucumbers: 70°F. A transplant going into warm soil will outpace one planted 2 weeks earlier into cold soil within 10 days. The frost date is a starting reference — soil temperature is the actual trigger. Use our frost dates tool to know your window, then confirm with the thermometer.
Quick Reference: 15 Mistakes at a Glance
| # | Mistake | What Happens | The Fix |
|---|---|---|---|
| 1 | Wrong timing (usually too early) | Root-bound, stressed transplants | Use seed starting calculator for exact dates |
| 2 | Starting direct-sow crops indoors | Transplant shock, poor results | Direct sow beans, carrots, beets |
| 3 | Wrong growing medium | Poor germination, disease | Use sterile seed-starting mix |
| 4 | Dry mix in trays | Uneven moisture, poor germination | Pre-moisten mix before filling |
| 5 | Planting too deep | Seeds never emerge | 2–3× seed diameter, not more |
| 6 | Inconsistent moisture during germination | Partial or failed germination | Dome + daily misting check |
| 7 | No bottom heat | Slow, uneven germination | Heat mat at 75–80°F |
| 8 | Delayed move to light | Leggy seedlings from day one | Move to light at first emergence |
| 9 | Insufficient light | Pale, leggy, weak stems | LED grow light 2–4″ above, 14–16hr |
| 10 | Overwatering → damping off | Seedlings topple at soil line | Bottom water + airflow + dry surface |
| 11 | Not thinning | Two weak plants instead of one strong | Snip weaker seedling at true leaf stage |
| 12 | Forgetting to feed | Pale, slow growth after week 3 | ¼-strength liquid feed at true leaves |
| 13 | Not potting up | Root-bound, slow transplant establishment | Pot up at 3–4″ to 3–4″ pot |
| 14 | Skipping hardening off | Transplant shock, 2–3 week setback | 7–10 day gradual outdoor exposure |
| 15 | Cold soil at transplanting | Plant sits, doesn’t grow | Soil thermometer — wait for target temp |
Frequently Asked Questions
My seedlings keep dying at the base — what is that?
Damping off — a fungal disease caused by overwatering and poor airflow. Remove the dome, run a fan, switch to bottom watering, and let the surface dry between waterings. There’s no saving affected seedlings, but you can stop the spread. See Mistake 10 above for the full prevention protocol.
Can I save leggy seedlings?
Sometimes. For tomatoes specifically, pot them up and bury the leggy stem — roots will develop along the buried section and the plant can recover. For other crops, severely leggy seedlings rarely produce as well as ones grown with adequate light from the start. Your best move is to address the light situation and start a second sowing if you have time in your season.
How do I know if my seedlings are root-bound?
Three signs: the soil dries out within 24 hours of watering, you can see roots emerging from the drainage holes, or when you pop the plant out of the pot the root ball holds its shape completely and roots are circling the outside. Any of these means it’s time to pot up immediately.
Is it too late to start seeds if I've already missed my ideal date?
For most crops, starting 1–2 weeks late is completely recoverable. For tomatoes and peppers, 3+ weeks late usually means buying transplants from a garden center is the better choice — you won’t have time to build a full-sized plant before outdoor conditions require it. For cool-season crops (broccoli, lettuce, kale), the late-summer planting window for fall harvest is an entirely separate opportunity.
Related Articles in Our Seed Starting Guide
- How to Start Seeds Indoors: Complete Step-by-Step Guide (2026)
- Seed Starting Mix vs. Potting Mix — What’s the Difference and When to Use Each
- When to Start Seeds Indoors — Region-by-Region Schedule (2026)
- How to Harden Off Seedlings Without Shocking Them (7-Day Schedule)
- Free Frost Dates by ZIP code tool
- Vegetable Gardening Guide
Final Thoughts
We hope this list saves you from at least a few of the seedling failures that show up on this list every season.
Most of these mistakes share a root cause: the conditions indoors are nothing like what seedlings need to prepare for outdoor life.
The more you bridge that gap — with real light, controlled moisture, gradual outdoor exposure — the better your transplants will be.
For the complete seed-starting setup guide from lights to trays to timing, our how to start seeds indoors guide walks through every step.
Share this post with a fellow gardener who’s ready to get growing — and let us know in the comments which of these 15 you’ve made — and which one you found hardest to fix. Happy growing!
