

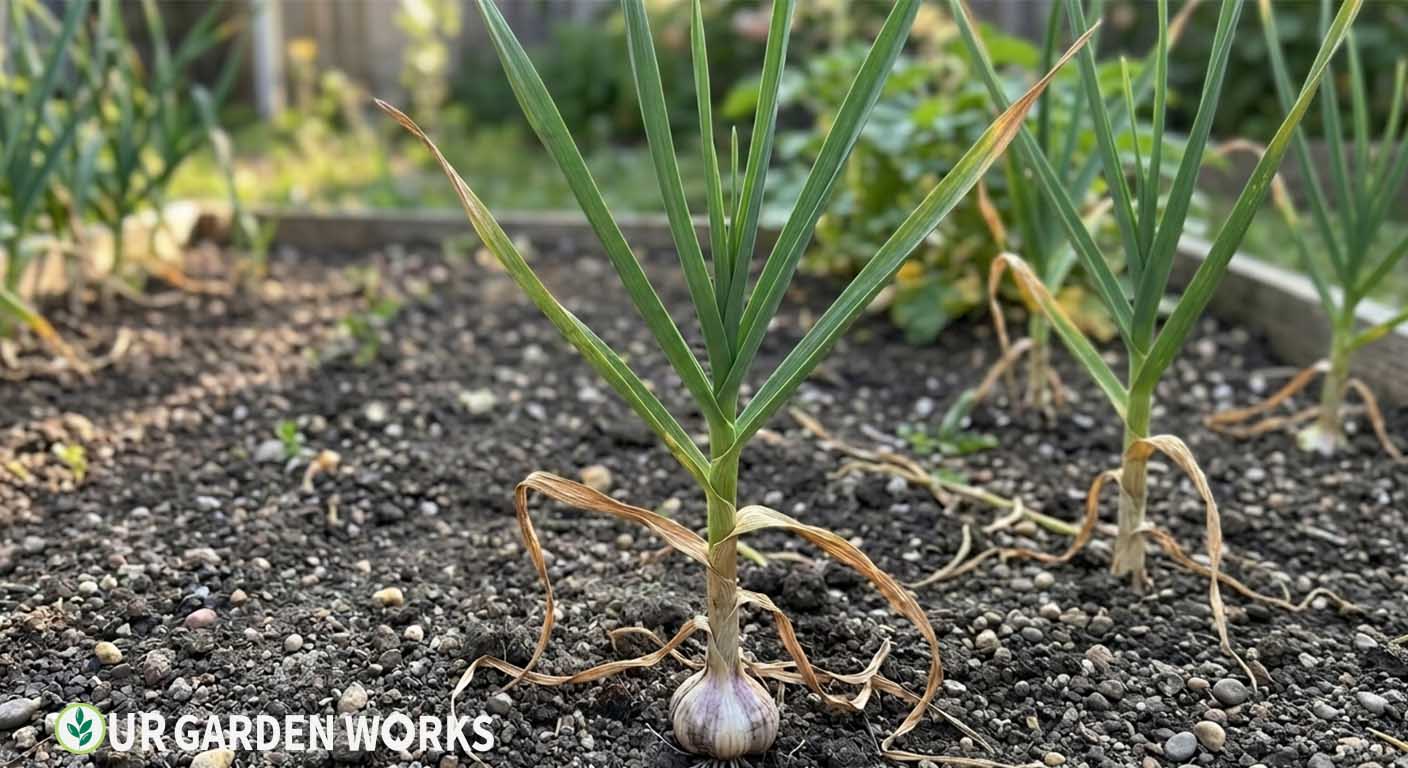
Garlic harvest timing is one of those things where the margin between right and wrong is surprisingly small.
Harvest too early and the cloves are underdeveloped — smaller, harder to peel, and shorter-lived. Harvest too late and the wrapper breaks down underground, the bulb separates, and it won’t store at all. The sweet spot is specific and worth understanding correctly.
The good news: garlic gives you clear, readable signals when it’s ready. You don’t need a soil thermometer or a refractometer. You just need to count leaves.
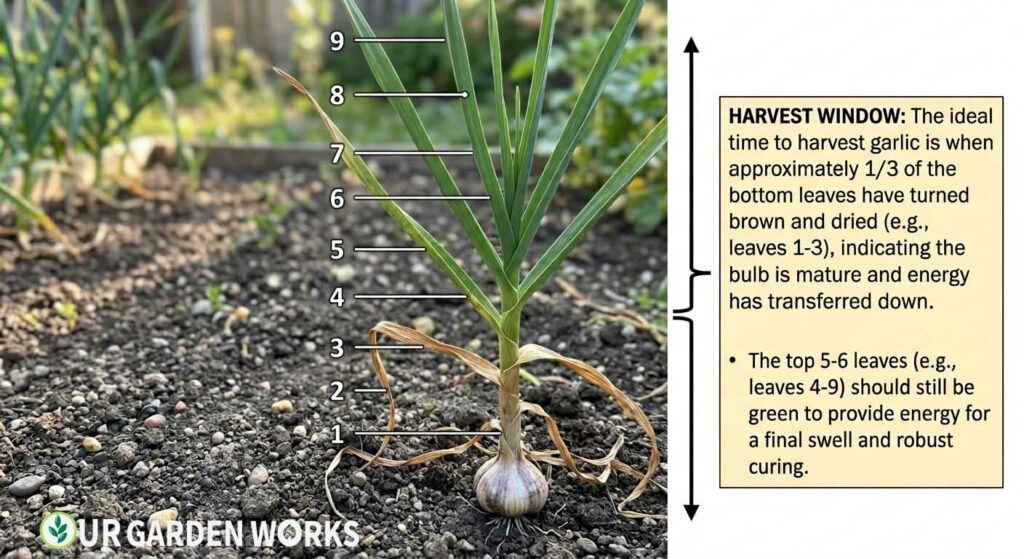
When to Harvest Garlic – Quick Answer: Harvest garlic when the plant has 5–6 green leaves remaining and the bottom 3–4 leaves have browned and died back. Each green leaf corresponds to one wrapper layer on the bulb. Don’t wait for all leaves to brown — you need some green leaves left for the wrapper to hold the bulb together in storage.
Why the Leaf-Counting Method Actually Works
This isn’t a folk rule of thumb — it reflects exactly how a garlic bulb is constructed. Each leaf a garlic plant produces above ground has a corresponding sheath at its base that wraps around the bulb below, and as the plant matures and that leaf dies back, its sheath dries into one of the papery wrapper layers you see when you buy garlic at the store.
A bulb with 8 intact wrapper layers stores far longer and resists bruising and disease entry far better than one with only 2 or 3, because each layer is a physical barrier against moisture loss and pathogen entry.
This is also why harvest timing is genuinely a balancing act rather than a simple “wait as long as possible” rule.
Every additional week you leave the plant in the ground after it’s truly finished maturing costs you another wrapper layer, as the lower leaves continue their natural die-back.
Harvest too early, while too many leaves are still green, and the bulb hasn’t finished sizing up or developing distinct cloves. Harvest too late, after all leaves have browned, and you’ve lost so many wrapper layers that the bulb has nothing holding it together — it splits apart in the ground or falls apart in your hands.
The 5–6 green leaf target exists precisely because it sits at the point where bulb development is essentially complete but enough wrapper material remains intact to protect it through curing and months of storage.
The Leaf-Counting Method — Most Reliable Harvest Indicator
Each leaf the garlic plant produces corresponds to one layer of the papery wrapper (skin) around the bulb. As the plant matures, the lower leaves die back from the bottom up. Each dead leaf = one lost wrapper layer.
You want to harvest when:
- Bottom 3–4 leaves have browned and died — these wrapper layers are already gone
- At least 5–6 leaves remain green — these are the intact wrapper layers that will hold your bulb together in storage
- The plant has stopped sending up new growth — it’s focused on bulb development, not new leaves
Additional Signs That Confirm Readiness
- The scapes (the curling green shoots that emerge from hardneck varieties) have been cut and 3–4 weeks have passed
- The soil around the bulb has started to crack slightly as the bulb pushes outward
- The leaves have begun to look slightly dusty or matte rather than glossy green
💡 Do a test dig
Two weeks before you think harvest is ready, carefully dig up one bulb and check it. The cloves should fill the wrapper tightly, the skin should be papery, and the bulb should be the expected size for your variety. If cloves are still loose inside, give it another week.
How to Harvest Garlic Without Damaging Bulbs
Directions
- Stop watering 2 weeks before expected harvest. Dry conditions at harvest make curing faster and reduce rot risk.
- Use a garden fork, not a shovel. Insert it 4–6 inches away from the plant base, angle it under the bulb, and lever up gently. The goal is to lift the whole root system intact.
- Grab the stem near the base and lift the bulb free from the soil.
- Brush off excess loose soil with your hand. Do not wash the bulbs — moisture causes rot during curing.
- Do not cut or break the stems yet. The nutrients in the stem continue moving into the bulb during curing.
Curing Garlic for Long Storage
This step is what separates garlic that lasts 8 months from garlic that rots in 3 weeks. Curing dries the outer wrapper and toughens the neck, creating a sealed environment that slows moisture loss and prevents pathogen entry.
It’s worth thinking of curing as a continuation of the same wrapper-development process that’s been happening since the leaves first started maturing — you’re simply giving the bulb the controlled time and airflow it needs to finish that process outside the soil, away from the moisture and pathogens still present underground.
Curing Process
- Tie garlic in bundles of 8–10 stems, or lay single-layer on a screen or rack.
- Hang or place in a well-ventilated location out of direct sunlight. A barn, garage, shaded porch, or greenhouse with good airflow all work.
- Cure for 3–6 weeks. The neck should feel completely dry and papery. The outer wrapper should crinkle when pressed.
- After curing, cut the stems 1 inch above the bulb (or braid softneck varieties for hanging storage). Trim roots to ½ inch.
- Store in a cool (55–65°F), dry, well-ventilated location. A mesh bag, open crate, or paper bag works — never plastic, which traps moisture.
For the complete guide to planting garlic in the first place, see our how to plant garlic in the fall guide. And for growing your own from scratch, our how to grow garlic guide covers every stage.
Hardneck vs. Softneck — Does Timing Differ?
The leaf-counting method applies to both major garlic types, but a few practical differences are worth knowing.
Hardneck varieties send up a scape — a curling flower stalk — partway through the growing season, and cutting that scape (usually recommended for better bulb size) is a separate event from the harvest itself, typically happening 3–4 weeks before the bulbs are ready.
Removing the scape redirects energy the plant would otherwise spend on flower and seed production back into bulb development, and scapes themselves are a genuine seasonal treat, with a mild garlicky flavor good in pesto or stir-fries.
Softneck varieties, the type most commonly braided for storage, don’t produce a true flowering scape under normal growing conditions, which simplifies their harvest signals somewhat — you’re relying purely on the leaf die-back pattern without the scape-cutting step to factor in.
Softneck types also tend to have a flexible enough neck after curing that braiding is practical, which is part of why they’re the more common choice for the decorative kitchen braids you see at farmers markets, while hardneck necks stay too stiff to braid.
If you’re growing both types in the same garden, it’s worth tracking their leaf progress separately, since hardneck and softneck varieties don’t always reach the 5–6 green leaf mark on exactly the same calendar schedule.
What a Test Dig Actually Tells You
The test dig recommended above does more than just confirm size — it reveals the internal structure of the bulb, which the leaf count alone can’t tell you. Pull one plant about two weeks before your estimated harvest date and slice the bulb in half.
You’re looking for individual cloves that are clearly defined and separated by visible wrapper material, rather than a solid, undifferentiated mass. An underdeveloped bulb looks more like a single fused lump with faint clove outlines; a properly mature one shows distinct, plump cloves you could easily separate by hand.
If you’re not sure when that two-week-before window actually falls based on your planting date, our harvest countdown calendar tracks expected maturity for garlic alongside everything else in your garden, giving you a rough date to schedule the test dig around rather than guessing.
If the test bulb looks underdeveloped, this is useful information beyond just “wait longer” — it can also signal that the growing season simply wasn’t long enough, the variety was poorly matched to your climate, or the plant didn’t get adequate nutrition early in the season when bulb-initiation signals are set.
Garlic forms its eventual clove count and structure quite early in the growing cycle, well before you’d notice from the leaves alone, so a disappointing test dig sometimes traces back to a decision made months earlier rather than anything happening right now.
Frequently Asked Questions
How long does garlic last after harvest?
Properly cured hardneck garlic stores 6–9 months. Softneck garlic (the braiding type) stores 9–12 months. Uncured or poorly cured garlic may rot within 4–6 weeks. The curing step is the most important factor in storage life.
Can I harvest garlic before it's fully ready?
Yes — immature garlic (harvested early) can be used immediately as “green garlic,” with a milder, leek-like flavor. It won’t store well, but it’s delicious fresh. Use it within a week.
My garlic bulbs separated before I harvested — what happened?
You waited too long. When all the wrapper layers have broken down, the cloves split and the bulb falls apart. The garlic is still edible — use it immediately since it won’t store. Next year, harvest 1–2 weeks earlier.
Should I cut the scapes off my hardneck garlic, and does it affect harvest timing?
Cutting scapes when they curl (usually one full curl) redirects energy back into the bulb and is widely recommended for larger harvests, but it doesn’t meaningfully shift your eventual harvest date — keep watching the leaves as your primary signal regardless of whether you cut scapes.
Can weather right before harvest affect storage life even if my timing is correct?
Yes — harvesting right after heavy rain means pulling bulbs out of wet soil, which slows curing and raises rot risk regardless of how well-timed the leaf count was. Where possible, time the actual harvest day for a dry stretch, even if that means harvesting a few days earlier or later than the absolute ideal leaf-count moment.
Related Articles in Our Vegetable Gardening Guide
- How to Grow Garlic: Complete Guide from Planting to Curing (2026)
- How To Plant Garlic In The Fall & Get A Good Harvest
- How Deep to Plant Garlic — Planting Depth, Spacing & Timing Guide
- What to Plant with Garlic – Best and Worst Companion Plants
- When to Harvest Onions — Signs They’re Ready and How to Cure Them
- Vegetable Gardening Guide
Free Tools to Time Your Harvest
Final Thoughts
We hope this guide means you pull perfectly formed, fully wrapped garlic bulbs every harvest — because the leaf-counting method genuinely removes all the guesswork. For all our vegetable growing guides, our vegetable gardening guide has everything in one place.
Share this post with a fellow gardener who’s ready to get growing — and let us know in the comments which variety you grew and how long yours stored. Happy growing!
