

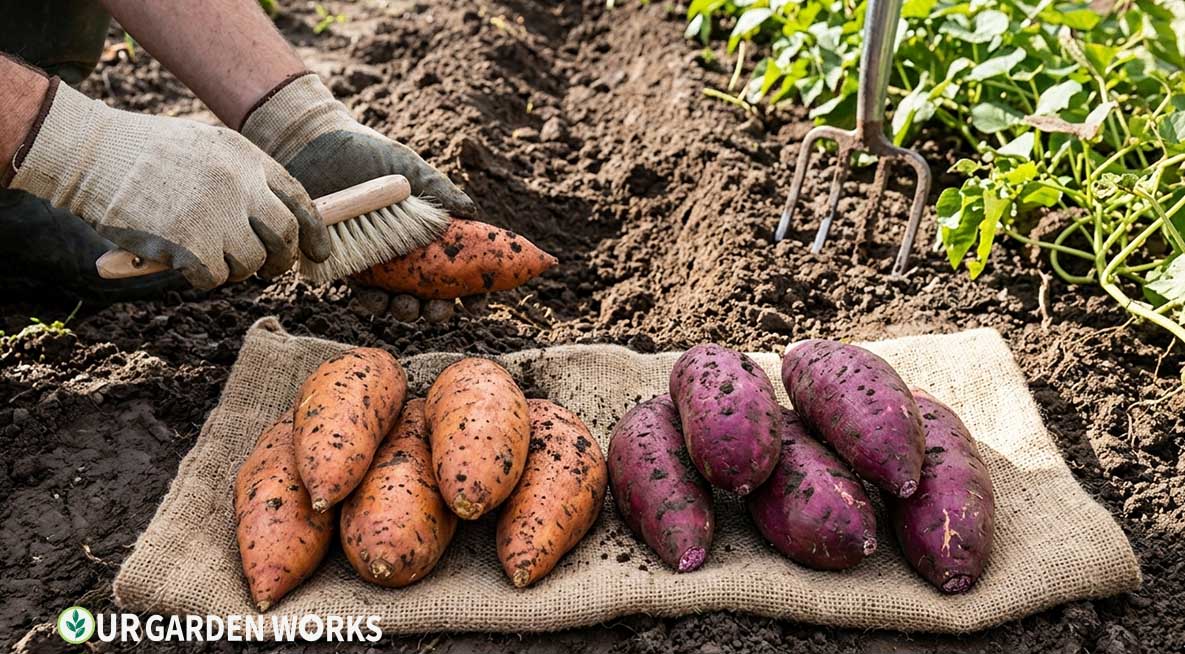
Sweet potatoes are one of the most hands-off, heat-loving crops in the vegetable garden. Once established, they practically grow themselves — spreading their trailing vines across the bed, shading out weeds, and quietly building bulky, nutritious roots underground.
The main work is at the beginning (growing slips) and the end (harvesting and curing). In between, you mostly watch them grow.
The curing process is where most home growers leave yield and flavor on the table. Freshly harvested sweet potatoes taste surprisingly bland.
After 1–2 weeks of proper curing, the starches convert to sugars and they become the rich, sweet, deeply flavored roots you expect. Don’t skip it — it’s the single step that separates an average harvest from a genuinely excellent one.
How to Grow Sweet Potatoes – Quick Guide: Plant sweet potato slips (rooted cuttings, not seeds or tubers) after all frost risk has passed and soil is above 60°F. They need 90–170 days of warm growing season. Harvest when leaves yellow or just before first frost. Cure at 80–85°F and 80–90% humidity for 10–14 days before storing.
Sweet Potato Growing Requirements
🍠 What Sweet Potatoes Need
- Sunlight: Full sun — 8+ hours daily for best root development. Shaded vines stay green and lush but produce smaller, fewer tubers.
- Soil pH: 5.8–6.2, slightly acidic. Outside this range, nutrient uptake suffers and skin quality can decline.
- Soil texture: Loose, sandy-loam, well-draining. Heavy clay restricts root expansion and produces oddly shaped, forked tubers.
- Heat: Genuinely heat-loving — soil temperature above 65°F speeds establishment dramatically, and cool nights below 50°F can stall growth even in summer.
This is a crop where bed preparation matters more than ongoing maintenance. Get the soil loose, warm, and well-drained at planting, and the vines largely take care of themselves through the rest of the season.
Choosing Your Variety
| Variety | Flesh | Days | Notes |
|---|---|---|---|
| Beauregard | Orange | 90–100 | Most widely grown; reliable yield; classic flavor |
| Georgia Jet | Orange | 90 | Excellent short-season variety; best for Zones 5–6 |
| Covington | Orange | 100–110 | Commercial standard; excellent storage; very productive |
| Stokes Purple | Purple | 120–140 | Stunning color; moist, dense texture; needs long warm season |
| O’Henry | White/cream | 100 | Mild, dry flavor; excellent for Zone 8+ baking |
How to Grow Sweet Potatoes: Step by Step
Step 1 — Grow Your Own Slips (4–6 Weeks Before Planting)
Sweet potatoes are not grown from seed or directly from tubers — they’re grown from “slips,” which are rooted cuttings grown from a sprouting sweet potato.
You can buy slips from garden suppliers, but growing your own is easy, cheaper, and gives you more control.
How to Grow Slips
- Choose a healthy, unblemished sweet potato (organic grocery store types work fine for slip production — the sprouting inhibitor concern applies mainly to regular potatoes).
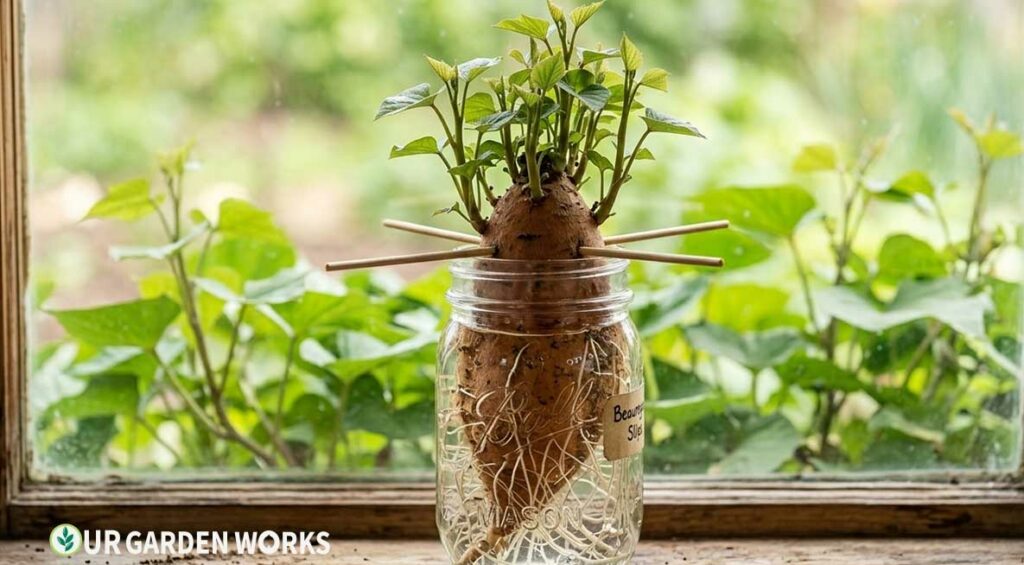
- Suspend the potato halfway in a jar of water using toothpicks. The bottom half should be submerged, the top half in air.
- Place in a warm (75–80°F), bright spot. Change the water every few days.
- In 2–4 weeks, shoots (slips) will grow from the top and roots will emerge from the bottom.
- When slips are 4–6 inches long, twist them off the mother tuber and root them in a glass of water until you see 1–2 inches of roots — about 1 week. Then they’re ready to plant.
Step 2 — Prepare a Warm, Well-Drained Bed
Sweet potatoes need warm, loose, well-draining soil. Heavy clay produces misshapen tubers. Build raised ridges (mounds) 8–10 inches tall and 12 inches wide — this improves drainage and warms faster in spring.
Mix in compost but go easy on nitrogen — high nitrogen produces beautiful vines and small, branching roots. This is a crop where less fertilizer is more.
Step 3 — Plant After Soil Hits 60°F
Directions
- Plant slips 12 inches apart in rows 3–4 feet apart (they need room for vining).
- Plant deep enough that only the top 2–3 leaves are above soil. Buried nodes produce additional roots.
- Water immediately and keep soil moist for the first 2 weeks while the slip establishes — this is the critical window. Once established, sweet potatoes are remarkably drought-tolerant.
- Cover the bed with black plastic mulch — it retains heat, accelerates vine establishment, and suppresses weeds. This alone can increase yield by 20–30% in Zone 5–6.
Step 4 — Minimal Care Through Summer
Once established (usually 2–3 weeks after planting), sweet potatoes need very little. Water once per week in dry spells. Don’t fertilize after planting — late nitrogen pushes vines at the expense of tubers. Resist the urge to lift vines and look at the roots — it damages them. Trust the process.
Step 5 — Harvest Before Frost, Cure Properly
Harvest when vines begin to yellow naturally, or about 2 weeks before your first expected frost — whichever comes first. Frost damage to the vines initiates a chemical process in the tubers that shortens storage life dramatically. Don’t wait.
Harvest Directions
- Cut vines back to 6 inches with pruners.
- Loosen soil with a fork 12 inches from the plant base — sweet potato roots extend surprisingly far.
- Gently lift and find all tubers by hand. They break easily — handle carefully.
- Cure immediately: place in a warm (80–85°F), humid (80–90% RH), well-ventilated space for 10–14 days. A warm room with a humidifier works. The curing heals cuts, develops the papery skin, and converts starches to sugars.
- After curing, store at 55–60°F (not refrigerated — cold destroys texture) in a dark location. Properly cured and stored sweet potatoes last 6–12 months.
Common Pests and Problems
Sweet potato weevils: The most serious pest in warm climates — larvae tunnel into tubers, making them bitter and unmarketable.
Crop rotation (never planting sweet potatoes in the same bed two years running) and destroying volunteer plants between seasons are the most effective controls, since there’s no easy in-season treatment once weevils establish.
Voles and other rodents: Can tunnel in and damage tubers underground, especially in mulched or no-dig beds. Hardware cloth buried around bed perimeters helps in problem areas, particularly for gardeners who’ve had recurring vole pressure in other parts of the yard.
Black rot and scurf: Soil-borne diseases that cause dark, sunken lesions on tubers, mostly cosmetic but reducing storage life. Source certified disease-free slips and rotate beds to minimize buildup, and avoid saving slips from a previous year’s harvest if any disease symptoms were present.
Frequently Asked Questions
Can I grow sweet potatoes in the North?
Yes, with the right variety and black plastic mulch. Georgia Jet (90 days) was specifically bred for short-season northern growing. In Zone 5–6, start slips indoors 4–6 weeks before your last frost date, use black plastic mulch for soil warming, and you can reliably harvest a meaningful crop even in a 90-day growing window.
Do sweet potatoes need a lot of space?
The vines need significant space — each plant sends runners 5–6 feet in every direction. Plan for at least 9 square feet per plant. Alternatively, train vines up a trellis (they don’t naturally climb but can be tied) or grow the more compact Vardaman variety in smaller beds.
Are sweet potato leaves edible?
Yes — sweet potato leaves are nutritious and delicious, popular in Asian and African cuisines. The young tender tips are the best part, harvested by snipping the last 4–6 inches of vines. Light harvesting of vine tips doesn’t meaningfully impact tuber production.
Why are my sweet potatoes long and skinny instead of plump?
This usually points to compacted or heavy soil restricting root expansion, or too much nitrogen pushing vine growth over tuber development. Loosening soil to at least 12 inches at planting and avoiding nitrogen-heavy fertilizer after the first few weeks both help correct this in future seasons.
How many slips do I need for a typical home garden harvest?
A single healthy slip, given adequate space and a full warm season, can produce 3–8 pounds of tubers. For a meaningful harvest to last through winter storage, most home gardeners plant 10–20 slips, which fits comfortably in a standard 4×8 raised bed with proper spacing.
Related Articles in Our Vegetable Gardening Guide:
Final Thoughts
We hope this guide has made sweet potato growing feel achievable — even in shorter-season climates. The curing step alone transforms a decent harvest into an exceptional one. For all our vegetable growing guides, our vegetable gardening guide links to everything.
Share this post with a fellow gardener who’s ready to grow their own — and let us know in the comments which variety you’re growing and whether you’re in a short or long-season climate. Happy growing!
