

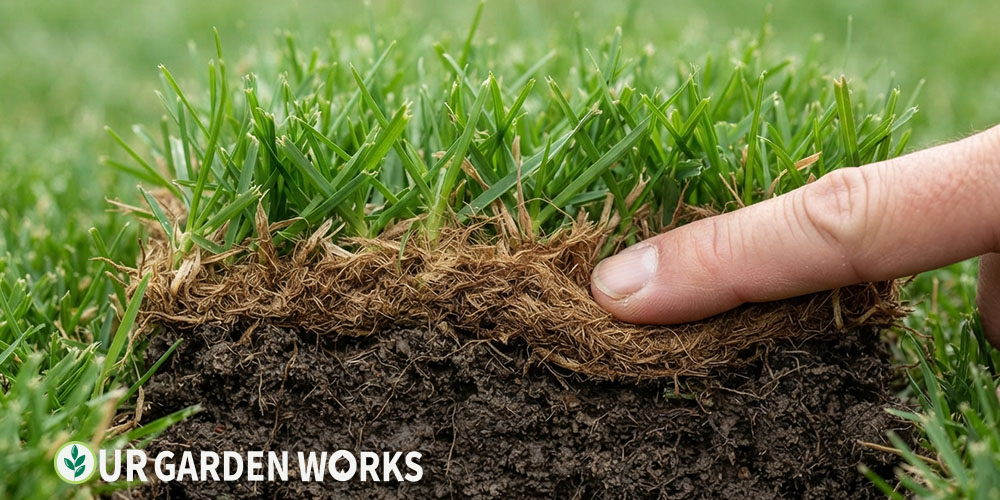
A lawn that feels spongy or bouncy underfoot — like walking on a slightly soft mattress rather than firm ground — points to one of two very different underlying causes, and the right response depends entirely on telling them apart. One calls for a mechanical fix; the other calls for pest treatment.
We’ll walk through a simple test that resolves this diagnosis quickly, since the two causes feel similar underfoot but look completely different once you actually dig into the turf.
Editor’s Note: A spongy lawn is most often excess thatch (a layer of dead organic matter built up between the grass and soil, visible as a brown, fibrous mat when you cut a small section) or grub damage (roots eaten away beneath the surface, with the spongy feeling coming from grass that’s lost its anchor to the soil). Cut a small square of turf and lift it to check which one you’re dealing with.
The Cut Test — Resolving This in Under a Minute
Using a garden knife or small spade, cut a square section of turf about 4 inches on each side and lift it up to examine the cross-section.
This single test resolves the diagnosis almost immediately, since thatch and grub damage look completely different once you can actually see what’s happening beneath the grass blades.
What You’ll See
- Thatch: A distinct brown, fibrous, somewhat matted layer between the green grass blades above and the soil below. If this layer is thicker than about ½ inch, that’s your spongy feeling.
- Grub damage: The grass section lifts away from the soil with very little resistance, since roots have been eaten away. You may see cream-colored, C-shaped larvae directly in the soil beneath where the turf was.
Cause 1 — Excess Thatch
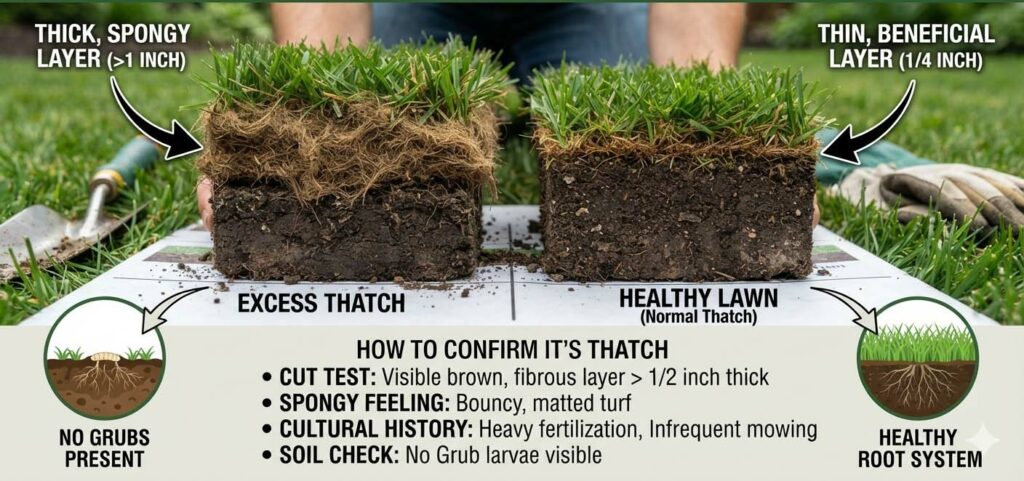
Thatch is a natural layer of dead grass stems, roots, and other organic debris that accumulates between living grass blades and the soil surface.
A thin layer is normal and even somewhat beneficial, but excessive thatch — generally more than about half an inch — creates that bouncy, spongy feeling and can also block water and nutrients from reaching the soil and roots properly.
How to confirm it’s thatch:
- The cut test reveals a visible brown, fibrous layer between grass and soil
- Layer measures more than about ½ inch thick
- Lawn has a history of heavy fertilization, infrequent mowing, or mowing with a bagging attachment removed (clippings left to build up)
- No grub larvae visible in the soil beneath
Fix: Dethatching, either with a specialized dethatching rake for smaller areas or a power dethatcher/vertical mower for larger lawns, physically removes the excess buildup. Core aeration also helps break up thatch over time and improves the soil’s ability to absorb water and nutrients despite the layer. See our spring aeration guide for timing and technique.
💡 Thatch buildup often traces back to fertilizing and mowing habits
Excessive nitrogen fertilization pushes grass to grow faster than it can naturally decompose old plant material, while infrequent mowing that removes large clippings all at once (rather than fine clippings spread evenly) both contribute heavily to thatch accumulation.
Adjusting these two habits going forward helps prevent thatch from rebuilding as quickly after you’ve removed the existing layer.
Cause 2 — Grub Damage
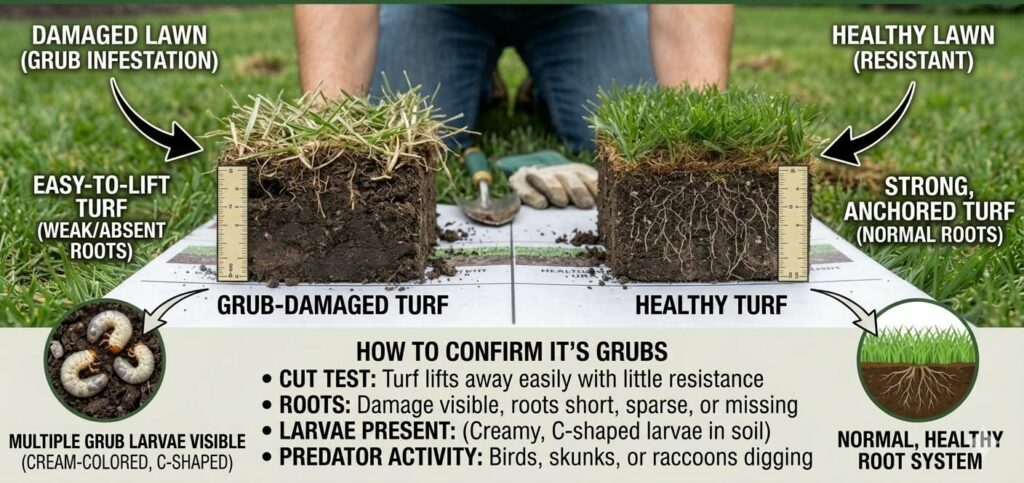
Grubs feed on grass roots from below the surface, and as roots are progressively eaten away, the grass above loses its normal anchor to the soil, creating a similar spongy, slightly lifted feeling underfoot — though for a completely different reason than thatch.
Left untreated, grub damage typically progresses to visible dead, brown patches as the root damage becomes severe enough to actually kill the grass.
How to confirm it’s grubs:
- The cut test shows turf lifting away with minimal resistance, roots clearly damaged or absent
- Cream-colored, C-shaped larvae visible in the soil directly beneath the lifted turf
- Increased bird, skunk, or raccoon activity digging in the lawn (common grub predators)
- Most active and most damaging in late summer and early fall
Fix: A grub count test across several sample areas confirms whether populations exceed the treatment threshold, generally around 8-10 grubs per square foot. Beneficial nematodes or a targeted grub insecticide, applied at the right life stage, provides effective control. See our brown patches guide for more detail on grub identification and treatment timing.
Can You Have Both Problems at Once?
Yes, and this is worth checking for specifically, since thatch buildup can actually make grub damage harder to detect through casual observation while also creating a more favorable environment for some grub species to thrive closer to the soil surface.
If your cut test reveals both a noticeable thatch layer and root damage or larvae beneath it, you’re dealing with both issues simultaneously and should address each one — dethatching for the thatch layer and appropriate insecticide or nematode treatment for the grub population.
Treating only one of the two problems when both are present means the spongy feeling will likely persist or partially return, since you’ve only addressed half of what’s actually contributing to it.
Telling the Two Causes Apart at a Glance
| Indicator | Thatch | Grub Damage |
|---|---|---|
| Cut test reveals | Brown fibrous layer above soil | Roots eaten, larvae in soil |
| Turf lifts easily? | No | Yes |
| Visible larvae? | No | Yes |
| Animal digging activity? | Not typically | Often, yes |
| Fix | Dethatch + aerate | Insecticide/nematodes |
Why Some Grass Types Build Up Thatch Faster Than Others
Grass type plays a meaningful role in how quickly thatch accumulates, which is worth knowing if you’re trying to understand why your lawn seems more prone to this issue than a neighbor’s.
Aggressive, spreading grass types like Bermuda, zoysia, and Kentucky bluegrass naturally produce more stems and rhizomes that contribute to thatch buildup than more clump-forming types like tall fescue, which tends to accumulate thatch more slowly under similar care conditions.
This doesn’t mean fast-thatching grass types are a poor choice — many of them offer other advantages like better heat or traffic tolerance — but it does mean lawns with these varieties benefit from more proactive, regular dethatching as a routine part of maintenance rather than waiting for an obvious spongy feeling to develop before taking action.
If you know your lawn is one of these naturally thatch-prone types, building an annual dethatching session into your regular calendar, similar to how you’d schedule aeration, prevents the problem from reaching the more dramatic, harder-to-manage levels that prompted this diagnosis in the first place.
Best Timing for Treating Each Cause
Timing matters for both dethatching and grub treatment, and getting it right significantly improves how effective your intervention actually is.
Dethatching is best done when grass is actively growing and able to recover quickly from the disruption — early fall for cool-season grasses and late spring to early summer for warm-season varieties, avoiding the most stressful heat or cold periods when the lawn has less recovery capacity.
Grub treatment timing is even more specific, since insecticides and beneficial nematodes work best against young, actively feeding larvae rather than the more resistant later life stages.
Mid-to-late summer, when grub eggs have hatched into small larvae but haven’t yet grown into their most damaging late-stage size, is generally the optimal treatment window in most regions, though checking with a local extension service for your specific climate’s grub life cycle timing provides the most accurate guidance.
Preventing Both Problems Going Forward
Once you’ve addressed whichever cause is currently affecting your lawn, a few ongoing habits reduce the chance of either problem recurring.
For thatch prevention, mow regularly enough that you’re never removing more than about a third of the grass blade height at once, and consider mulching clippings back into the lawn in fine pieces rather than bagging or leaving large clumps that decompose unevenly.
For grub prevention, an annual or biannual grub count check during the late summer monitoring window catches a developing population before it reaches damaging levels, allowing for earlier, less drastic intervention than waiting for visible turf damage to appear.
Maintaining overall lawn health through proper watering and fertilizing also helps grass tolerate incidental grub feeding better than a stressed, weakened lawn facing the same pest pressure.
Frequently Asked Questions
How often should I dethatch my lawn to prevent this problem from recurring?
Most lawns benefit from dethatching once a year, though lawns with a history of heavy thatch buildup or that receive frequent nitrogen-heavy fertilization may need it more often, sometimes twice yearly.
Checking thatch depth periodically with a simple cut test, rather than dethatching on a fixed schedule regardless of actual need, helps you calibrate the right frequency for your specific lawn.
Will aerating alone fix a thatch problem, or do I need to dethatch separately?
Aeration helps manage thatch over time by improving decomposition conditions and water penetration, but for a thatch layer that’s already significantly built up (more than about ¾ inch), direct mechanical dethatching removes the existing buildup more immediately and effectively than aeration alone.
Many lawn care routines combine both — dethatch to remove the existing layer, then aerate to support healthier ongoing decomposition and prevent rapid rebuilding.
Can grub damage make my lawn feel spongy even before any brown patches appear?
Yes, the spongy feeling from root damage often develops before visible brown patches show up, since the grass blades above can remain green for a while even as the root system beneath weakens.
This is exactly why the cut test is so valuable as an early detection tool — catching grub damage at the spongy stage, before visible dead patches develop, allows for earlier and generally more effective treatment.
Related Articles in Our Lawn Care Guide
Final Thoughts
We hope this guide has made it quick and easy to tell these two very different problems apart — that simple cut test really does resolve the diagnosis in under a minute.
For more lawn care guidance, our soil and fertility guides cover everything from seasonal maintenance to pest management.
Share this post with a fellow homeowner who’s noticed a bouncy lawn — and let us know in the comments which cause matched what you found. Happy growing!
